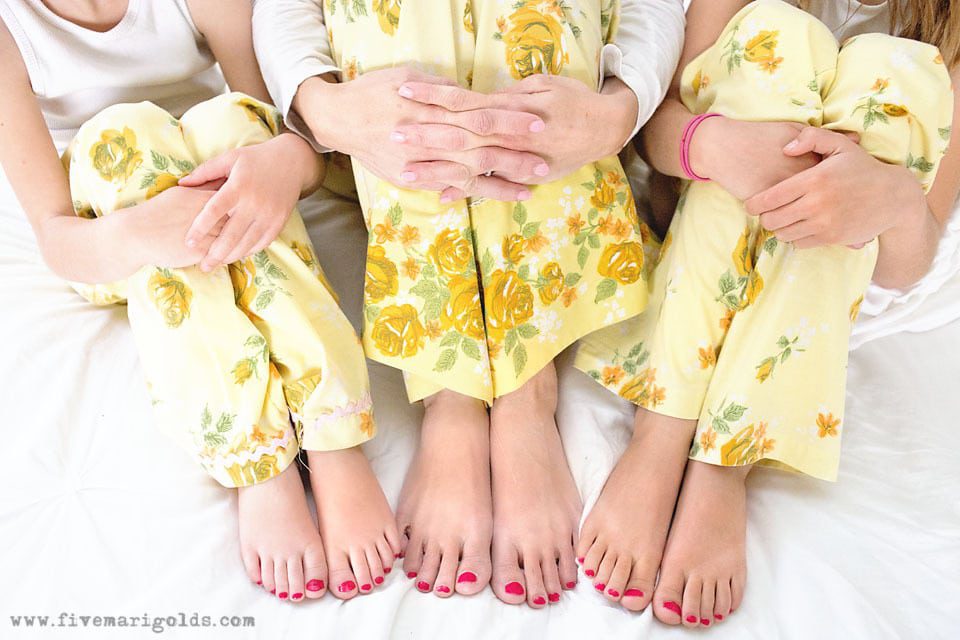
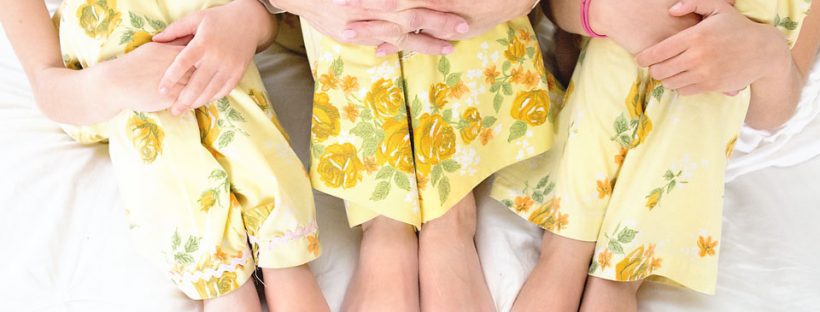
If you’ve followed my blog for any amount of time, you know that I love all things vintage. Lately, I’ve been especially fond of vintage sheets, afghans and quilts. I’m always brimming with ideas for repurposing these treasures, and I even sell my finds in my small Etsy Shop. Last year I shared an article with genius ways to repurpose vintage sheets, and I fell in love with the idea of sewing pajama pants from vintage sheets.
What could be better? The soft feel of summer sheets paired with gorgeous vintage patterns.
update a Winter tee for summer with this No-Sew Tassel Trick
Disclosure: This shop, DIY No-Sew Tassel Tee, has been compensated by Collective Bias, Inc. and its advertiser. All opinions are mine alone. #allfreeclearclean #CollectiveBias
Today I’m sharing a simple hack for transforming a shirt from winter drab to summer fab. This no-sew project is super easy and makes a huge impact – in just minutes!
This shop, No Sew Emergency Kit, has been compensated by Collective Bias, Inc. and its advertiser. All opinions are mine alone. #MoreMomentsWithExcedrin #CollectiveBias
Today I’m going to show you how to make a beautiful no sew emergency kit in just 15 minutes.Continue reading →
Thanksgiving has passed, and it’s now socially acceptable to begin the count down to Christmas. But let’s be honest, you’ve secretly been waiting for at least a month. One of the best ways to celebrate the most festive month of the year is with an Advent calendar. Instead of buying a generic version at the grocery store, craft your own calendar,and put it on display. I’ve pulled together a list of 15 of my favorite DIY Advent Calendars to inspire you.
A few weeks ago I shared my difficulty in letting go of baby clothes. Well, it goes far beyond baby clothes. Today I’m going to share how I recently made an upcycled t-shirt dress using outgrown knit shirts.
The best of apple Recipes, Crafts, Activities & More!
It’s finally time for me to admit that fall is here. The cold snap of the season started this week, and while I’m mourning the short-lived Midwest summer, I am looking forward to the tastes and activities of the season.
Last week I shared my Salted Caramel Dip recipe. This week, we are excited to share with you this collection of amazing Apple themed posts from the talented and creative Social Fabric community.
You’re going to want to Pin or bookmark this post for later, so you don’t miss out on these amazing apple recipes, crafts and activities for fall!
Upcycling Baby Clothes and the Art of (Not) Letting Go
I have a confession: I have an unreasonably hard time parting with my kids’ baby clothes. For reference, my “baby” is 3 years old, and I haven’t thrown anything away that hasn’t been irreparably stained or damaged. I have a problem letting go.
Years ago I hand sewed a Christmas Tree Advent Calendar, which has become such a sweet tradition for our family. Ever since I was a young child, I absolutely loved Advent Calendars – usually the perforated paper variety in our home – to count down the days until Christmas. The anticipation was overwhelming each year.
I wanted to have that same tradition in our family – and I wanted to create something we could use year after year. I stumbled across this sweet calendar by Stitch Craft Creations. I fell madly in love with this idea and got to work, using her calendar as my guide.
Pink Poodle Costume, Inspired by Pottery Barn Kids
My baby girl absolutely loves puppies, so the idea to dress her as a puppy for Halloween this year was a no brainer. However, I quickly realized that there are very few options out there for “girly” puppies, which for Belle is also a prerequisite. I found this adorable costume by Pottery Barn Kids, but I just couldn’t justify the price – especially since I already had most of the outfit at home: a pink tee, tights, tulle tutu pettiskirt and ballet slippers.
Source: Pottery Barn Kids
So with this adorable inspiration in mind, I concepted a DIY version of this pink poodle Halloween costume.
I went to my local JoAnn’s, which happened to be having amazing sales due to a move in location, so I bought 1/4 yard of curly white fur fabric for around $2.
I simply cut large rectangle strips, tall enough to fold over once (for bulk), and wide enough to fit around her wrists and ankles.
I made a simple template for the ears.
Poodle ears template made on the reverse side of curly fur fabric.
I cut them out and also backed them with white craft felt I had on hand, using adhesive spray, for a little structure. I then took a large square of the fabric and tucked all the corners until they met in the middle, forming a little ball. I filled that ball with a few of my fur fabric scraps for a little bulk. I affixed the ears to the sides of a headband we had on hand by tying grosgrain ribbon around it and fastening it into a bow. Using a needle and thread, I tacked the ball closed, and then threaded it to the headband. I then fastened a pink grosgrain hair bow to the front. Now, you could totally do this without sewing. You could just staple the fabric to form the ball, and hot glue it to the top of the headband. The only reason I sewed it was because I knew this headband would get lots of dress up play use, before and after Halloween.
Next, I found a novelty dress up tail at JoAnn’s (for $0.66!). I fashioned a fur ball in the same way as the top of the headband, and tacked it to the end of the tail with a needle and thread. Again, I was tempted just to tie a grosgrain ribbon around this tightly to affix it to the tail, because I can be that lazy, but I stitched it knowing that it would get use after Halloween and would hold up better this way.
Thanks for reading my pink poodle costume tutorial! I hope you like this copycat chic costume.
I think it would be super easy to make this a lamb, or even a kitty costume, just by replacing the poodle headband with some cute cat ears or lamb ears and adjusting the face paint. What do you think of my pink poodle Halloween costume?
I was browsing Anthropologie recently and fell in love with this Striped Heart Tank by Sundry:
So. cute. But the price tag is not so cute. $70 for a cotton tank? No thanks! But it kept popping up in my Facebook feed, willing me to buy it.
That’s when I decided to try to make it myself, but finding a plain white tank was a lot harder than I expected. I ended up just getting a Faded Glory tank from Wal-Mart on a recent grocery trip. It was the first white tank I found without a pocket, and at $3.96, the price was right!
I whipped up an 8″ x8″ template in Photoshop:
I then loaded the pattern into my Silhouette software. My usual method is to use clear contact paper in my Silhouette to make a template because you can get a giant roll for less than $5. Then I use a Tulip soft fabric paint, making sure to insert cardboard into the shirt first to prevent bleeding to the other side. The best part of this application method is that it’s incredibly inexpensive and long lasting.
This time, however, I happened to have some leftover heat transfer vinyl from a project last year. I ran my design through the Silhouette, removed the excess vinyl, and ironed it on.
Next, I added a bit of contrast stitching along the bottom hemline to give it a more expensive, custom look.
I adore this tank and have gotten so many compliments on it. When Eve first saw it, she insisted on a matching tank (I found two great , inexpensive options here and here). I just shrunk the template slightly ( to about 5.25″ x 5.25″) and applied it using the same method. Again, in retrospect I probably would have gone bigger for this one, as well. For this top, I did more stitching to more closely replicate the inspiration top. Instead of using the sewing machine, I hand stitched the hemlines using flossing thread to get that perfectly imperfect look. think it’s even cuter in this mini size!
I hope you’re a fan of my copycat chic Striped Heart Tank. Thanks for stopping by!
*This post contains affiliate links. Please read my affiliate disclaimer in the sidebar.
Looking for a way to upcycle those baby clothes you can’t part with? When Dub lost his first loose tooth, I decided to use his baby clothes to create a tooth pillow – a tradition my parents started with me. The concept is that the tooth pillow makes it easy for the Tooth Fairy to find baby teeth and deposit money (I’ve heard she hates to loose those first baby teeth!).
To make the pillow, I combined a chambray shirt and a little plaid shirt, with snap button pockets, that Dub wore as a baby. He actually helped me dig through his baby clothes to find just the right combo.
Here he is at just 3 months old sporting one of the shirts.
My mom used her fancy sewing machine to embroider some letters and voila! An easy, free tooth pillow that he absolutely loves.
Recycle T-shrts to make an Adorable, comfy Disney princess dress
I’ve had this project stuck in my head for a long time, and when I scheduled a visit to my parents’ house this month I knew it was my opportunity to bring it to life. My mom is a professional quilter and a wonderful seamstress, and I knew I would need her to lead the way.
I’d seen the concept of a t-shirt Disney princess dress on Homemade by Jill, but little EClaire already had a Belle dress up costume and wanted something different. So, enlisting one of her favorite colors, I decided on a Sleeping Beauty dress and found this one by Crafter Hours.
I thought it would surely be a one day project, and it probably was for these sewing pros, but we managed to stretch it out over three days, working probably a total of 10 hours.
First, we started with two women’s tees and large knit nightgown. We used the Simplicity pattern 5695 for the bodice and sleeves. Since we were upcycling clothing, we were able to use the original seam as the casing for the elastic on the sleeves.
We used a 10″ circle to draw and then sew two lines to emulate a bodice piece, and then sewed a straight line down the middle.
We wanted a very full skirt, which is difficult to create using knits, but I like how ours turned out. Our skirt used the full width of the large nightgown, which was approximately 32″ across (double the width of our bodice) and 64″ of full width all the way around. She sewed a long straight stitch across the top and then gently pulled it all around to ruffle it. Then, we attached the ruffled piece to the bodice and sewed it together with a tight straight stitch.
To create a bustle effect, we measured all the way around the bottom of the skirt and marked 9″ high lines every 8″ around. I sewed two long straight stitch lines at every marked line, secured the top and bottom of those lines with pins, and then begin pulling the strings from the top to scrunch the fabric (I like this tutorial for gathering fabric). Then, when we had the fabric scrunched to the right length, we put stabilizing fabric underneath and sewed right over the fabric, in between the two stitched lines. I absolutely love this detail of the dress – it really made the whole thing come together!
My mother created the white accent pieces using this pattern and by sewing square pieces of white knit into triangles. Both accent pieces were tacked on, as she felt the thickness would be too much for the knit dress to handle long-term.
I love that she’ll be able to wear this any time she wants to feel like a princess, and it’s cool and comfortable enough for everyday wear. Best of all – she absolutely loves it!
I’m not sure if I would have the skill to pull this off on my own and have it look as nice as this dress does. Maybe I can enlist my mother to create a Snow White tee, or Rapunzel, Cinderella or Elsa dress down the road? I think I’ll wait for some time to pass before I ask…
As a kid, I absolutely loved Advent Calendars. You know, the little paper calendars with the perforated doors. Sometimes there was a Christmas picture behind the little paper door and sometimes a bible verse. It didn’t matter, I loved the process of opening on each day. I wanted to create an Advent Calendar tradition with my own children, but I wanted to create a keepsake – something they would look forward to getting out each year.
So, I went to the interwebs to find something to inspire me – and the pickings were slim. This was in 2008, a pre-Pinterest era, and there just wasn’t a lot out there I loved. Enter Stitchcraft Creations with her super cute felt calendar. With her pretty version as my guide, I embarked on “adventures in Advent Calendars.”
For Dub’s first Christmas years ago, I decided I wanted to start the tradition of making something homemade for my kids for each Christmas. I ambitiously took on an activity book project to kick off the tradition, knowing I could add pages to it each year.
I drew inspiration from the interwebs and used a few patterns But mostly, I just winged it. Ididn’t want it to look perfect, I wanted it to look inviting and fun!
I did a lot of web surfing for inspiration. I used a few patterns from one of my favorite bloggers, Homemade by Jill.
From there, I narrowed down the pages and activities I wanted tobe in the book and madea list of the supplies I needed. I was patient with this and used 40% off coupons at Michael’sand JoAnn’s for several weeks to avoid paying full price on the more expensive supplies. Pre-planning is the most important step to any project, because having allthesupplies on hand means fewer half-finished projects laying around that were never picked back up after the inspiration left!
As a working mom, I made it my goal to complete at least two pages every weekend. This made the project much more manageable for me to take on. Looking face-on at a full weekend of sewing probably would have killed my motivation to start!
After all of the pages were complete, I paired pages two-by-two and sewed twosheetstogether back-to-back.
I then punched three grommets into each set of pages, like you would if you were going to add them to a binder.
Finally, I used loose leaf rings to secure them together. I chose to do it this way so I couldrepair pages or continue to add pages as I had kids.
Materials used:
White felt pages from the craft store (around 25 cents each)
Additional felt pages in various colors
Scrap fabric and notions, like a zipper and ricrac,
Assorted buttons I had saved over the years
Metal snaps (these are easier for little hands to use vs. the plastic snaps)
Finger puppets from Ikea for the Noah’s Ark page (pictured below). These are no longer available through Ikea but they pop up on ebay all the time!
I’m happy to say that 4 years later, this book still gets used by Dub and now Eve, too. It’s held up and only needed 1 small repair.
In retrospect, I wish I had more carefully documented the sewing process and made patterns for each page. It took me a long time pull this book together and it would have been so much easier if all the patterns had been in one place. I often wonder if I should go back and make the patterns to share for the next person. If you would like to see that in the future, please be sure to tell me in the comments below!