This shop, Throw the Ultimate Game Day Party, has been compensated by Collective Bias, Inc. and the Coca-Cola Company. All opinions are mine alone. #ReadyForKickoff #CollectiveBias
It’s the start of the new year and the excitement of the holidays is behind us. So naturally, this party planning junkie has turned my sights on gearing up for the upcoming big game!
When I was in college I used to go to this coffee shop that served a chocolate covered cherry mocha that I loved deeply. That was, ahem, a few years ago, and many miles away, and I’ve never found another coffee shop that can duplicate this dreamy drink. Inspired by the brew I once loved and lost, I created my new favorite hot chocolate: Chocolate Covered Cherry Hot Cocoa.
No, my recipe isn’t for coffee, but dare I say it’s even better?
I’ve been working on Dub’s bathroom from some time now. My vision keeps changing as I find little treasures here and there, and it’s becoming kind of an eclectic hodgepodge instead of a well thought-out theme. I guess that’s about perfect for a boy’s space, right?
I’d started out planning to use this artwork I designed (check out the free printables), but then remembered the vintage Star Wars metal art I’d picked up at Hobby Lobby awhile ago and thought it would be fun to frame it for this space. I bought custom mats and framed them with Ikea Ribba frames.
I wasn’t sure what to put above the towel rack, but when I was out thrifting and found this Wax & Polish sign, I just had to have it!
I love the crisp clean lines of the gray walls and white frames against the rustic barn wood vinyl floors and vintage finds.
Now I’m on the hunt for cabinet hardware. I’d really had my heart set on using these utility pulls from the hardware store. I just love this look. Unfortunately, they are just a little wide for the cabinet trim so I need to find a new option.
Which pulls do you think would be the right option for this space?
These are a shorter version of the same utility pulls – they are only 3 3/8″ inches, but would fit the width of our cabinet trim.
I’m slowly going room by room and decorating where inspiration strikes. That only happens to be working in the kids’ areas, but I’m embracing it!
Next up is Dub’s bathroom. I love the idea of making it an all-boy kind of space – I absolutely love decorating really boyish spaces – but I want it to be somewhat neutral since it will be shared with overnight guests.
I railroaded Dub into the blue color for his room – I’d rejected the crazy bright aqua color he really wanted (I just couldn’t…) so I let him choose the paint for this space himself.
I tried to convince him that a steel blue color would be great. I go for neutrals everywhere else, so I was hoping this would be a room with some color. However, he really liked the idea of a silvery gray for the space. Out of 5 grays, he chose Sherwin Williams Gray Screen because of the slightly blue tint and light tone. Nice choice!
Here is the working Mood Board I’m using to inspire the makeover.
I designed artwork to add some color to the otherwise neutral, rustic space. I’m not 100% sure on this scheme, but since the artwork is free (I already have the IKEA RIbba frames on hand from a failed attempt to use it elsewhere), I’m going with it for now.
And just because I couldn’t decide…I’m sharing a few variations I worked on:
What do you think? I’m hoping this inspires others to add some color to their spaces, so I’m making several of them available to you for free!
These 12×12 printables are designed to work with the Ribba frame, so you’ll want to get them printed at the copy store.
If you download these, please take a moment to tell me about it below. Even better, share photos of them in use. I’d love to see these prints getting used and enjoyed!
Engineer prints are a great way to design a boy bedroom, bringing custom touches through large photo prints on a budget.
I’m very slowly beginning the process of decorating our new home, and focusing on the areas where inspiration strikes me the most. Dub’s room is the one I have the most concrete vision for, and I knew exactly where I wanted to start when I saw this idea for engineer prints for a boy’s room.
I immediately set out taking images of the things most important to Dub. He loved being able to be a part of it in this way.
He loves Legos, video games, and the Wilson brand holds special inside meaning for us
I was able to order the engineering prints online by sending the images to the FedEx Kinkos copy store.
We recently made the decision to sell our “starter” home and build a new home that better accommodates our growing family. We bought this home just months before our wedding, had three babies here and many, many precious memories as a family. We’re ready for the next chapter, but this sentimental mom is feeling a bit emotional about it, as well.
The moment we signed the papers to build our new home I was immediately motivated to take on a project I’ve been meaning to for a long time – make a family growth chart that we can take with us – wherever we go. Our former growth chart was done the old fashioned way – with pencil on the wall of our kitchen (that I still can’t bring myself to paint over even since I’ve made this beautiful new chart).
I’d once tried my hand at an embroidered chart that was supposed to be cute and charming, but didn’t end up looking quite as polished as my inspiration. I also found that I was too lazy to embroider once a year. My laziness factor is high.
So I moved on to those cute reclaimed signs I’ve seen all over Pinterest.
I started with a 3/4″x7″x8′ piece of cedar lumber that I purchased at Home Depot for less than $9. First, I enlisted Dub to weather it for me. I gave him chains and a hammer and let him have at it. I stained it with leftover stain that I used on our stairs for our garage makeover.
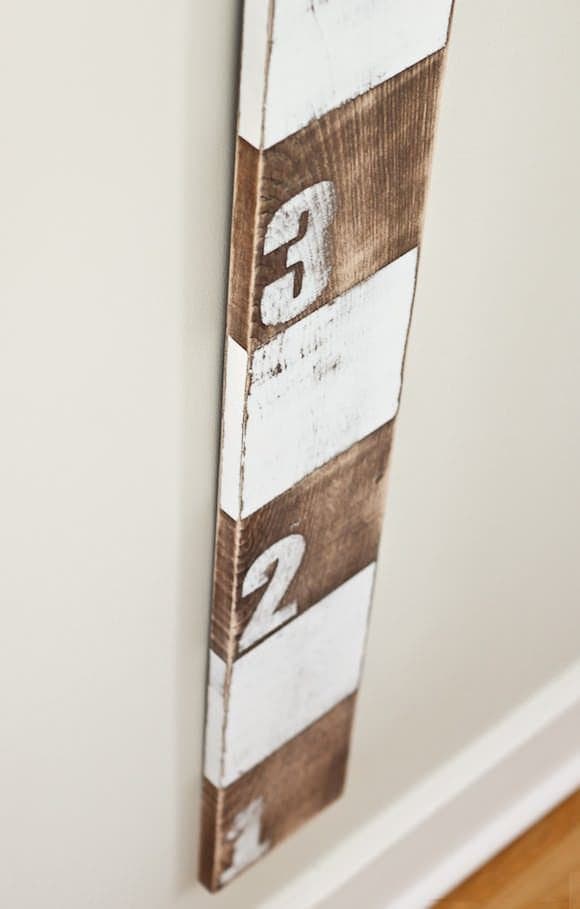
From there, I had to get measuring – my least favorite part. Our family is really tall, so I cut my board to 6′ tall and painted 1′ white stripes using leftover paint from the garage makeover. These are some terrible progress photos, but you get the idea.
I actually liked the way this looked when I was done, but I went ahead and sanded it to give it a more distressed look.
Then, I used my silhouette to create the measurement marks. I barely use my Silhouette but I used it for this, figuring it would make the measuring much easier for me. I measured it on the computer, cut it out on the Silhouette and then used transfer paper to stick it right on the board without having to re-measure.
I’m super happy with the way that it turned out! I can’t wait to hang this measurement chart in our new home next year. I can see keeping this chart in our home forever, and measuring little grandbabies someday.
Postscript: after completing my chart, I stumbled upon this cute version by Handmade Charlotte
If I had to do it over again, I think her way of painting the numbers would be a lot cheaper and easier. However, I’d still want to make the measurement marks so that I could tell visually exactly how tall the kids are. Everytime they get measured they want to know EXACTLY how many feet, inches and centimeters tall they are. Because that matters to 4 and 6 year olds.
What do you think? Do you have a family growth chart in your home?