Make a tooth pillow for the Tooth Fairy using upcycled baby clothes | www.fivemarigolds.com

Tooth Fairy Pillow Using Upcycled Baby Clothing

Looking for a  way to upcycle those baby clothes you can’t part with? When Dub lost his first loose tooth, I decided to use his baby clothes to create a tooth pillow – a tradition my parents started with me. The concept is that the tooth pillow makes it easy for the Tooth Fairy to find baby teeth and deposit money (I’ve heard she hates to loose those first baby teeth!).

To make the pillow, I combined a chambray shirt and a little plaid shirt, with snap button pockets, that Dub wore as a baby. He actually helped me dig through his baby clothes to find just the right combo.

Tooth Fairy Pillow Using Upcycled Baby Clothing | Five Marigolds

Here he is at just 3 months old sporting one of the shirts.

Tooth Fairy Pillow Using Upcycled Baby Clothing | Five Marigolds

My mom used her fancy sewing machine to embroider some letters and voila! An easy, free tooth pillow that he absolutely loves.

Do you have any Tooth Fairy traditions?


Sweet Treat: Easy Homemade Candy Buttons

There’s just something about Candy Buttons. These nostalgic candies are surprisingly easy to make, and are perfect for birthdays, party favors, or just a fun sweet treat.

To make Candy Buttons, all you need to do is prepare a simple royal icing recipe. You can use the recipe listed on the can of Meringue Powder, but I used the following recipe, inspired by Sweet Sugarbelle:

What you’ll need:

  • 1 lb. confectioner’s sugar (4 3/4 cups)
  • Meringue powder (about 1/4 cup)
  • 1/3-1/2 cup water
  • 1-2 tablespoons flavored extract (I used almond extract because it’s what I had on hand, but there are tons of fruity flavors at the craft store that would be fun to try!)
  • Food coloring
  • Electric mixer
  • Freezer paper
  • Icing bag and small round tip (or a resealable bag with a tiny corner cut off would work in a pinch)supplies

To prepare:

  1. Whisk the dry ingredients together.
  2. In a separate measuring cup, mix the flavored extract into the water.
  3. Slowly begin pouring the liquid mixture into the powder mixture while it mixes.
  4. Mix the frosting on medium-high speed until the frosting forms stiff peaks (around 7 minutes)
  5. Add food coloring to achieve desired color. (I first made pink frosting, and later added a few drops of blue to make purple to get two colors out of one batch.)

Next, tear off a sheet of freezer paper – large enough that you can fit a large batch of buttons on (you won’t cut the paper until these are dry).

Fill your pastry bag (I used my Pampered Chef Decorator Bottle Set*) with frosting and twist the top, removing excess air. Now, simply pipe evenly sized dots across the paper. If possible, print a template in advance and place it below the freezer paper. Be sure that the design will fit into your final packaging. If you’re using pretzel bags for your packaging, your design will need to be approximately 2.15 x 5″ to fit the pretzel bags I would be placing them in.Candy Button Crown Template | Five Marigolds

Candy Button Heart Crown Party Favors _ Five Marigolds_45mLet the Buttons sit overnight to dry. Any excess frosting will keep in a resealable bag refrigerated for two weeks.

Now for the fun! Once the Buttons have set up overnight, you can begin cutting the freezer paper to your desired shapes.Candy Button Heart Crown Party Favors _ Five Marigolds_35m

Package your Candy Buttons for the occasion. I placed them in Wilton pretzel bags that I got at JoAnn’s for $1.37 using my 40% off coupon. Think of the possibilities! Birthday party favors, Valentines, and more!Candy Button Heart Crown Party Favors _ Five Marigolds_15m

Valentine's Candy Button Hearts _ Five Marigolds5m

Valentine Candy Buttons


In addition to being featured on the fab blogs listed on the right of this blog, this post was also featured on Huckleberry Love.


Inexpensive, Easy Chore Chart for Kids

This summer is the first summer I’ll be at home most days with the kids since I started my freelance adventure last fall. My 6 and 4 year old are bright, exuberant kids and I knew I’d have to add structure their days if I wanted any sanity. However, with my freelance work I don’t have the ability to be there every moment to guide their day (and who would want to?). It’s also great for fostering their independence as well.

I went to work trying to find chore charts, but none of them were quite right. My 4 year old can’t read the text chore charts, and many of the picture charts were geared toward very little children, or had unattractive graphics.

After doing some research I landed on four requirements:

  • I wanted a photo chart that my four year old could understand and interact with on her own;
  • I didn’t want to spend much money;
  • I wanted the flexibility to change their days up, but I also didn’t want to have to print a new one each week; and
  • I needed something I could mount to the fridge somehow – I didn’t want a chart that required wall space.

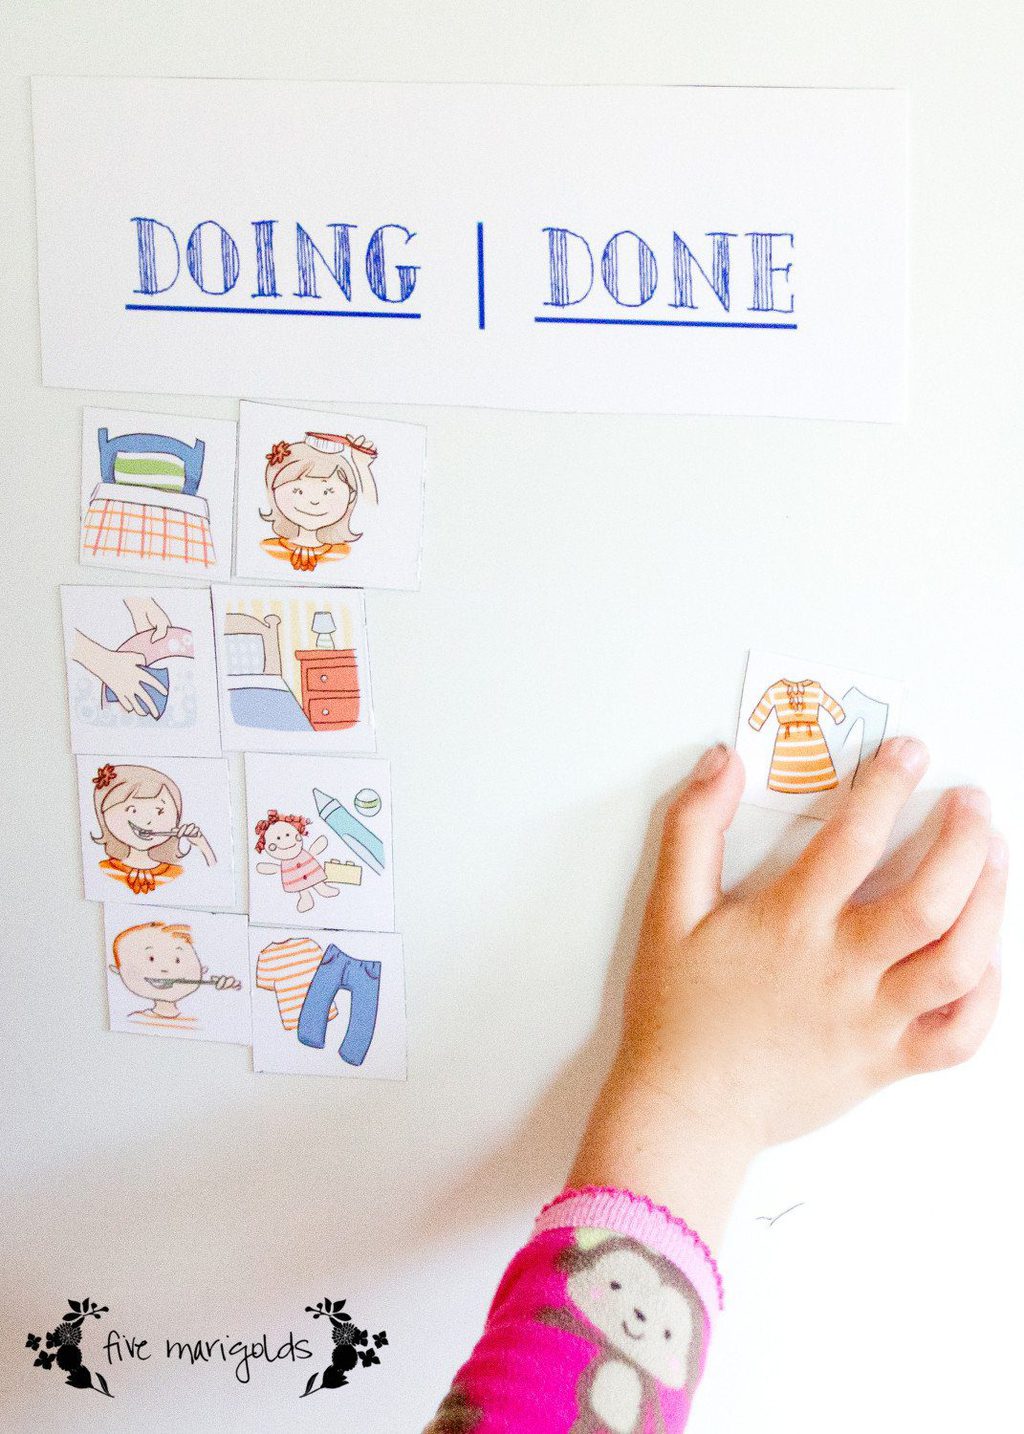
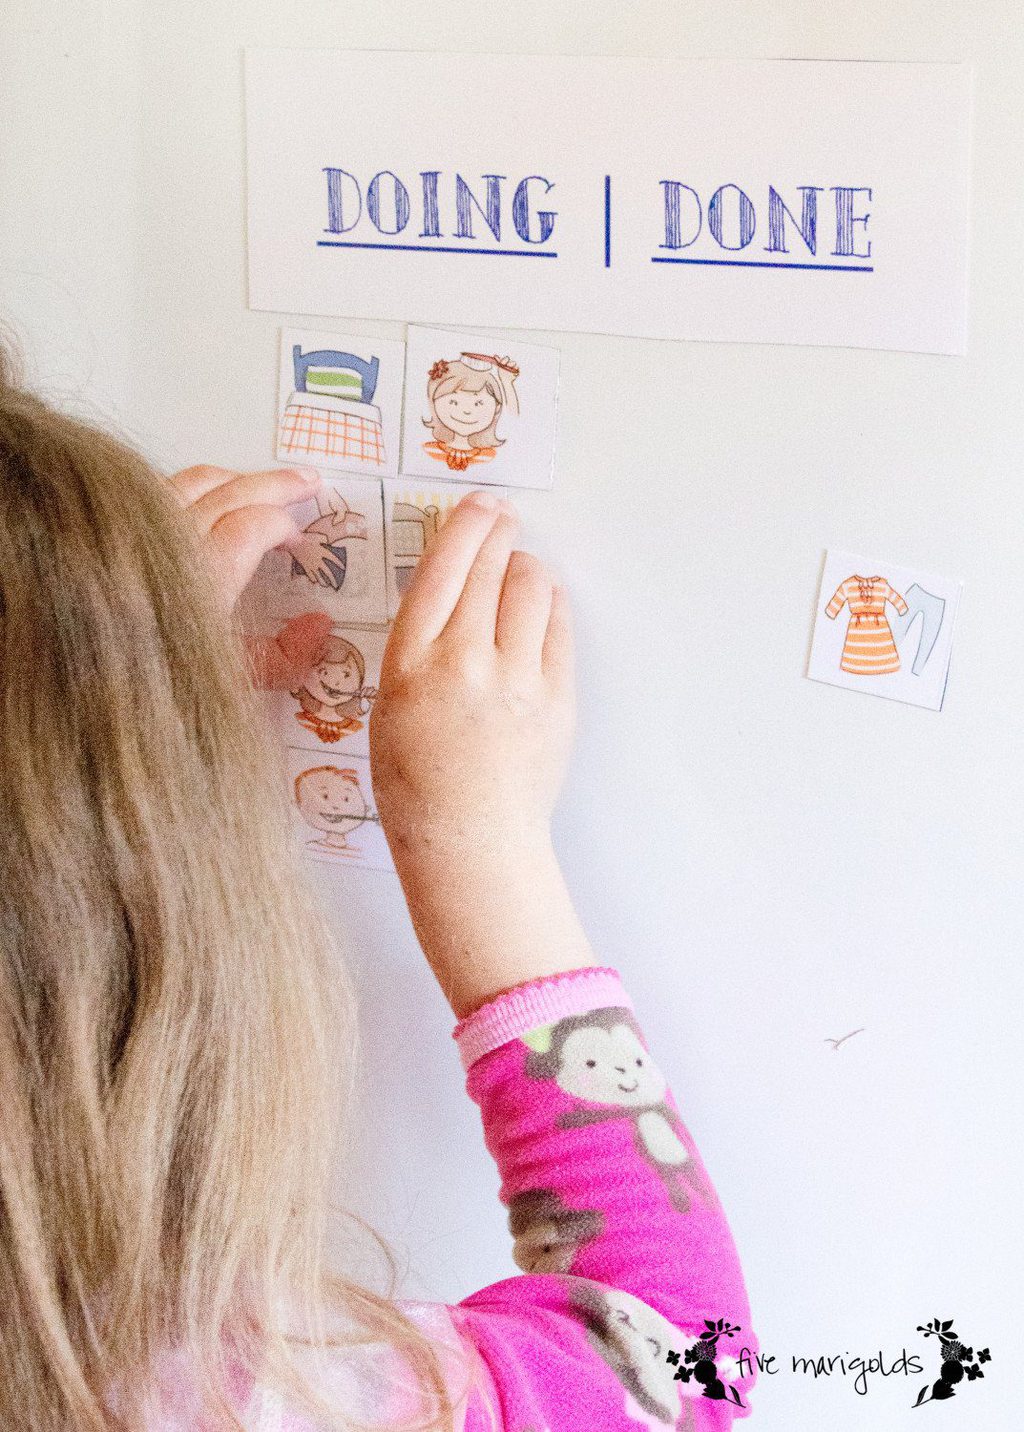
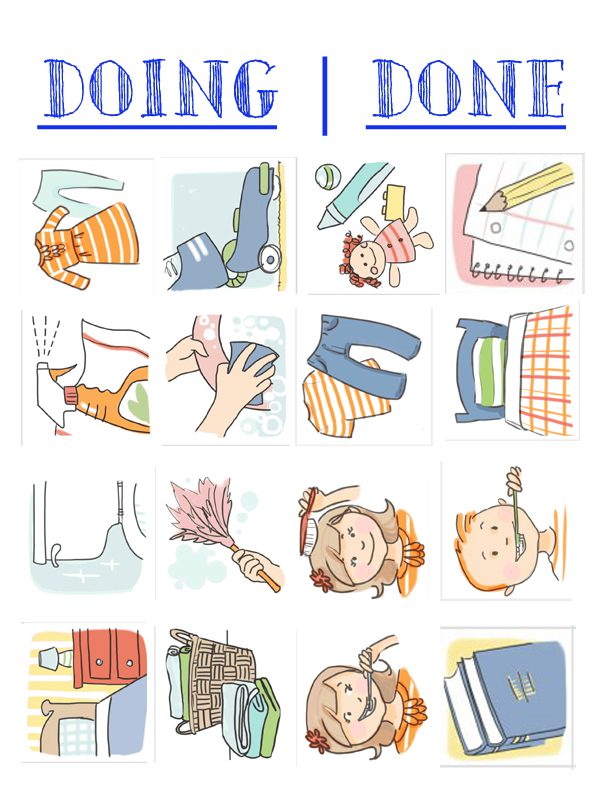
I landed on the concept of a magnetic chart with two categories: “Doing” and “Done.” I saw a few examples that I liked and got to work emulating those based on my needs. However, I needed clip art. It was SO hard to find cute clip art that would work for this! That’s when I stumbled upon Audrey Schilaty‘s blog. She had the exact chart I wanted – for free! Really, it’s the nicest free resource I’ve found. She offers both personal care and chore images, and I used a small combination of both (sad but true: I forget to have my children brush their teeth all to often).

I made it my own with a few modifications:

  • I drafted my own simple “Doing” and “Done” text document and used just the images I needed from her selection, so it would all print on one page, saving me money.
  • I printed it on a glossy sheet of photo paper that I had on hand, and then just placed it on an 8.5×11 sheet of adhesive magnet. You can buy packages of adhesive magnet sheets at office supply stores, but I found the most inexpensive option for heavy sheets – I got mine for just $3.59. I cut the small pieces to size, added them to the fridge, and voila – a clean, easy and inexpensive chart.

Magnetic Chore Chart | Five Marigolds

The kids woke up the first day and had moved two magnets over before I had a chance to remind them about it! So far, it’s been a great success.

DIY Magnetic Chore Chart | Five Marigolds

I encourage everyone to check out Audrey’s great blog. And, if you’d like a copy of the 1-page version of the printable I used to create my chart using her images, just click the image below!

Chore chart printable | Five MarigoldsThere you have it – a chore chart for just $3.59. What are your tips for keeping the kids structured in the summer? Let me know in the comments below.


*This post contains affiliate links. Please read my full disclaimer on the right sidebar. Thank you for your support!


Activity/quiet book

For Dub’s first Christmas years ago, I decided I wanted to start the tradition of making something homemade for my kids for each Christmas. I ambitiously took on an activity book project to kick off the tradition, knowing I could add pages to it each year.

I drew inspiration from the interwebs and used a few patterns  But mostly, I just winged it.  Ididn’t want it to look perfect, I wanted it to look inviting and fun!

  1. I did a lot of web surfing for inspiration.  I used a few patterns from one of my favorite bloggers, Homemade by Jill.
  2. From there, I narrowed down the pages and activities I wanted tobe in the book and madea list of the supplies I needed.  I was patient with this and used 40% off coupons at Michael’sand JoAnn’s for several weeks to avoid paying full price on the more expensive supplies.  Pre-planning is the most important step to any project, because having allthesupplies on hand means fewer half-finished projects laying around that were never picked back up after the inspiration left!
  3. As a working mom, I made it my goal to complete at least two pages every weekend.  This made the project much more manageable for me to take on.  Looking face-on at a full weekend of sewing probably would have killed my motivation to start!
  4. After all of the pages were complete, I paired pages two-by-two and sewed twosheetstogether back-to-back.
  5. I then punched three grommets into each set of pages, like you would if you were going to add them to a binder.
  6. Finally, I used loose leaf rings to secure them together.  I chose to do it this way so I couldrepair pages or continue to add pages as I had kids.

Materials used:

  • White felt pages from the craft store (around 25 cents each)
  • Additional felt pages in various colors
  • Scrap fabric and notions, like a zipper and ricrac,
  • Assorted buttons I had saved over the years
  • Metal snaps (these are easier for little hands to use vs. the plastic snaps)
  • Chalk Cloth fabric
  • Loose leaf rings
  • Grommets
  • Finger puppets from Ikea for the Noah’s Ark page (pictured below).  These are no longer available through Ikea but they pop up on ebay all the time!

Number Counting Duck Pond Quiet Activity book | Five Marigolds Activity Quiet Book Inspiration Rocket Outer Space | Five Marigoldsbird laces

Activity Quiet Book Inspiration Noah's Ark Finger Puppets | Five Marigolds 69998_PE185334_S3

Activity Quiet Book Inspiration | Five MarigoldsActivity Quiet Book Inspiration with Chalk Cloth | Five Marigolds

Activity Quiet Book Inspiration Art Pages | Five Marigolds road

Activity Quiet Book Barn Animals Finger Puppets | Five Marigolds Activity Quiet Book Inspiration | Five Marigolds

Activity Quiet Book Inspiration | Five MarigoldsActivity Quiet Book Barn Animals Finger Puppets | Five MarigoldsI’m happy to say that 4 years later, this book still gets used by Dub and now Eve, too.  It’s held up and only needed 1 small repair.

In retrospect, I wish I had more carefully documented the sewing process and made patterns for each page. It took me a long time pull this book together and it would have been so much easier if all the patterns had been in one place. I often wonder if I should go back and make the patterns to share for the next person. If you would like to see that in the future, please be sure to tell me in the comments below!


(Very) Small Spaces: Shared Girl Room

Baby #3 is on the way  soon(!) and the nursery is officially done. We live in a 3 bedroom home with cozy (aka ridiculously small) bedrooms which meant lots of creativity and organization.
I tried my best to create the illusion of space with monochromatic touches of taupe and pink with gold accents against white.  We used a pink and taupe toile in the bedding for both girls and carried the colors throughout the room. Here is a mock up:shared girl room3
I’m certainly no designer (clearly!) but because I had such a hard time finding decor ideas for tight quarters, I’m posting mine for all of you out there with small spaces.
Tiny Spaces Shared Girl Room
Do you like how I kept the overstuffed toy box in the shot? That’s just me keeping it real.