
Dollhouse Play room and Final Reveal
VINTAGE DOLLHOUSE MAKEOVER Series: PART I VINTAGE DOLLHOUSE, PART II EXTERIOR, PART III BOY’S ROOM, PART IV GIRL’S ROOM, PART V LAUNDRY / BATHROOM, PART VI LIVING ROOM, PART VII KITCHEN, PART VIII PLAY ROOM + FINAL REVEAL
I’m so excited to share the final reveal in my vintage dollhouse series today.This has been such a fun project, but I’m so ready to turn it over to my girls who have been impatiently waiting for me to complete it.
The last room in this project is the dollhouse play room. I left this room for last because it was the most awkward space – narrow with no windows. And since I knew I would finish it last, I knew there was a chance I’d run low on budget. I designated it the play room because I felt it was the least important room, and I wouldn’t need to make many purchases.
As it turned out, I was out of budget, so my original ideas for this room fell by the wayside as I found ways to make it work.
My daughter sacrificed her Shopkins ice cream truck sign to make an art easel, and of course you can tell I used Scrabble tiles to decorate the wall.
This post may contain affiliate links. Please read my privacy policy and disclosures.
I made a teepee out of some fabric and kebob skewers. I used a piece of scrapbook paper for the rug that I modpodged so that it would hold up to play.
The rocking chair and random ladder propped on the wall are leftover from the Girl Room furniture set.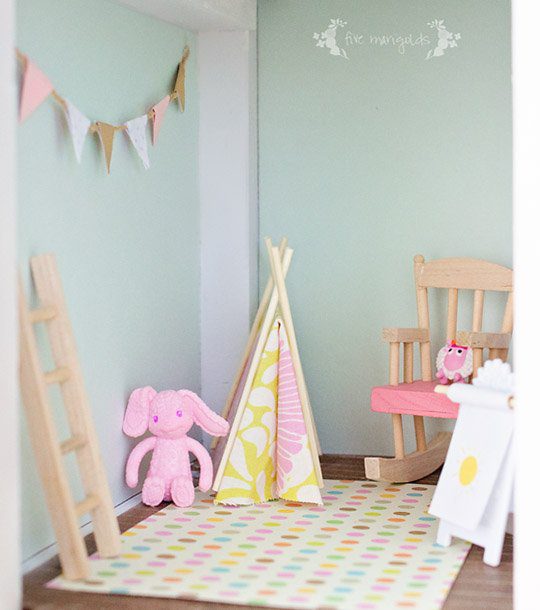
I made the bunting from scrapbook paper and hemp twine, and added a couple of Lalaloopsy toys to finish off the space.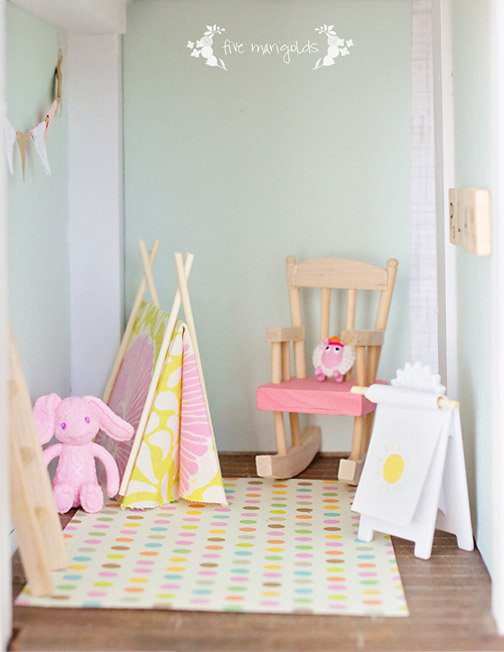
Even though I didn’t have the budget or motivation to finish the dollhouse play room the way I’d originally envisioned, the girls think it’s super, and that’s all that matters to me. That, and it’s done!!
Here is the final budget breakdown for the entire vintage dollhouse remodel project:
Price Breakdown: Vintage Dollhouse Remodel
- Boy Room: $1.90
- Girl Room: $9.50
- Bath/Laundry: $7.18
- Living Room: $9.04
- Kitchen: $8.19
- Play Room: $0.66
- Exterior: $18.87
- TOTAL= $55.34 Oops! A little over my $50 budget 🙂
And with the last room introduced, I bring you…drumroll please…the dollhouse:

The girls actually moved in several weeks ago before it was finished, and log at least 1-2 hours a day playing with it.
I spent many years playing with and decorating my childhood dollhouse over and over, and they are some of my favorite childhood memories. I hope my girls experience the same magic with theirs.

Thanks for following along with this project! Tell me, which room is your favorite? I’d love your feedback in the comments below! Additionally, I hope you’ll check out the other posts on the dollhouse here:

Just the cutest!! Loved your transformation!
Thank you, Jen! Xo
LOVE! You are sooo talented. Mom goals for sure!
Aw, thank you so much for the love, Megan!
This is so beautiful!!! Your girls must love their dollhouse. Awesome job!
Everything about this dollhouse is perfection! My daughter would have absolutely loved a dollhouse like this when she was young. Talk about attention to detail!
Oh my goodness this is adorable!!! You did great at designing and decorating this!!! Growing up, I think we only played with the plastic-type dollhouses..this is beautiful! Your girls will certainly treasure this 🙂 I think my favorite (for now) is the buffalo plaid walls with the stag head!!
This is awesome!! I love all your details…like the little teepees. Soooo Cute!!
This is so cute! The colors and details are so sweet. Love it 🙂
This playroom is so cute. Perfect for the kids.
This turned out so nice! I have really enjoyed keeping up with all your renovation posts and watching it all come together. And $5.34…I’d say that’s not such a failure going over budget. 🙂 Good work!
Thank you so much for following along with me, and for those kind words!
Really cute, I like all the little twiddly bits you’ve added – so creative. I be your daughter loves it!
I loved doll houses as a little girl (and still do). This is a fabulous remodel!
I did (and do), too. 🙂 Thanks for the kind words, Heather!
Beautiful photos and work on that doll house. Looks like your daughter just loves it and the room is beautiful!
Thank you, Melanie 🙂
So pretty! My favorite room is the kitchen with the stairs, very cute.
Thank you Agnes! I like the stairs in that room, too.
Fantastic job! If your girls are like mine they will be playing with their dollhouse for many years to come!
I sure hope so! Thanks for stopping by, Wendy.
This is incredible! I would have gone crazy over this as a little girl. I’m sure it will be all the more special for your daughter because you decorated it and made the pieces with your own hands!
Thank you for the kind words, Karina.
I think I want to shrink myself and move in. It is just adorable. Your budget was so reasonable for all you needed. Very cute.
Lol! Thank you, Debby! I used to wish I could live inside my childhood dollhouse.
She looks like a happy camper. This is awesome and well done
She is! Thank you, Mardene.
Congratulations! You did a terrific job, and I trust your girls will hold similar memories from playing and enjoying your labor of love. Kudos! 🙂
Thanks, Elizabeth!
Oh my goodness- it is so cute! I hope I have a girl one day to do the same with. Great job! I’m visiting from the Blog hop and am so glad you linked up 🙂
Thank you, Ashley!
How stinking cute is this?! So shabby chic and love the Lily Pulitzer inspired room!
Adorable! And great photos!!
Thank you, Erika 🙂
Love it! It’s cute and amazing. You are extremely talented.
I always wanted a doll house and yours looks amazing, love the play room too, great job. Thanks for sharing at the Thursday Favorite Things Blog Hop.
What a sweet transformation. I’m sure it will bring hours of fun. Featured at Be Inspired this morning. Thanks so much for sharing!
this is ADORABLE! love the buffalo check room so much!!! if you feel like doing another one i just announced a dollhouse challenge on my blog today! 🙂
Oh noooo! I don’t think I have another one in me so soon. Hopefully I can still join in as a recently completed one…or if I can provide inspiration to your followers as a completed project, please let me know!
Oh how darling!!!!
Oh my goodness, this is darling! I love the colors you chose and the homemade touches!
I have loved seeing this come together. So much more detail than anything like what’s in traditional department stores these days. I would have loved a doll house when I was young. I think the boys room is my favorite room. Great job!
I have this very same doll house. My granddaughter is turning 3. My daughter had this for me, but just gave it to me today. I was so glad to find this on the internet. WOW! Her birthday is in three weeks. I have my work cut out for me. I love the inspiration for your makeover on this. Just wondering,,,,,is it appropriate for there to be a parent’s bedroom? The doll set I found on internet has a whole family, even grandparents. They are just the right size for this house. Wondering if the playroom could be the bathroom and the upstairs would be the laundry. Just throwing around some ideas. I’m so excited to get started. Thanks so much for sharing this.
Oh I’m so excited I could inspire you! I’d love to see what you do with it. Yes, a parents’ room would be the traditional choice, but I just modeled ours based on how I typically see my girls use their plastic playhouse. The dollhouse parents’ room never got used, and their little dollies were always in the kitchen and bedrooms. ????
This is beautiful, and I love that it was done on a budget and was done with sturdiness/play in mind!
How did you measure for wallpaper around doors and windows? I’m renovating my childhood dollhouse for my daughter and the house has lots of them. I’ve tried measuring/testing/adjusting as well as making a sticky note template and moving that to the ironing board, where I’ve ironed freezer paper onto the sticky note shape. I’ve gotten an okay freezer paper template this way, but I feel like it could be better, and I’m nervous about cutting the actual wallpaper. Any tips?
I wish I could say I employed a special technique, but I actually just used a plain piece of card stock, held it to the wall and kept adjusting it until it was an accurate template for me to trace and cut from. It worked well!
Thanks! I’ll try that. I think everything I’ve tried has been too movable, so maybe the firmness of the card stock will keep the measurements more accurate.