Doll House Living Room Makeover
This week we’re moving the vintage dollhouse remodel to the main floor living room.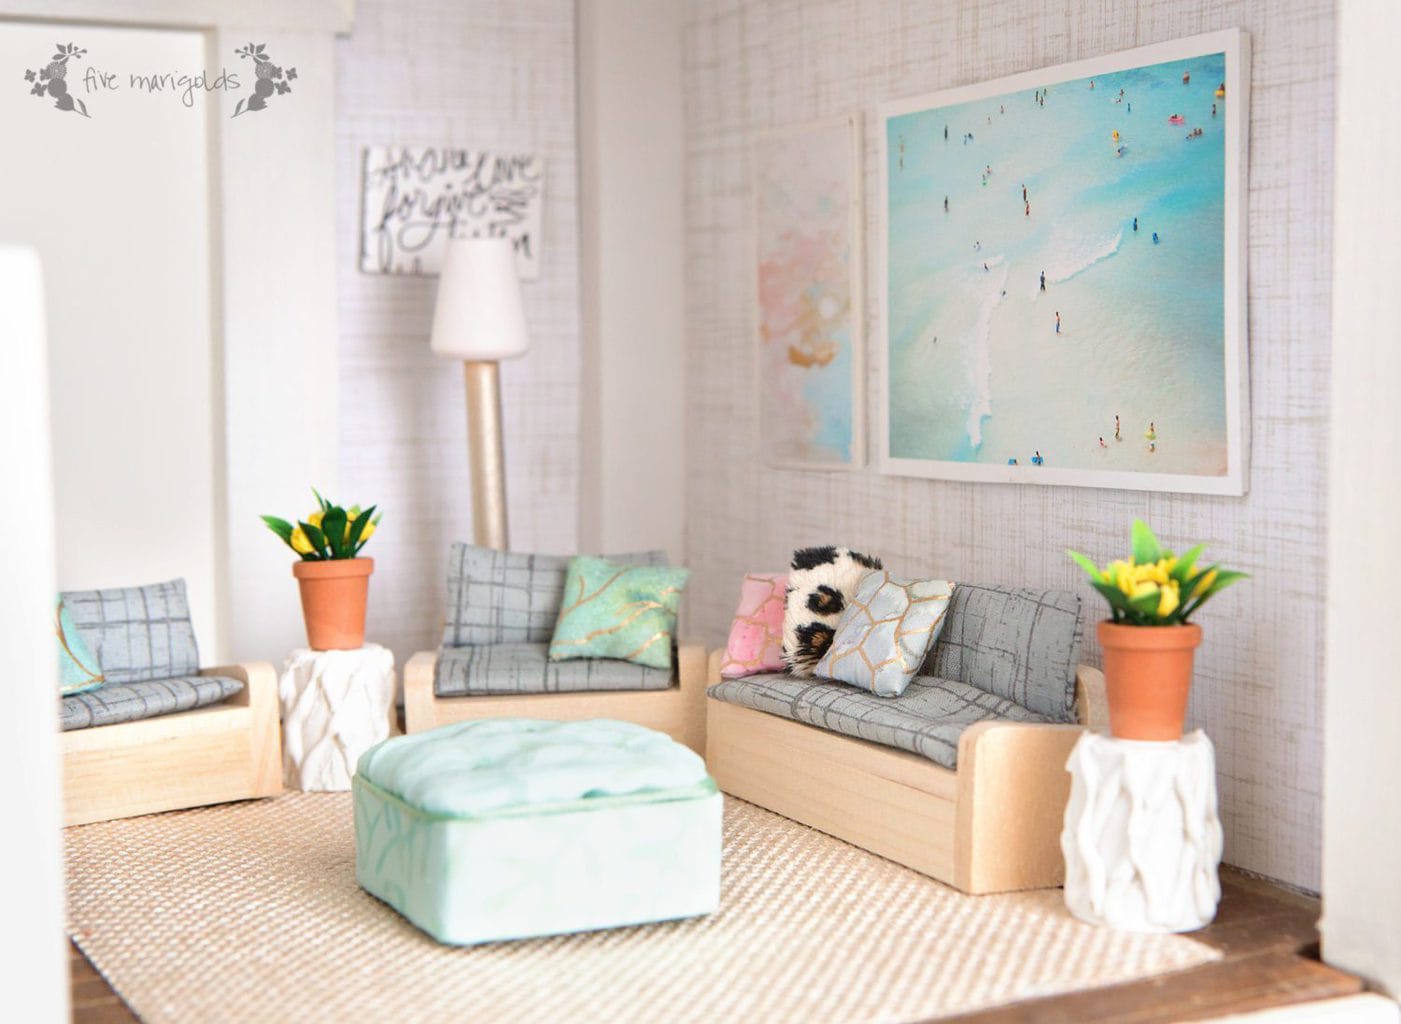
This week we’re moving the vintage dollhouse remodel to the main floor living room.
Do you love the look of those great pallet signs on Pinterest (my own version here!), but not the time and labor that goes into them? You’re in luck! Today I’m going to share with you how to make a faux pallet sign in just 10 minutes using inexpensive wood print paper.

See the Complete Vintage Dollhouse Makeover Series: Part I Vintage Dollhouse, Part II Exterior, Part III Boy’s Room, Part IV Girl’s Room, Part V Laundry / Bathroom, Part VI Living Room, Part VII Kitchen, Part VIII Play Room + Final Reveal
This week in my vintage dollhouse makeover series I bring you the remodeled bath and laundry room: two rooms that normally don’t get a lot of love in a dollhouse! I was determined to take on the challenge though – my girls’ dolls use this room quite a bit…

If you need a fun classroom-themed Valentine for your child to give to their friends, this free printable is for you!
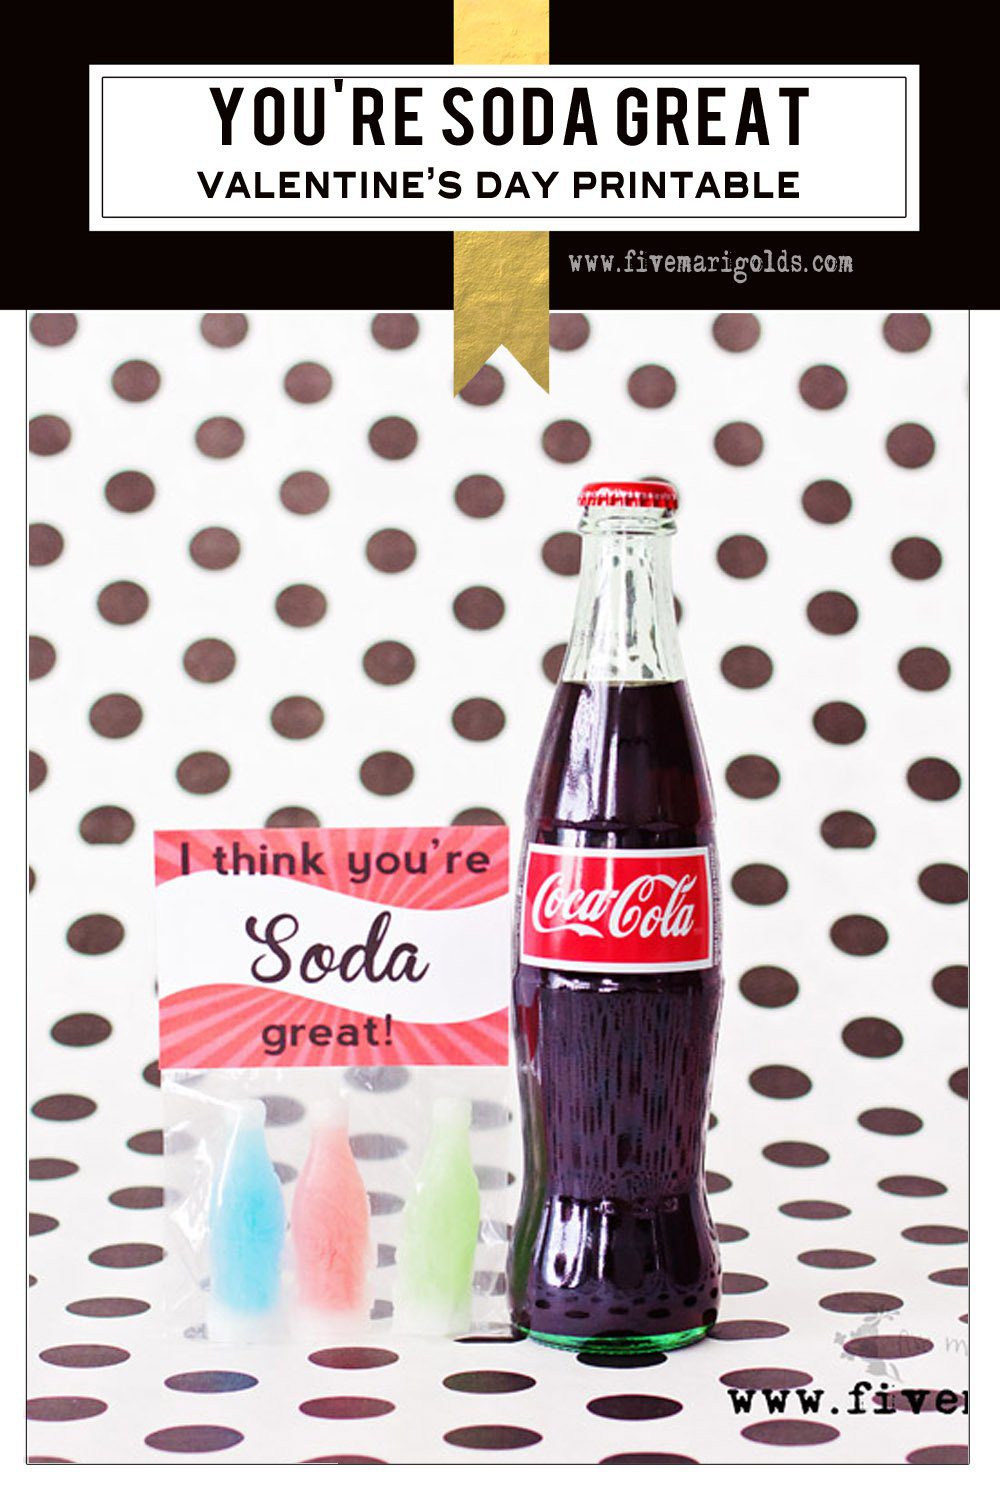
Are you a fan of the Soda Shoppe Valentine’s Day printables I shared earlier this week? I have one more soda-themed valentine for you. My son loved the idea of giving candy wax bottles to his buddies at school, but he was kind of hoping for a more cola inspired theme and wanted it to read “soda great” instead of “soda sweet.” You don’t want to send the wrong message in 2nd grade, apparently.
When you need to send some Valentine’s treats for your kid’s classroom party, how often do you turn to the usual boxed ones, and just add a small box of candy or a sweet lollipop? While this is fun and very acceptable for us busy moms, I have a fun printable for you that will help your child stand out in the crowd.
The best part is that you can use this with different kinds of “soda” candy, from candy bottle caps, wax bottles, or cola gummies and it’ll be great. Simply bag your candy, add the printable, and you are ready to go!
I love that this printable will work for any age. It’s great for a teacher gift, neighbor gift, or anyone else you want to share the day and love with. The best part is that it is FREE for my subscribers to download and use!
What kind of candy will you use with this Soda Great Valentine’s Day Printable?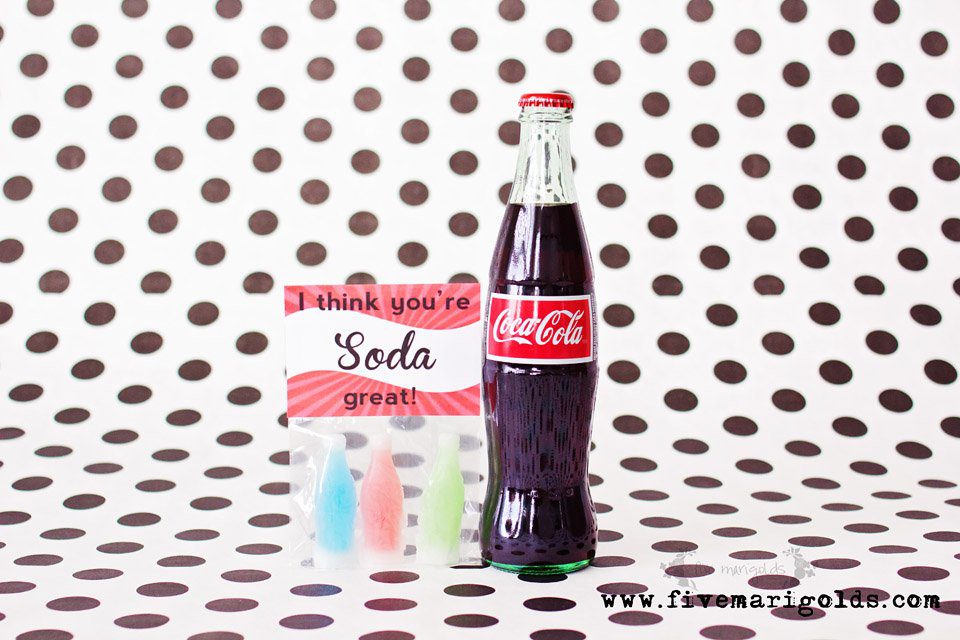
If you like Valentine idea, you might also like these Soda Shoppe Valentine’s Day printables. You can download this, and all my free Valentine’s Day printables, by subscribing here!
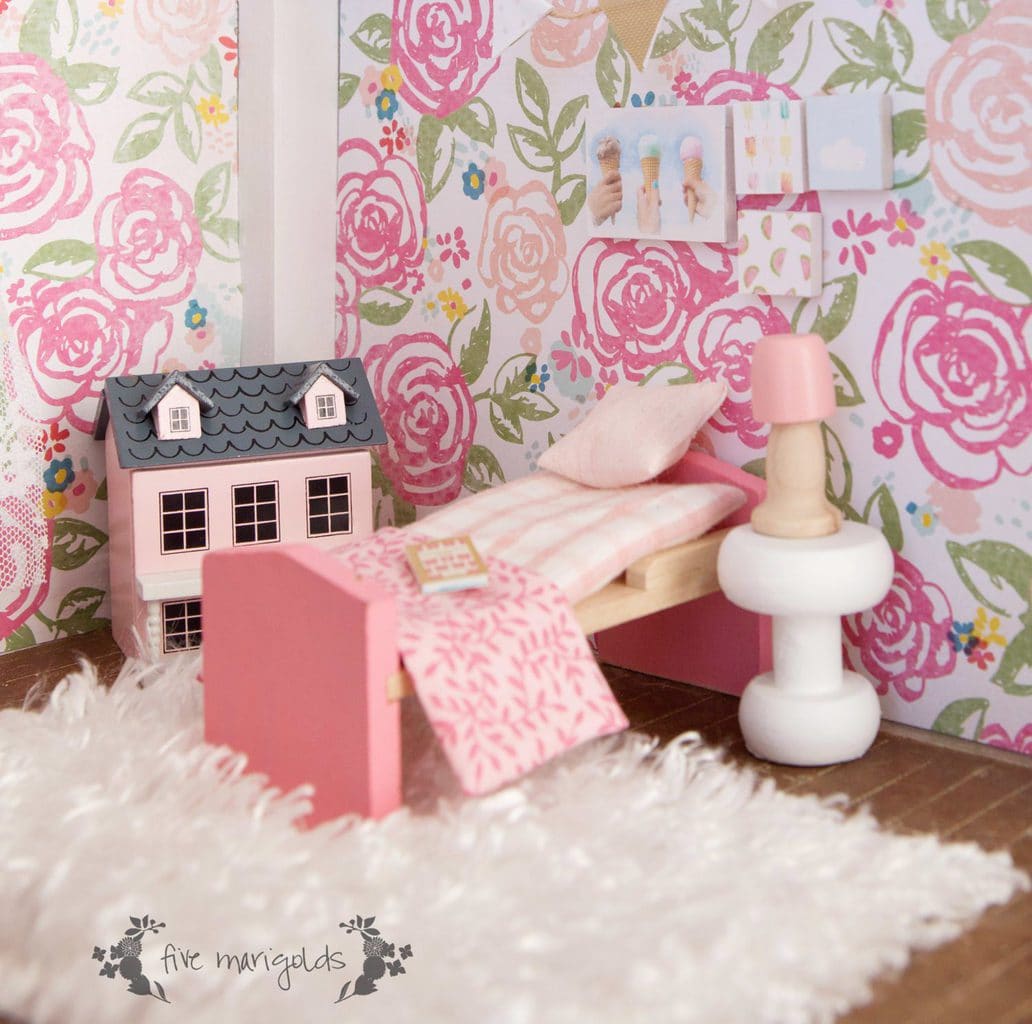
I’m so excited to share my vintage dollhouse girl room remodel with you! It has been such a vicariously fun exercise to decorate an entire girl’s room for less than $10.
When I scoured the internet for inspiration, I was drawn to the darling sets by Daisylane, Lundby and Hape. However, I was working with a minimal budget, so I set to work creating the look for less.
Need s’more (sorry) Valentine’s Day ideas? Just grab a box of graham crackers, a bag of mini Hershey’s chocolate bars and some heart-shaped Peeps or marshmallows, print out one of the free printables below, and you’re in business!
Love you S’More!
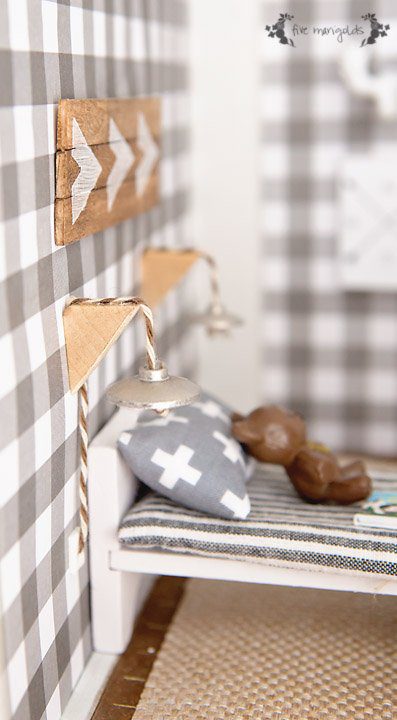
I’m excited to share the first finished room in my vintage dollhouse makeover series today!
I started with the boy room, because just like in my own home, it’s where inspiration struck me first.
Today I’m bringing you Part II of my vintage dollhouse makeover.
You can find the rest of the Vintage Dollhouse Makeover series here: Part I Vintage Dollhouse, Part II Exterior, Part III Boy’s Room, Part IV Girl’s Room, Part V Laundry / Bathroom, Part VI Living Room, Part VII Kitchen, Part VIII Play Room + Final Reveal
I think that you’re supposed to leave the exterior for the final “big reveal”, but I’m a rule breaker that way. That, and it happened to be the one part I could tackle while I waited for the interior furnishings to appear in the mail.
As I mentioned in my introductory post, I put myself on a budget for this project, so I needed to DIY it as much as possible, using supplies I already had on hand. Still, this portion of the makeover was the most costly, since all the paint used in the house is accounted for in this portion.
Years ago I hand sewed a Christmas Tree Advent Calendar, which has become such a sweet tradition for our family. Ever since I was a young child, I absolutely loved Advent Calendars – usually the perforated paper variety in our home – to count down the days until Christmas. The anticipation was overwhelming each year.
I wanted to have that same tradition in our family – and I wanted to create something we could use year after year. I stumbled across this sweet calendar by Stitch Craft Creations. I fell madly in love with this idea and got to work, using her calendar as my guide. 
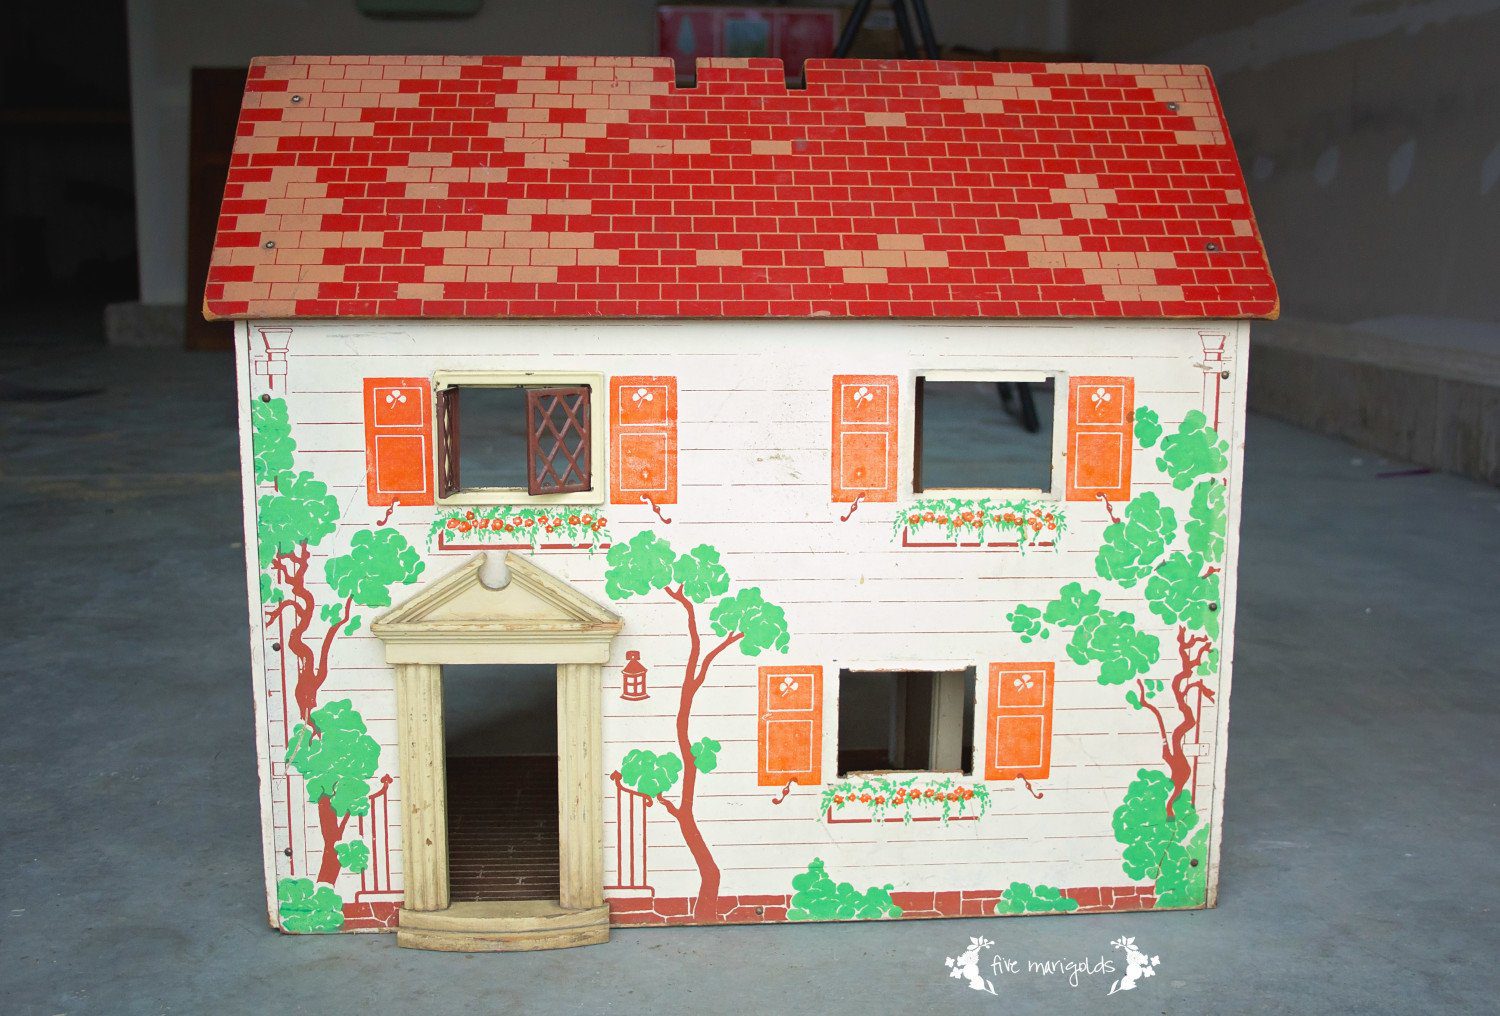
This summer I picked up this vintage doll house from the thrift store for a few dollars. I can’t explain why I picked it up, but I was thrilled with the find. So, what to do with a 1940’s era doll house in disrepair? I originally had delusions of restoring it, because it certainly had charm. However, once I started trying to do some touch ups I was faced with the reality that this baby needed a complete overhaul.
Here’s how it looked when I brought it home.
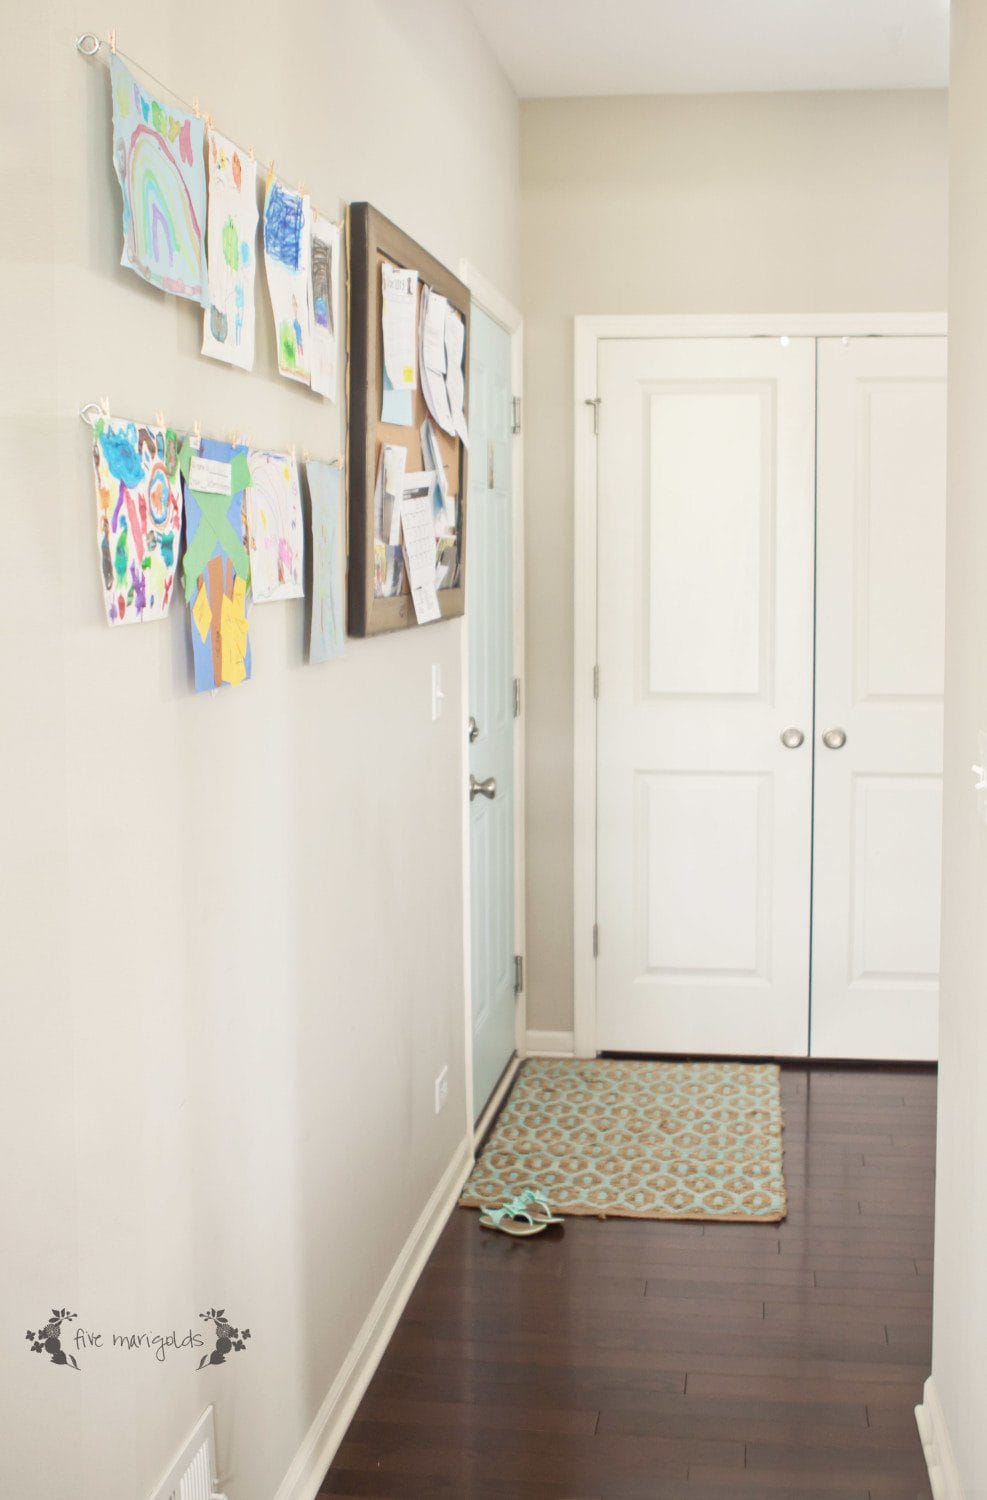
This is one of my favorite projects to date – also the easiest and least expensive: the children’s artwork display located in our Family Command Center – otherwise known as the mud room.
I wanted plenty of space where the children could hang their artwork and good grades with pride, without that messy cluttered look on the fridge. It also needed to be really flat to the wall, since the area I’d designated is in a space the width of a hallway.
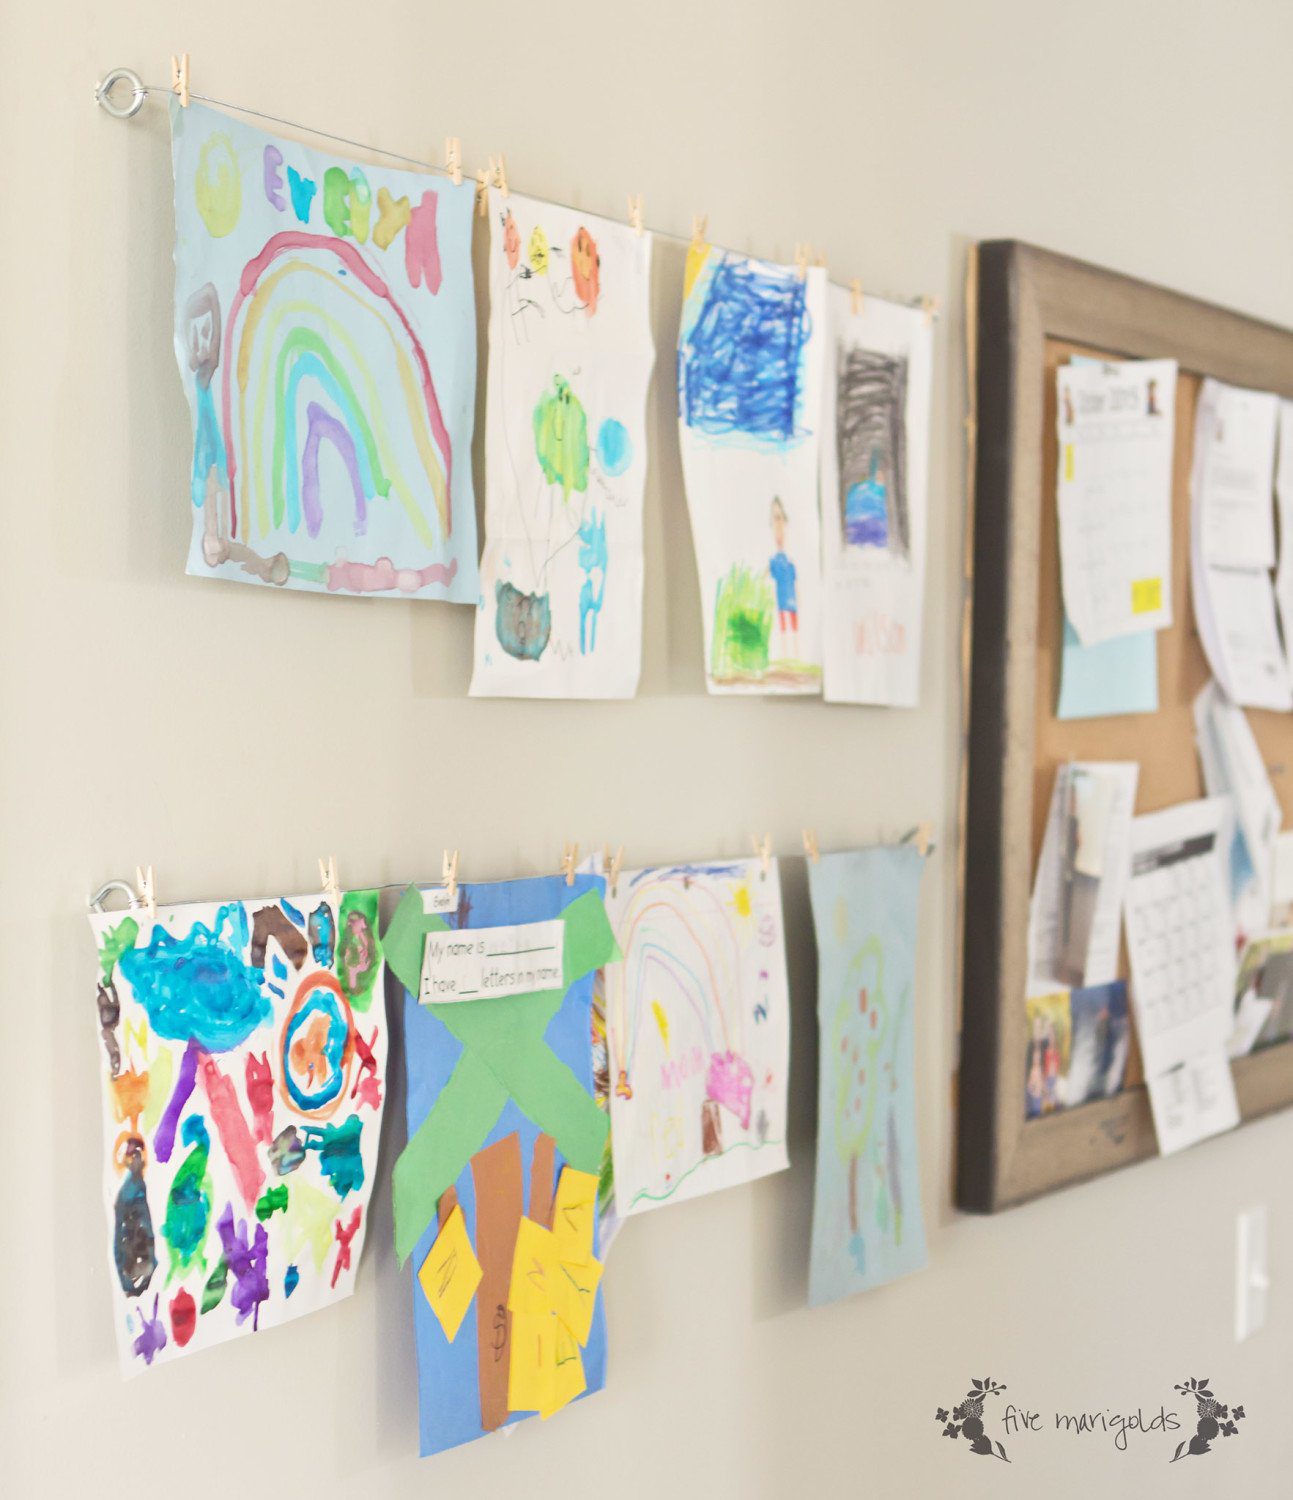
Here’s how I did it:

As for the rest of our family mud room command center, it’s still a work in progress. I have dreams for this space!

I found that sign at the thrift store. I think it was from a hotel long ago. I just love it!
What do you think of my low-tech art center for the kids?
Sources:
Earlier this year, I gave a small tour of ‘Belle’s nursery that is slowly transitioning to a big girl room. SLOWLY. Recently, I tried my hand at creating a DIY Canvas for Baby Nursery.
After making Eve’s wall art project I was inspired to make another one for ‘Belle’s room to fill a blank wall. 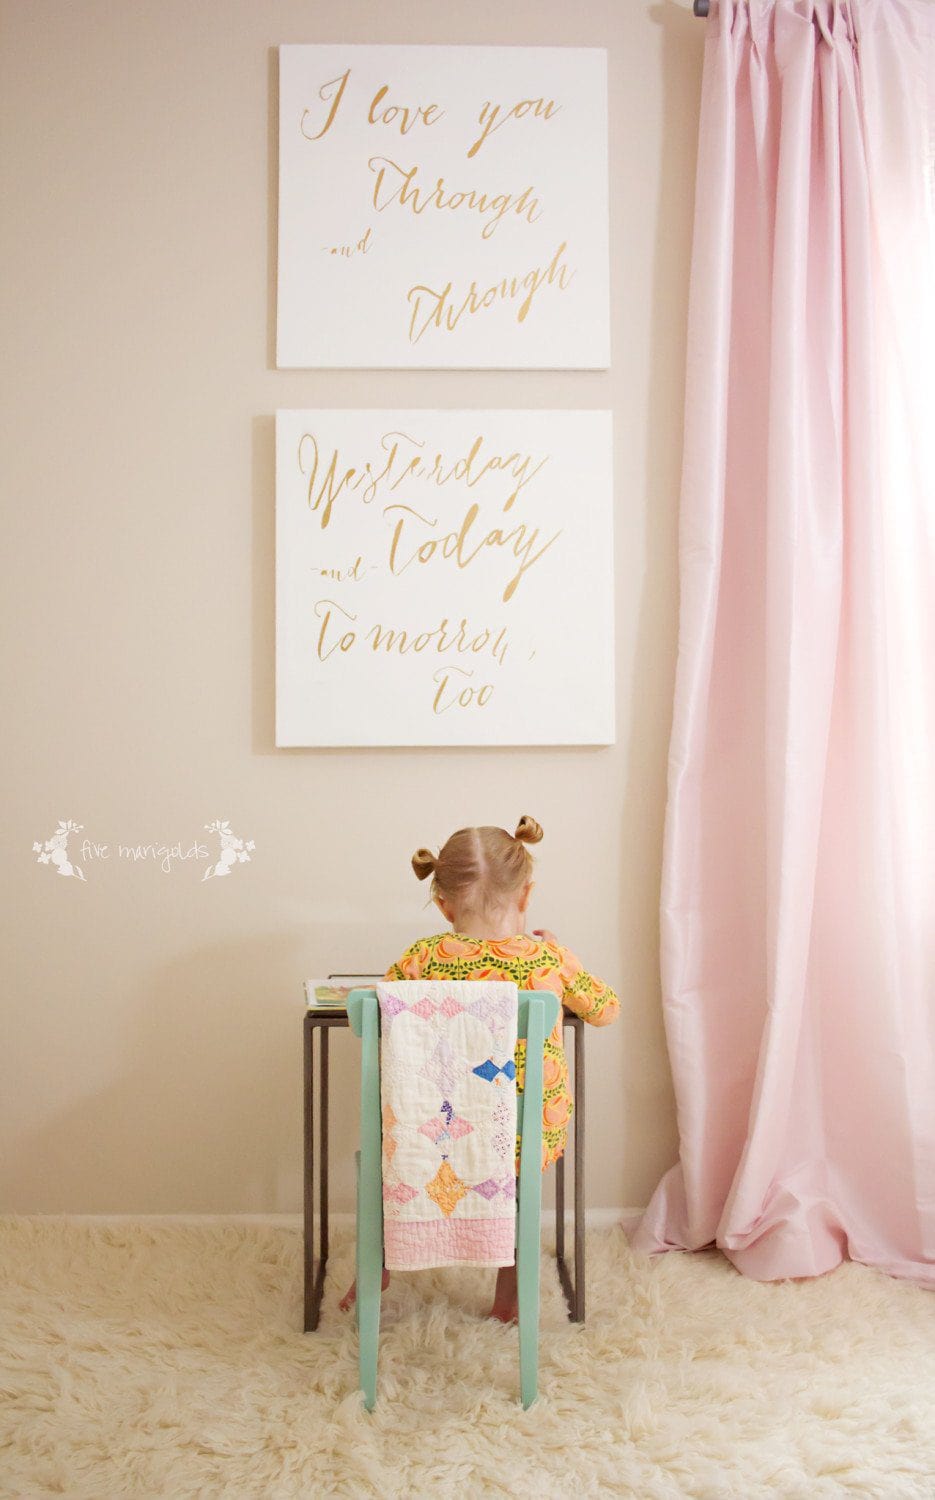
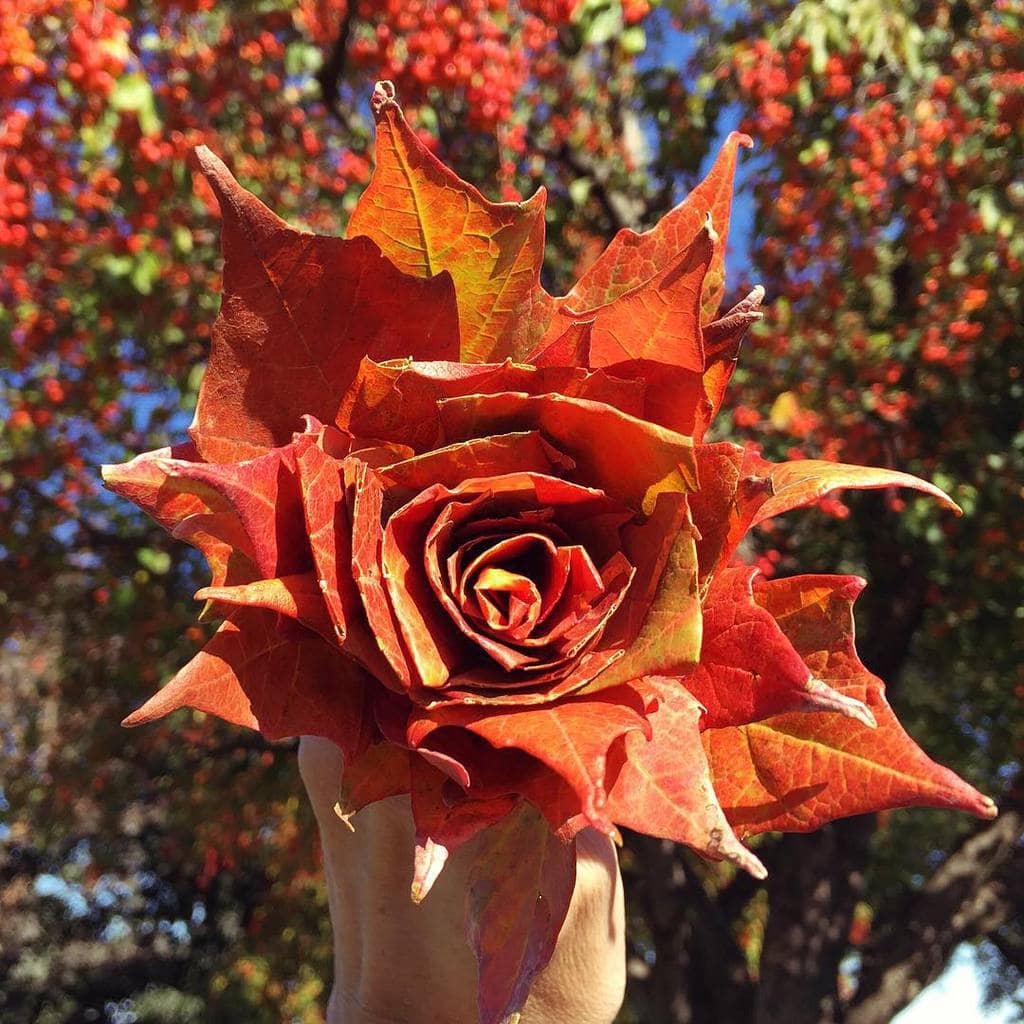
I recently posted an Instagram photo of a “rose” I’d created out of fall leaves. I had several of you message me to ask how I’d done it. It’s easy! However, I can’t take credit for this idea – I saw this in my Facebook feed one day and decided to follow it:
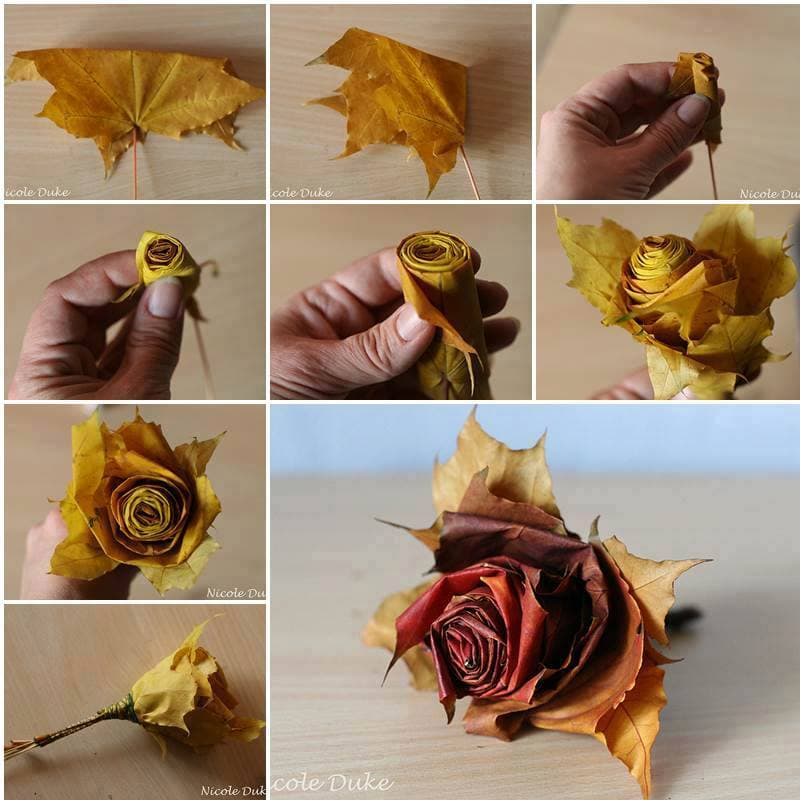
Photo tutorial c/o Nicole Duke – unfortunately I can’t find her to link you to her online.
Collect around 10-15 of the prettiest fall leaves you can find, ranging from small to large. I put the kids in charge of this. Starting with one of the smallest leaves, fold the “points” or tips of the leaves down, making sure the colorful side is on the outside.
Then, roll it from left to right into a tight tube, with the stem pointing down. Take your next leaf and do the same, but this time wrapping it around the first leaf. Repeat this over and over, wrapping looser with each leaf.
With your final 3-6 leaves, leave the points up and wrap them around the outside. Doesn’t it resemble a beautiful rose?
In addition to the fab blogs in the right sidebar, this was also linked up at Tatertots and Jello,Savvy Southern Style, Live, Laugh Rowe, Nap Time Creations The Turquoise Home.and The Scoop.
Looking for a last-minute Halloween costume, on a budget? Shop your closet and go as Liz Lemon of 30 Rock! Who cares that the show ended two years ago? Tina Fey is always in style. Plus, there are cheese puffs involved.
This one came a little naturally to me – I often get comments that I remind people of Tina Fey when I wear my glasses. Having spent half my life in corporate, I pretty much already have all the makings of a Liz Lemon wardrobe (for better or worse), but you can shop the look below.
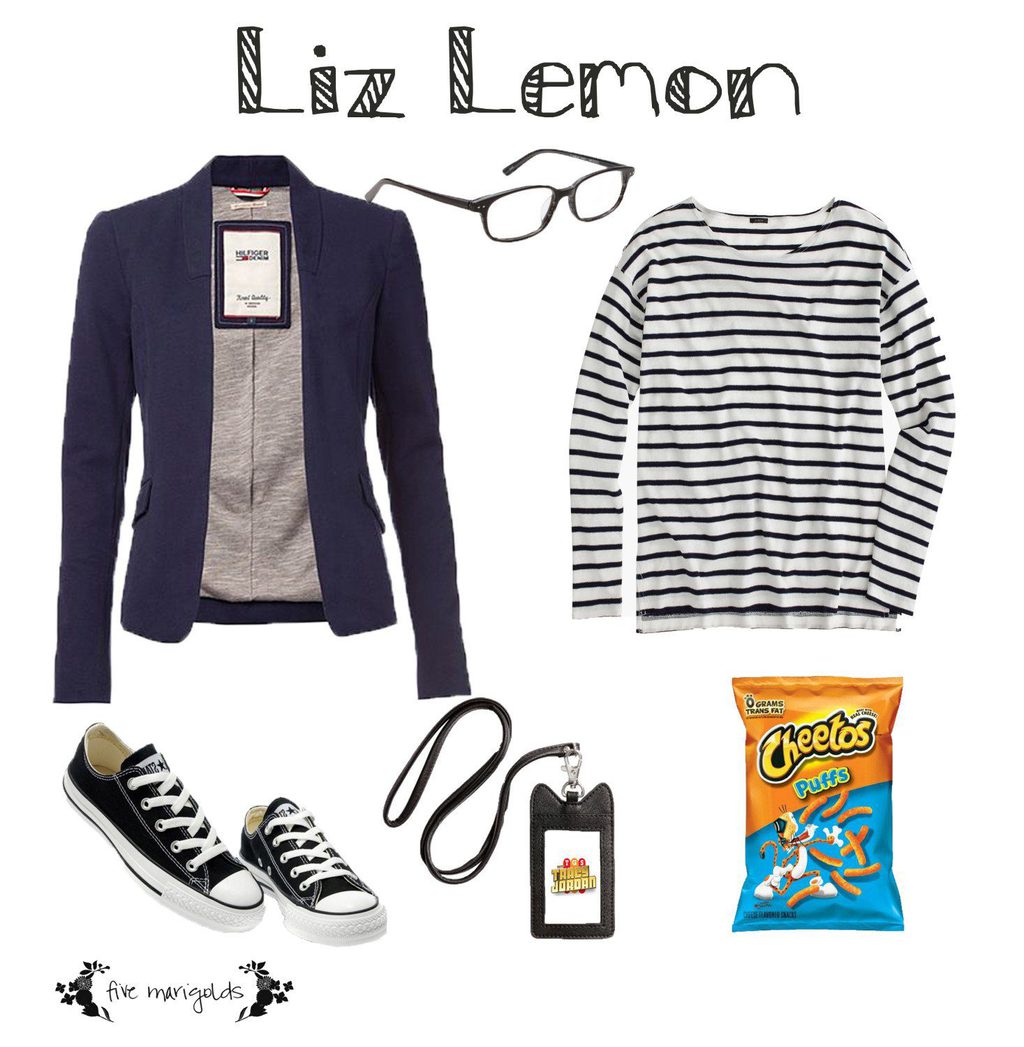
Shop the look:
Looking for more last minute and free Halloween Costumes? Check out my round-ups, here and here.

Confession: I had a bag of Cheese Puffs for this costume…but I ate them before I could take the picture. I am Liz Lemon.
Do you want some pumpkin decorating ideas that do not require you to carve them up first? I have the best no carve pumpkin decorating ideas the whole family will love!
At our home, we don’t really “do” spooky Halloween. We have fun, dress-up, and eat lots of sweets on Halloween. So this year, I thought it would be fun to make a pumpkin representing each member of our family that we could bring back out year after year – in addition to carving Jack-O-Lanterns in real pumpkins, of course.
For this pumpkin, you will need:
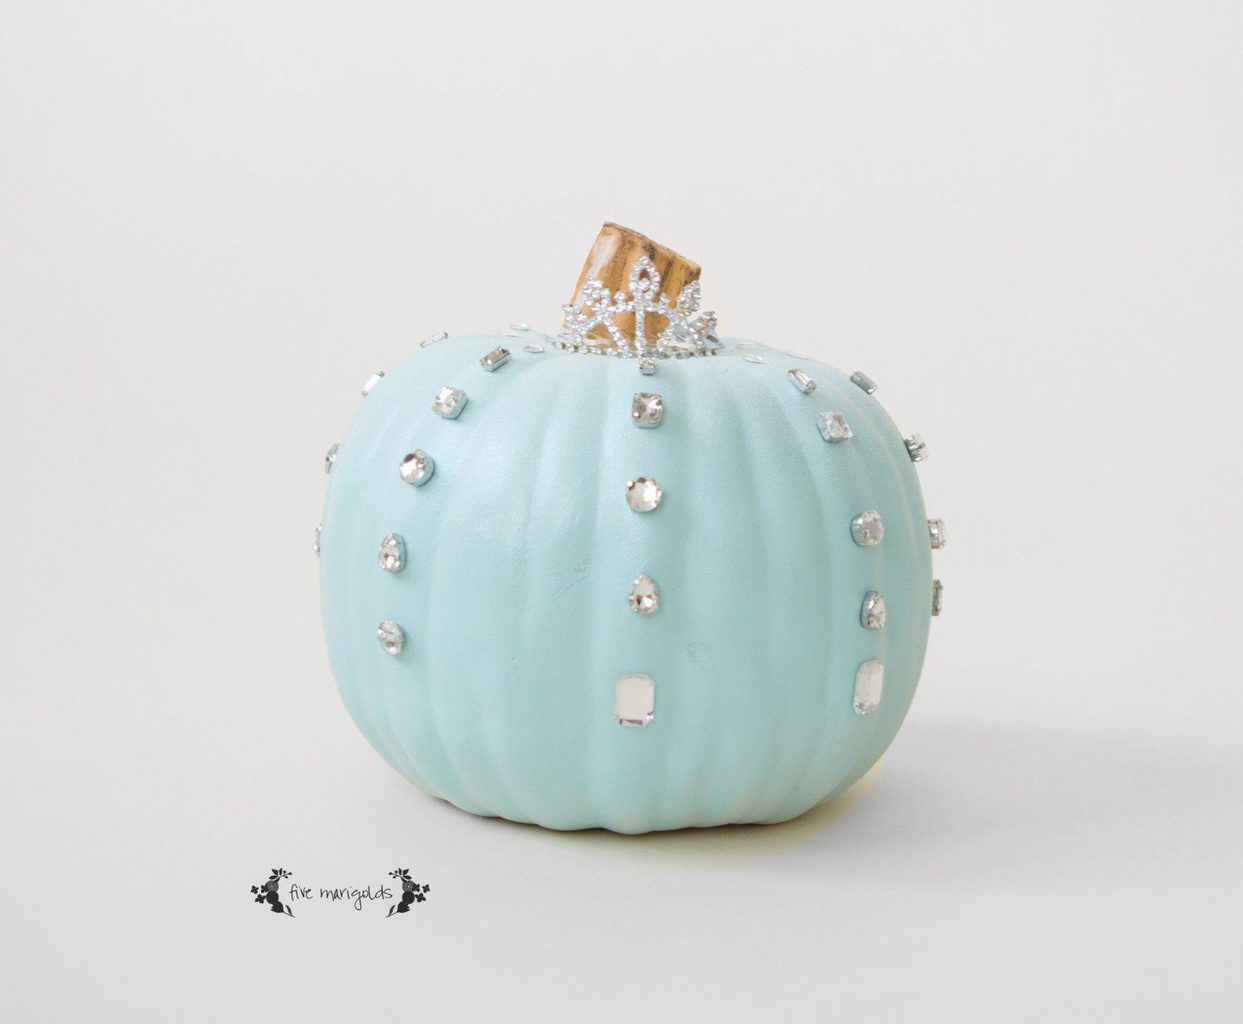
You will want to paint the pumpkin with the aqua matte spray, and allow it to dry.
Then, spray a light coat of the diamond dust spray, and allow it to dry.
To make it, I used Krylon aqua matte spray paint to painT a white craft pumpkin.
I then layered Krylon opulent opal glitter spray paint on top. I was super bummed with this though. It was gorgeous going on, but within moments it stopped working. I figured the glitter was clogging the nozzle and I tried multiple solutions to no avail. What a waste!
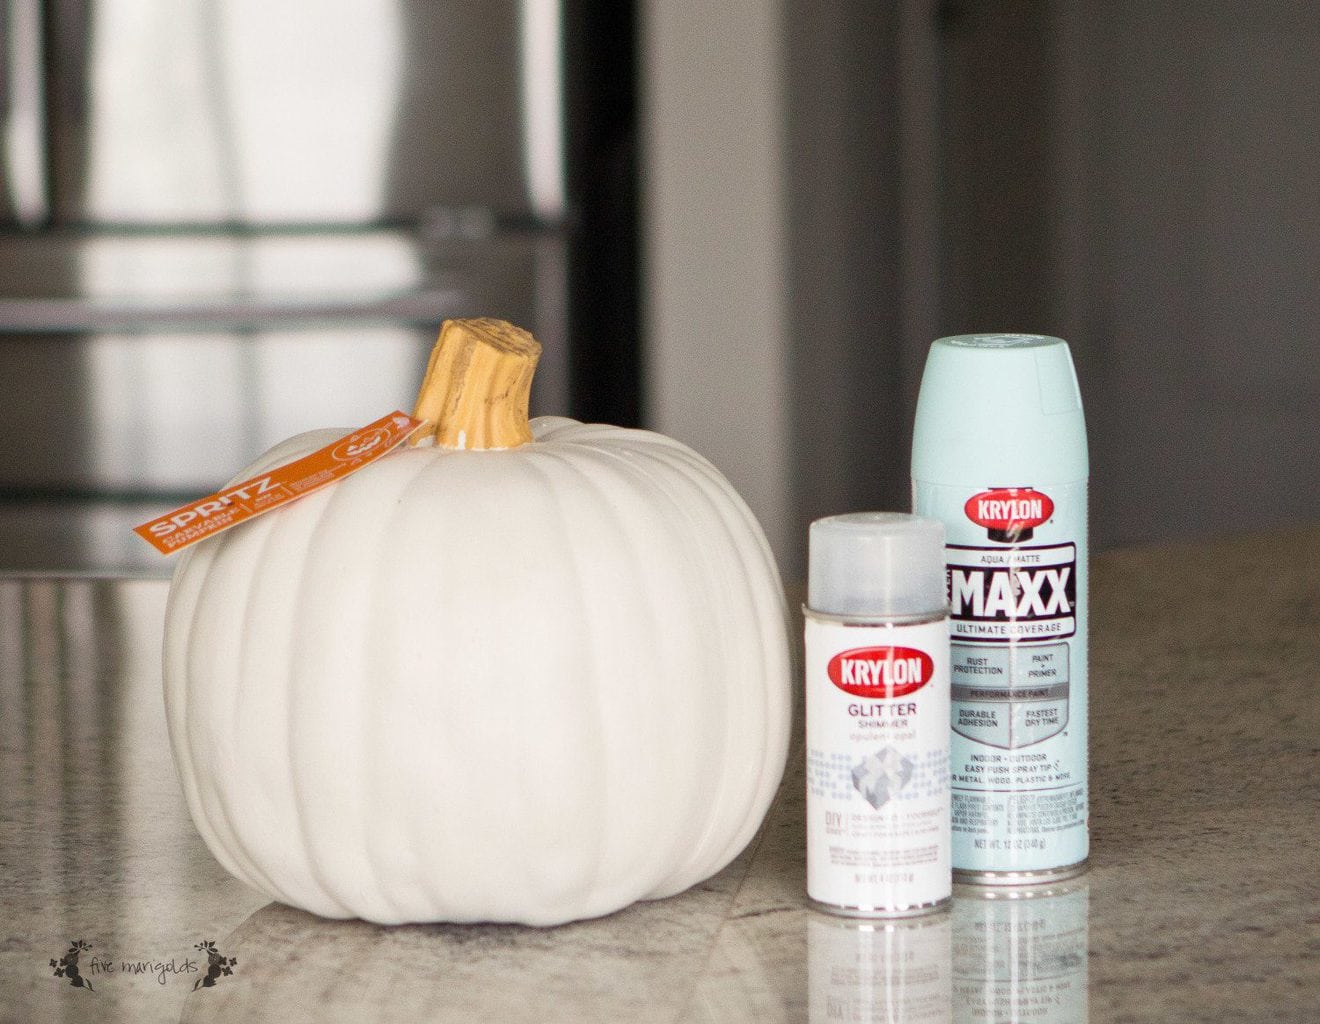
I went back and purchased Krylon glitter blast diamond dust spray paint. It was also beautiful and the can worked much better.
Once completely dry, decorate as desired with self-stick rhinestone gems. Top with a fun princess tiara, if desired.
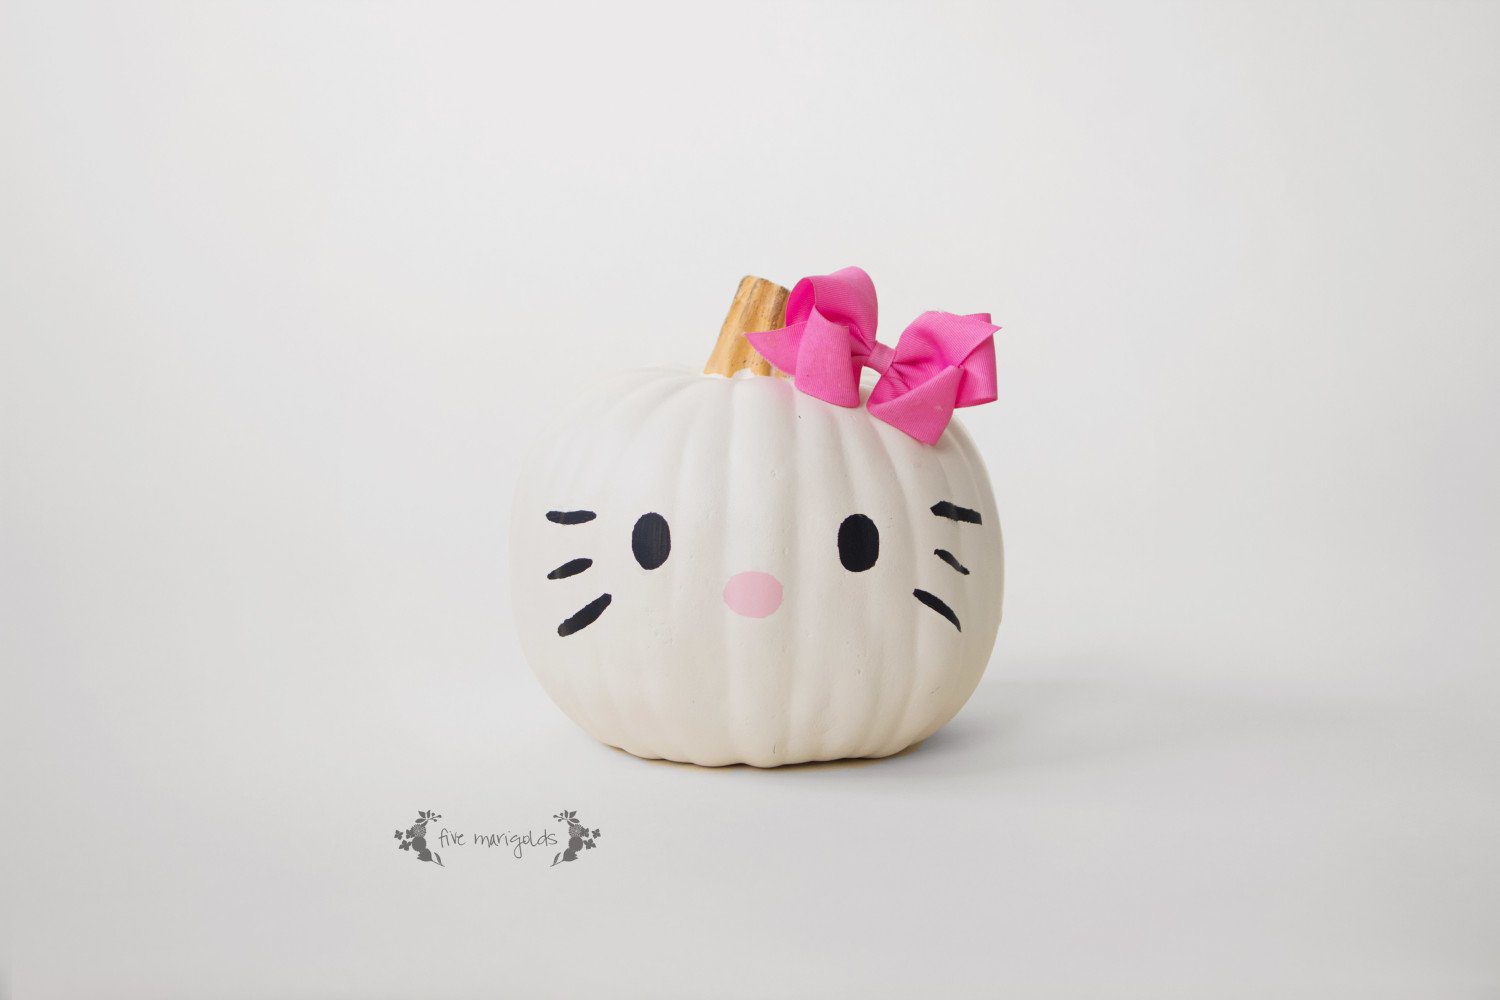
For this pumpkin, you will need:
Simply print out a Hello Kitty face on the printer, and place it over the clear contact paper as a stencil.
Paint the stencil in with the paint and allow it to dry. Add a fun hair bow to complete this look.
For this pumpkin you will need:
To make this painted pumpkin, cut out a square in the black craft pumpkin, and paint the inside green with the green spray paint. Print out the Creeper face, and place it over the contact paper to use as a stencil. Place the stencil inside the dry pumpkin and paint on the Creeper face with the black acrylic paint.

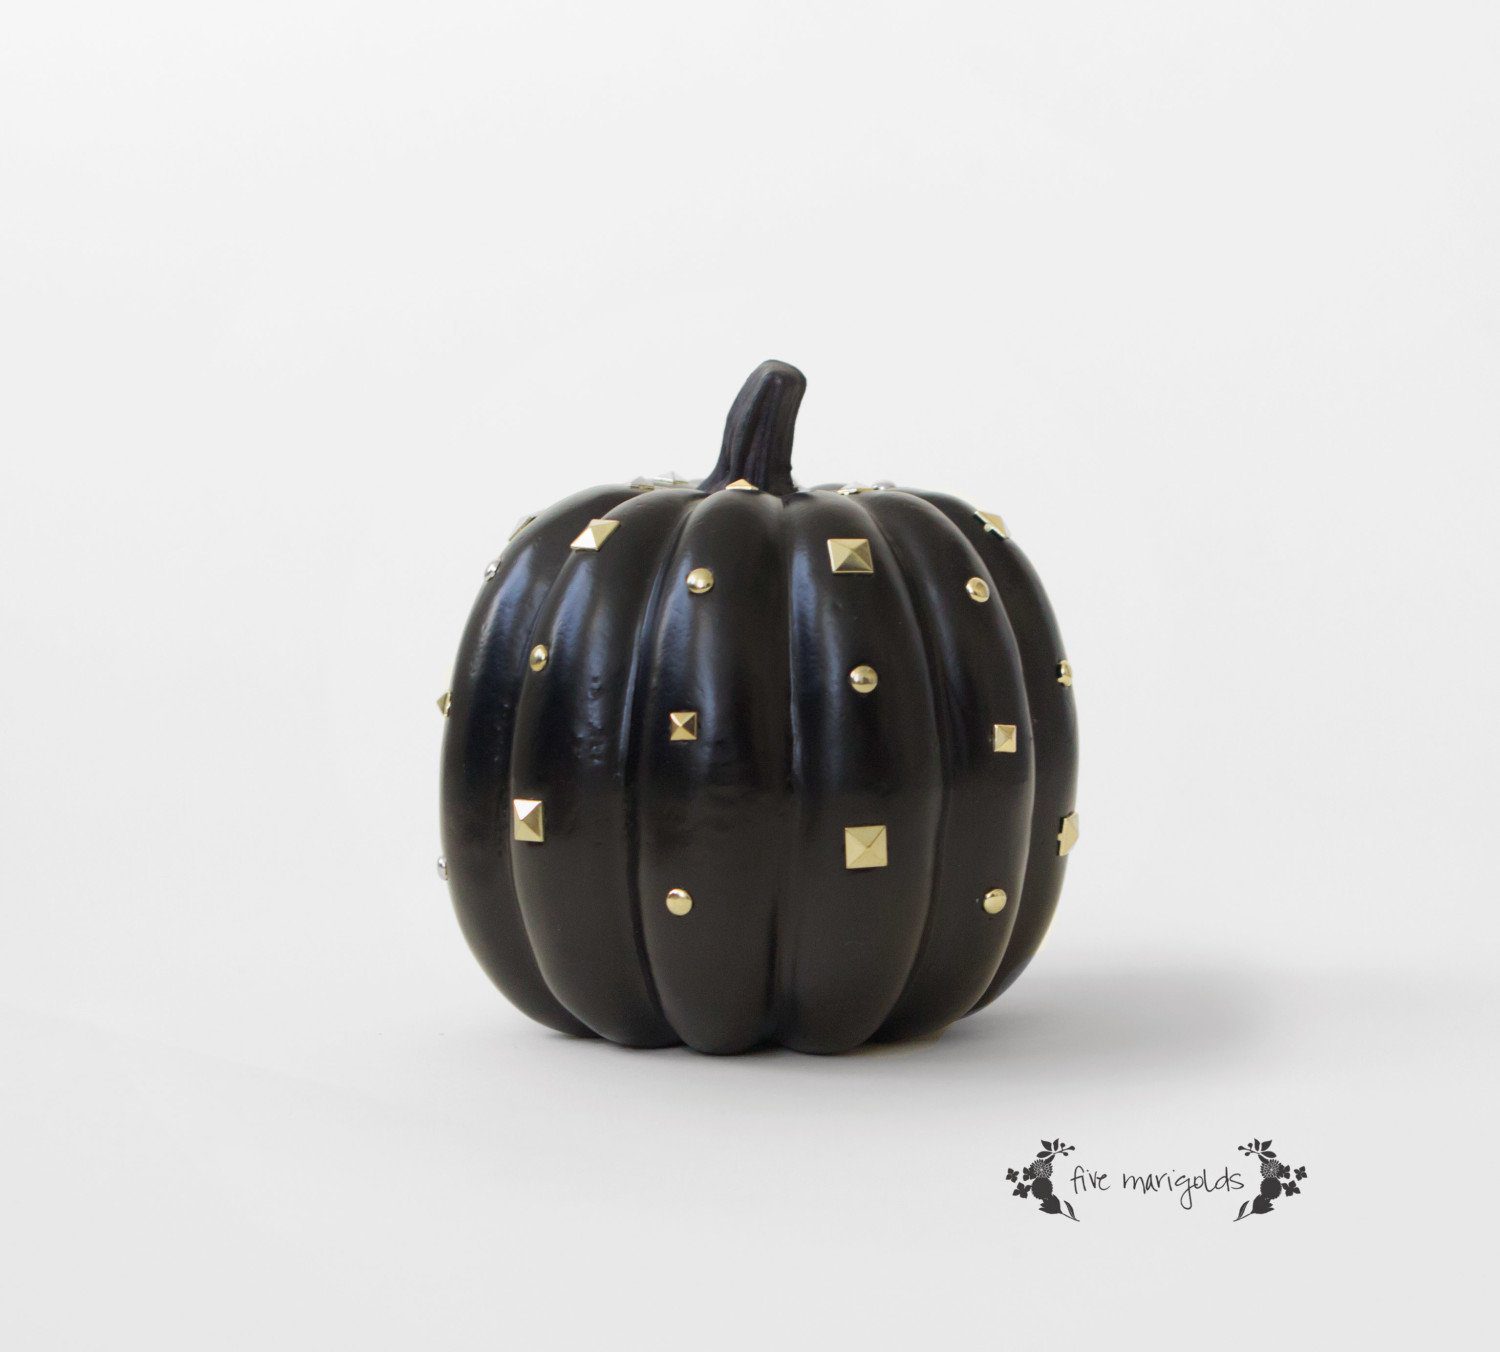
For my pumpkin, I just picked up this black studded pumpkin from JoAnn’s I just love it!
For my husband, well…

He’s a long-suffering Chicago Bears fan (as am I). Da Bears!
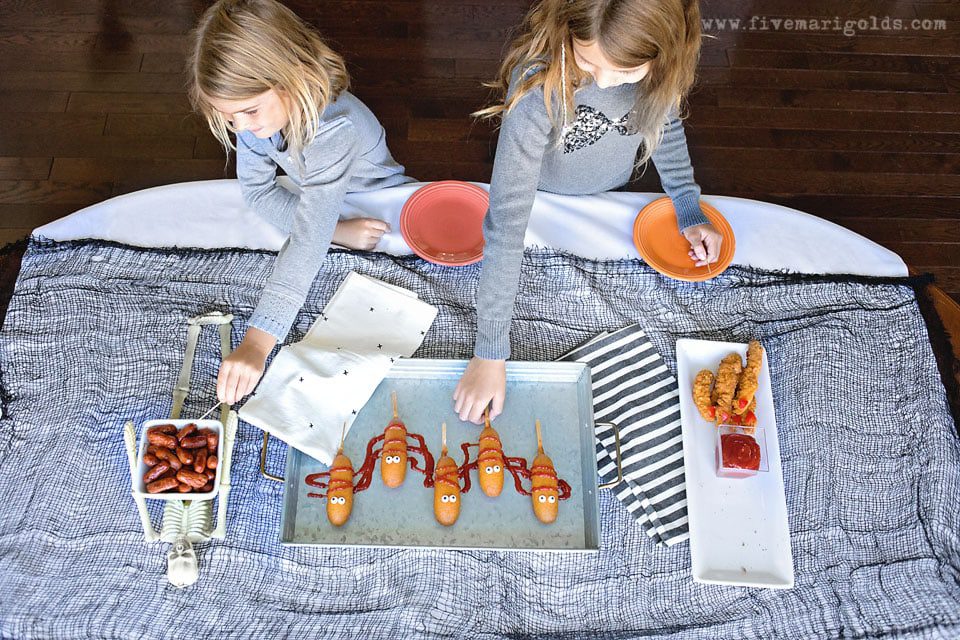
What do you think of our no-carve Family Halloween Pumpkins? Looking for more easy Halloween ideas? Check out my Lazy Mom’s Guide to a Halloween theme dinner.
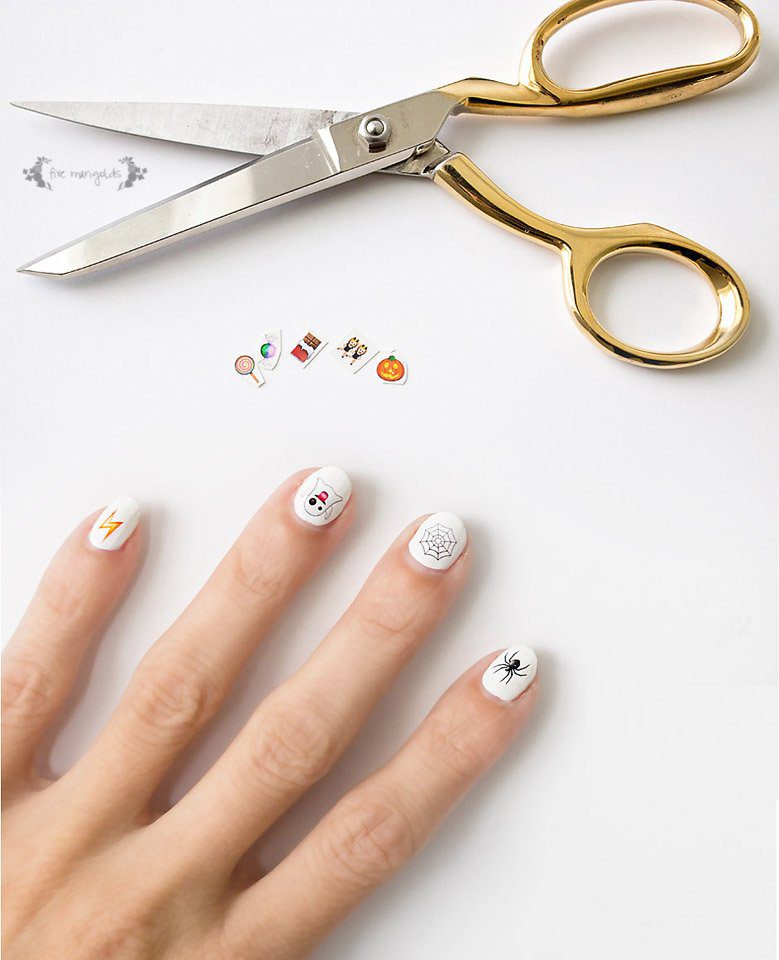
Then, check out my free printable Halloween emoji nail decals here.
Looking for last-minute Halloween Costumes? Look no further than this inspiration for shopping your kids’ closets for these super cute looks!
Star Wars Jedi Luke Skywalker: All it takes is a Karate uniform top, a bathrobe or bed sheet (or you can buy a Jedi cape inexpensively here), some khakis and a pair of boots – and a blue light saber, of course. Here is how I envisioned the costume:
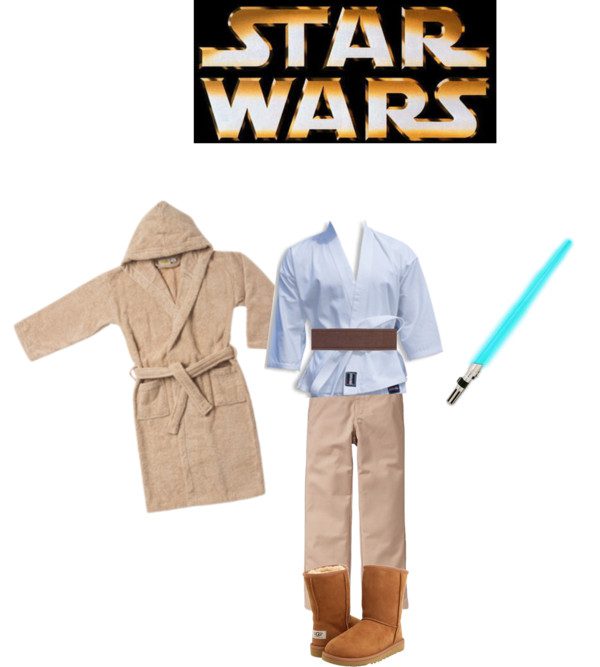
Shop your kids’ closets for Halloween – Star Wars Jedi Luke Skywalker| Five Marigolds
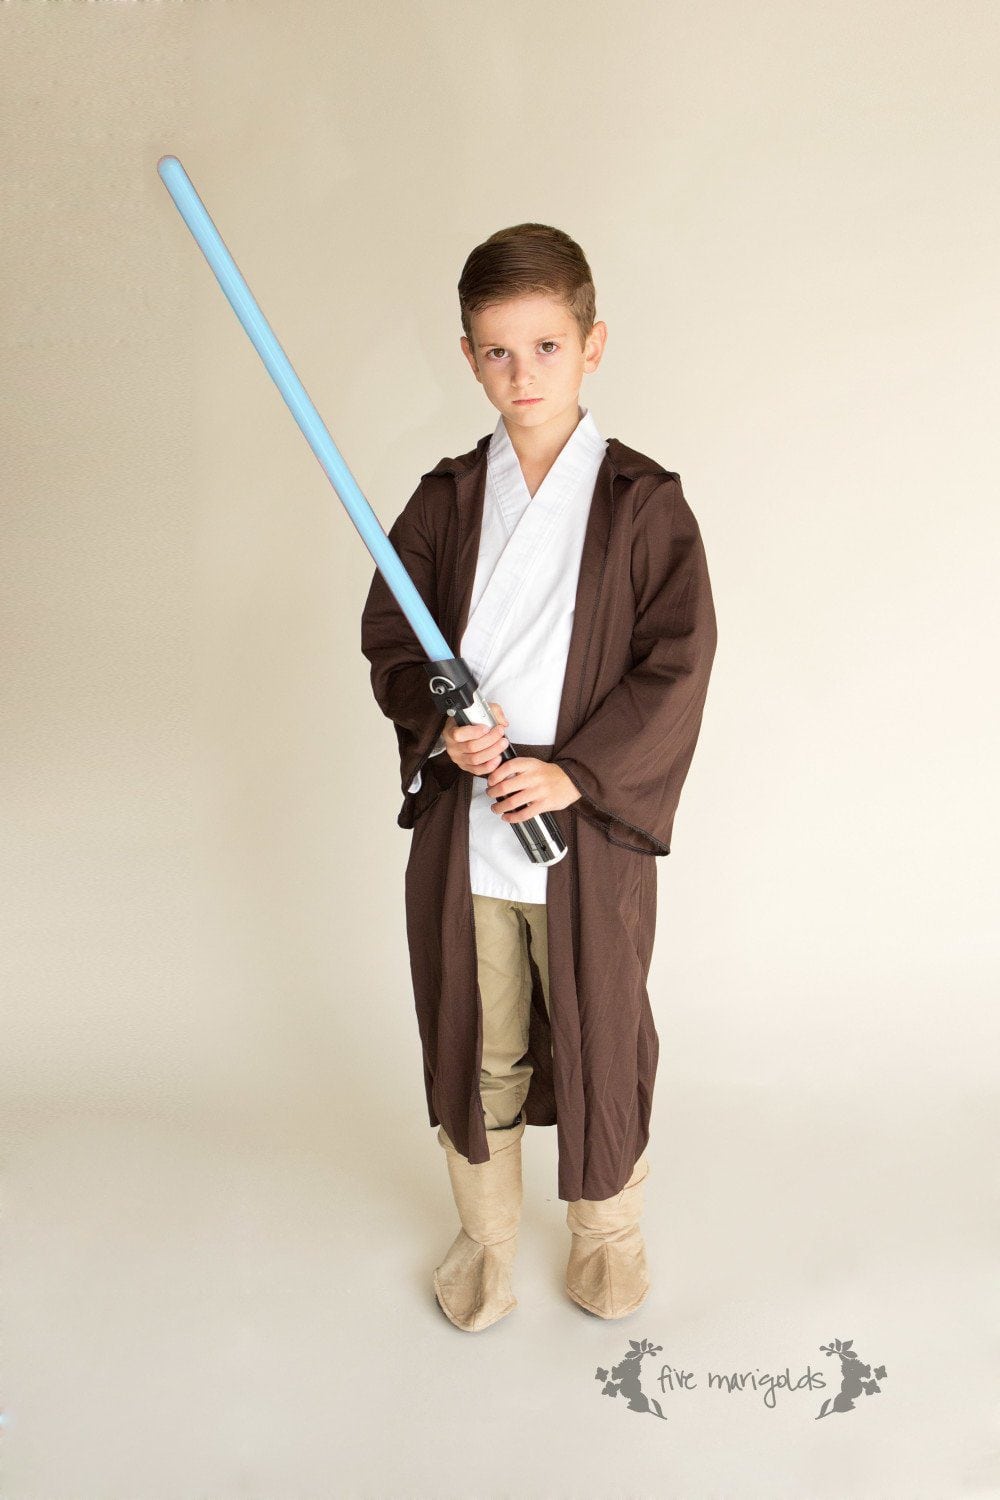
And here’s how it looked on Dub.
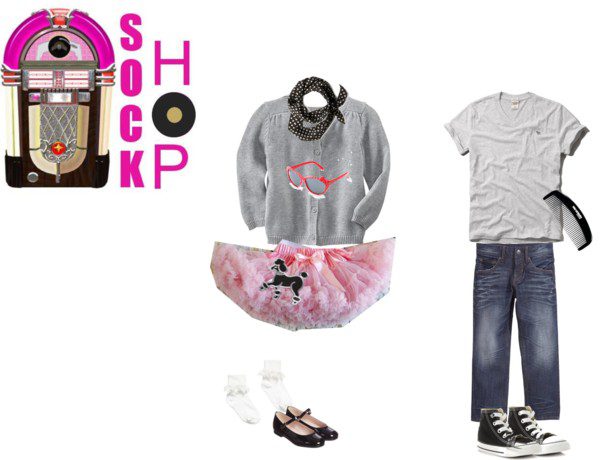
Sock Hop – I love this look for a brother and sister! The boy look is super easy, of course. For the girls, I paired a pink tutu pettiskirt with a cardigan, scarf and some black Mary Janes. Either cut out your own “poodle’ or grab a really inexpensive one online. Add some cute glasses for a final touch!
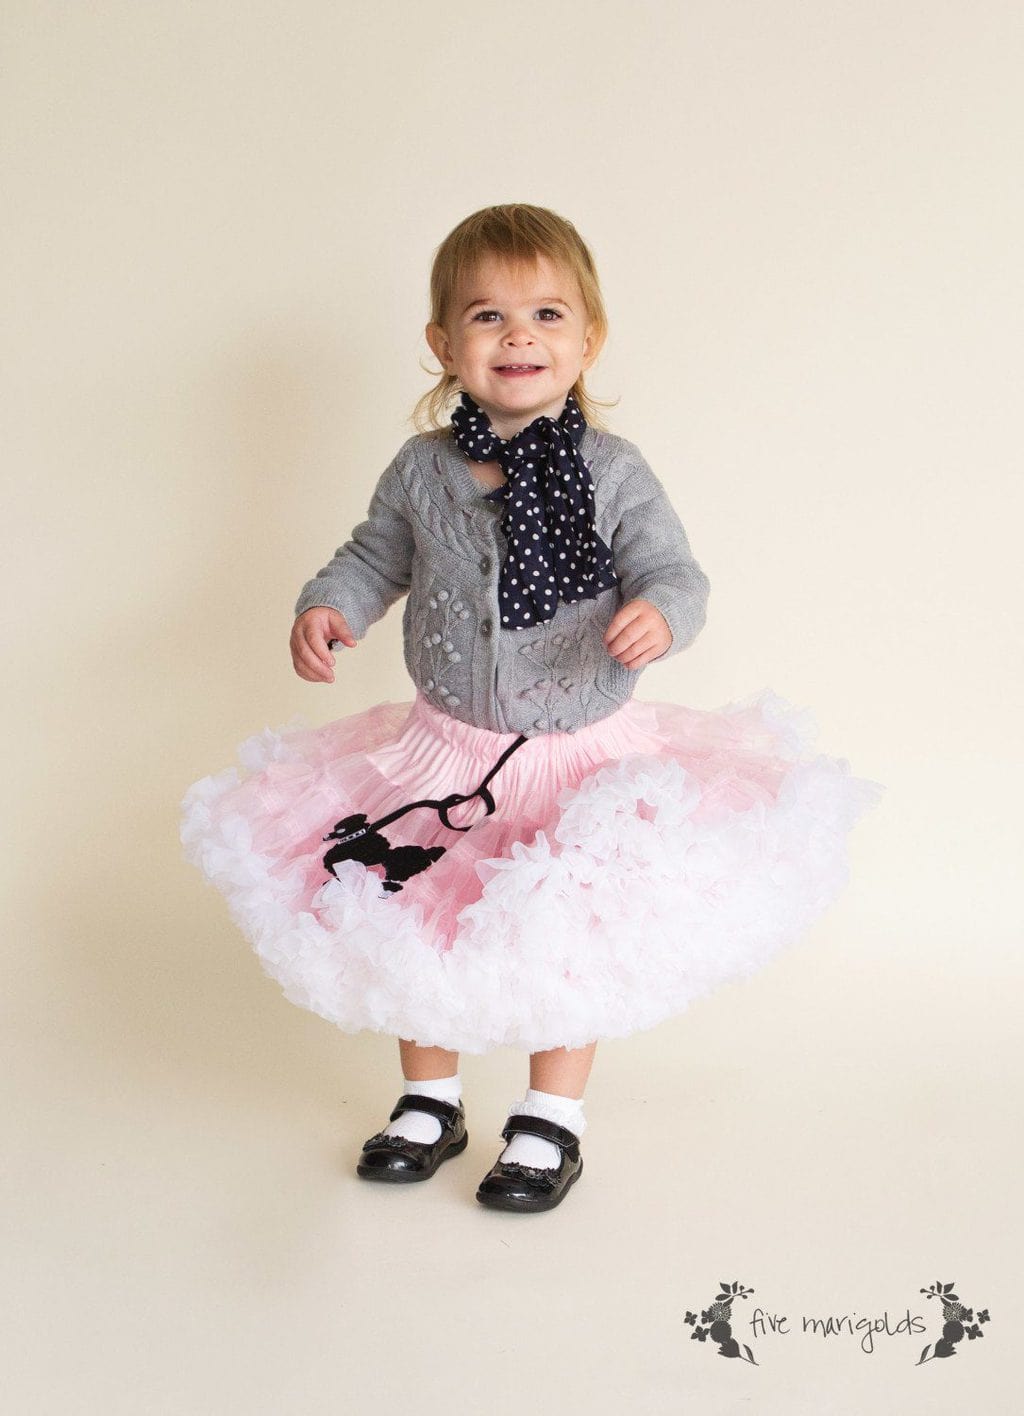
Here’s how it looked on my little one (Yeah…that was before her hair was done, but the only happy look I got. Toddlers!):
Baby Jazzerciser: This goes down as my favorite costume yet and it’s super easy. Just pair a baby onesie with a bright cut-up onesie, legings or tights, some baby legwarmers or Baby Legs (or cut up some old socks) and use a knit baby headband for, well, the headband. I actually cut the elastic tops off of some baby socks for the little baby wristbands! My mother sewed an adorable boom box to complete the look. You can get something similar here or here.
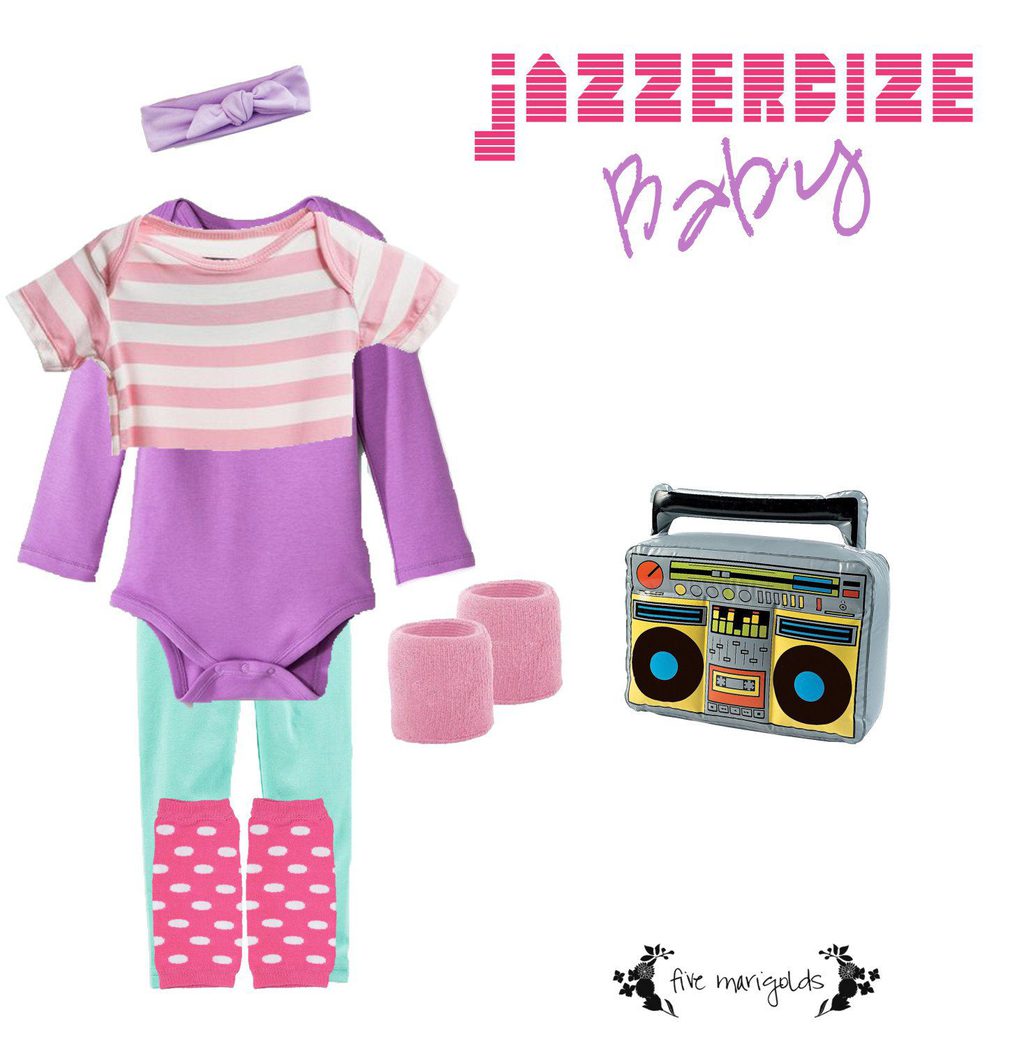
Here’s how my little one rocked it:

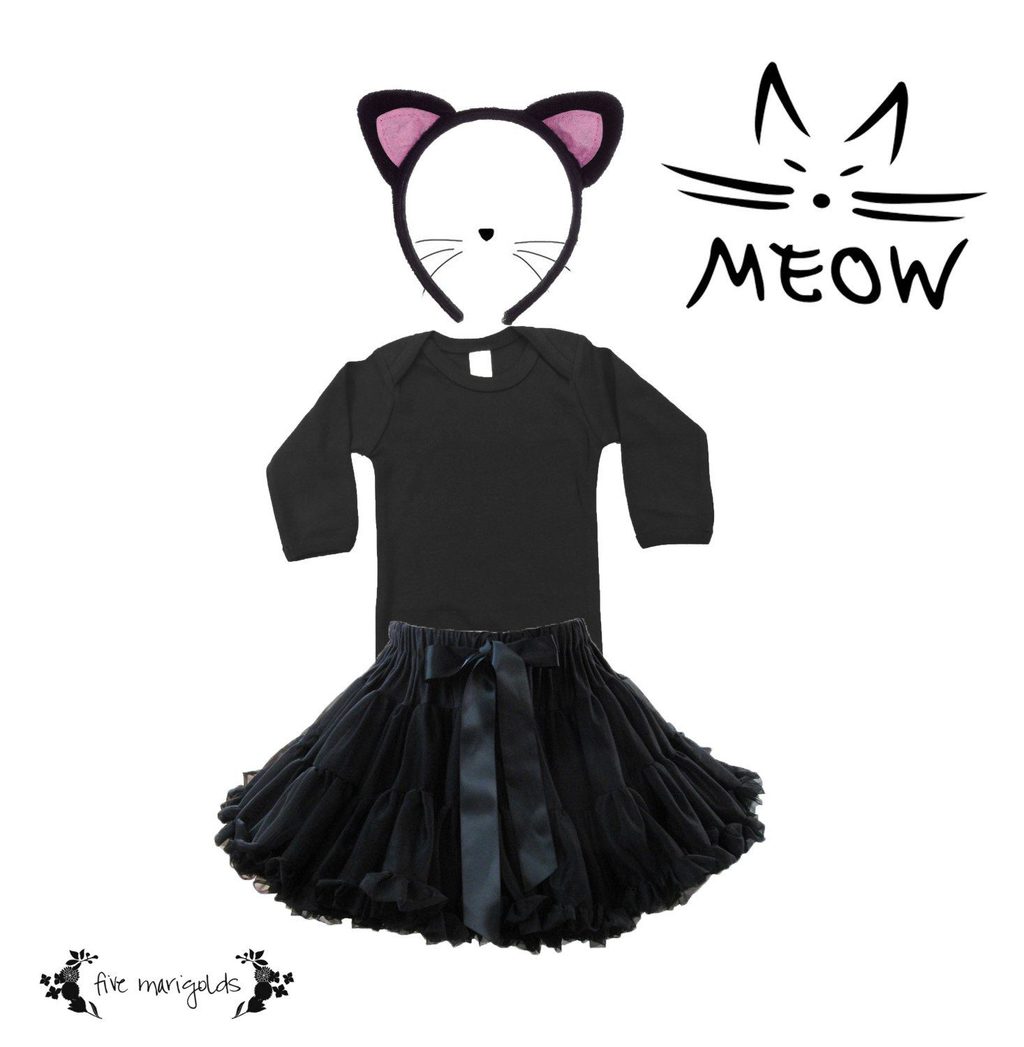
Baby Kitty Cat: This one can’t get any easier. Combine a black baby onesie with black leggings or tights, and maybe a cute matching fur vest or black tutu pettiskirt, and you’ve got yourself a kitty cat! Add the finishing touches of a black nose and whiskers using eyeliner, and don’t forget the kitty ears! You can currently buy kitty ears headbands at the Target Dollar Spot, online here, or you can make them on your own. Use a thin feather boa from the dress up pile, and cut it up to make “fur” wrist cuffs and use as the tail.
Pink Poodle: Similar to the black cat costume above, this costume starts with a pink leotard and tutu. I completed the look with a DIY Poodle Headband and faux fur cuffs.

Shop this look: Pink top or leotard, tights, tutu pettiskirt, ballet slippers

Note: This post was originally published in 2013, but due to the continued traffic and interest each season, I’m reposting it with updated shopping links. Enjoy!
Looking for last-minute Halloween costume ideas? Here are 5 inexpensive DIY Halloween costumes you can shop your own closet for. Or, follow the links to shop these looks for yourself!
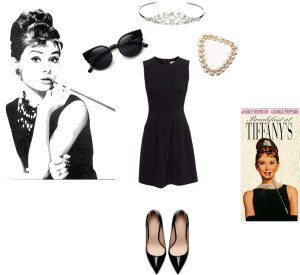
Holly Golightly – Breakfast at Tiffany’s
Or here are a couple inspired by some great television shows:
Liz Lemon (Tina Fey) in 30 Rock

Couple Costume: Sheldon and Amy from The Big Bang Theory

I think my favorite is the “Shamy” couple costume from one of my favorite shows, “The Big Bang Theory.” Which is your favorite?
This week we finally finished my vision for lights and feature art above Dub’s bed.

Ever since I’d planned my first born daughter’s nursery 7 years ago, I had a vision for adding vintage Barbie prints to the room that they could grow with.
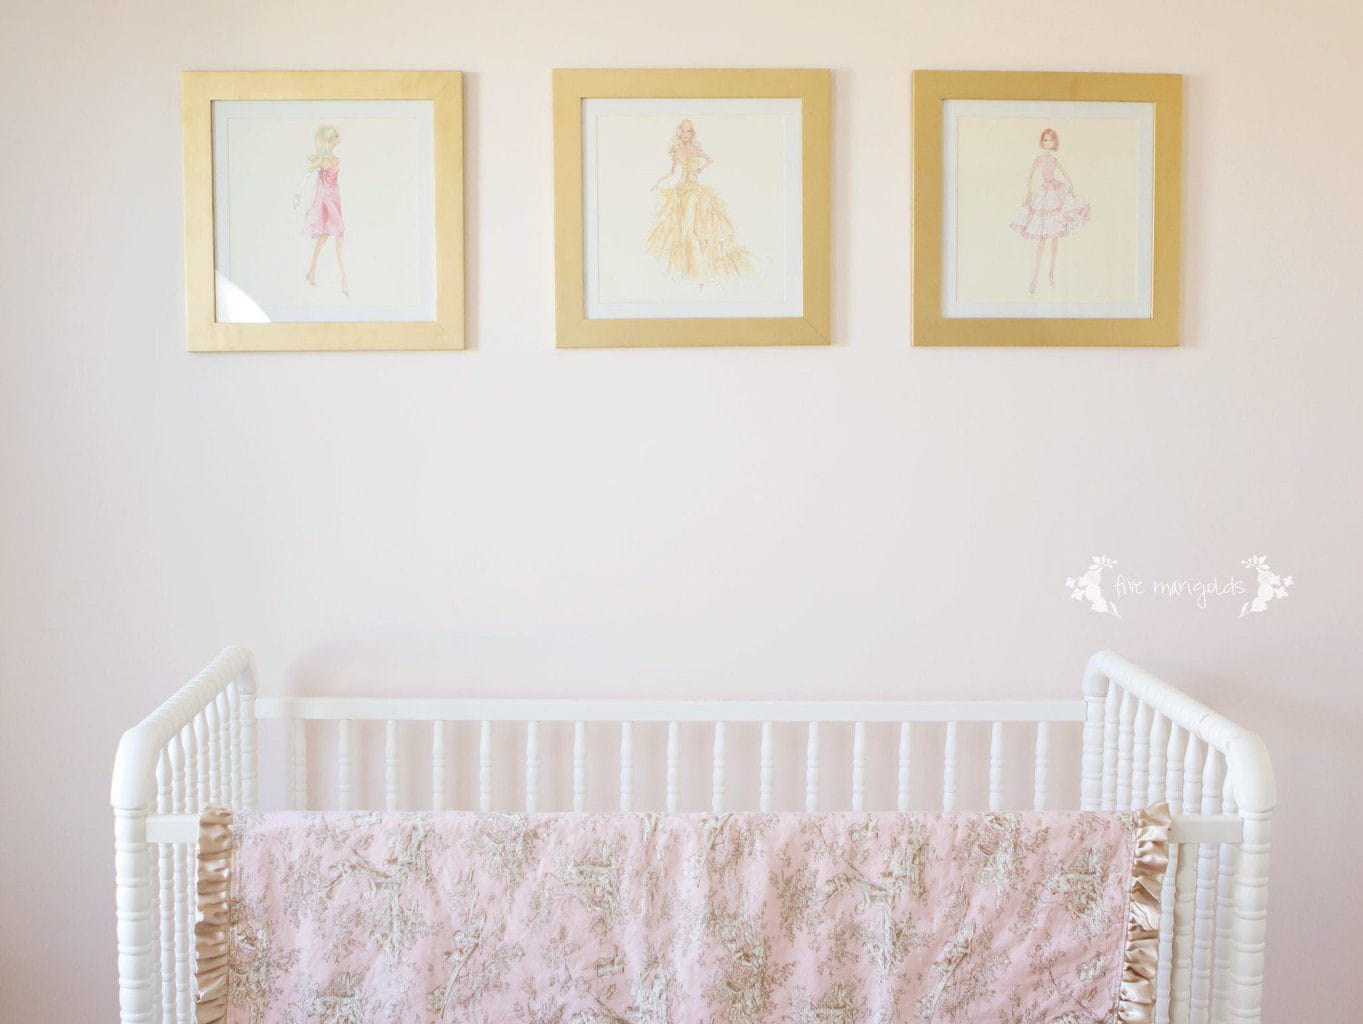
My inspiration came from places like Posh Tots, Rosenberry Rooms, and other upscale design stores who were selling the framed prints for upwards of $135 each.
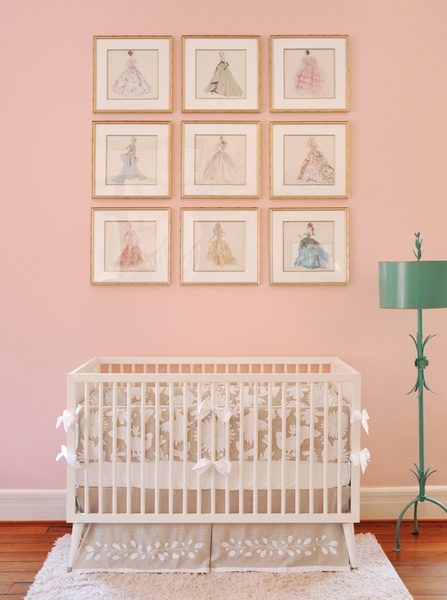
Source www.rosenberryrooms.com
Fast-forward to this year. In the process of moving I realized we had four matted square frames that we’d never used! I think it was one of those things that I thought my husband had returned, and he thought I’d returned. Regardless, it was a sweet score that inspired me to revive this decor idea as we began decorating the kids’ new rooms. This time, I found a way to create this art on the cheap. I scoured Amazon for used vintage print Barbie calendars, and found that there are usually at least two 12×12 calendars available for a reasonable price. I believe I bought mine for around $10.
I spray painted my black frames with Rust-Oleum Metallic spray paint I had on hand (love this stuff), inserted my favorite prints, and voila! Vintage Barbie art for less than $15.
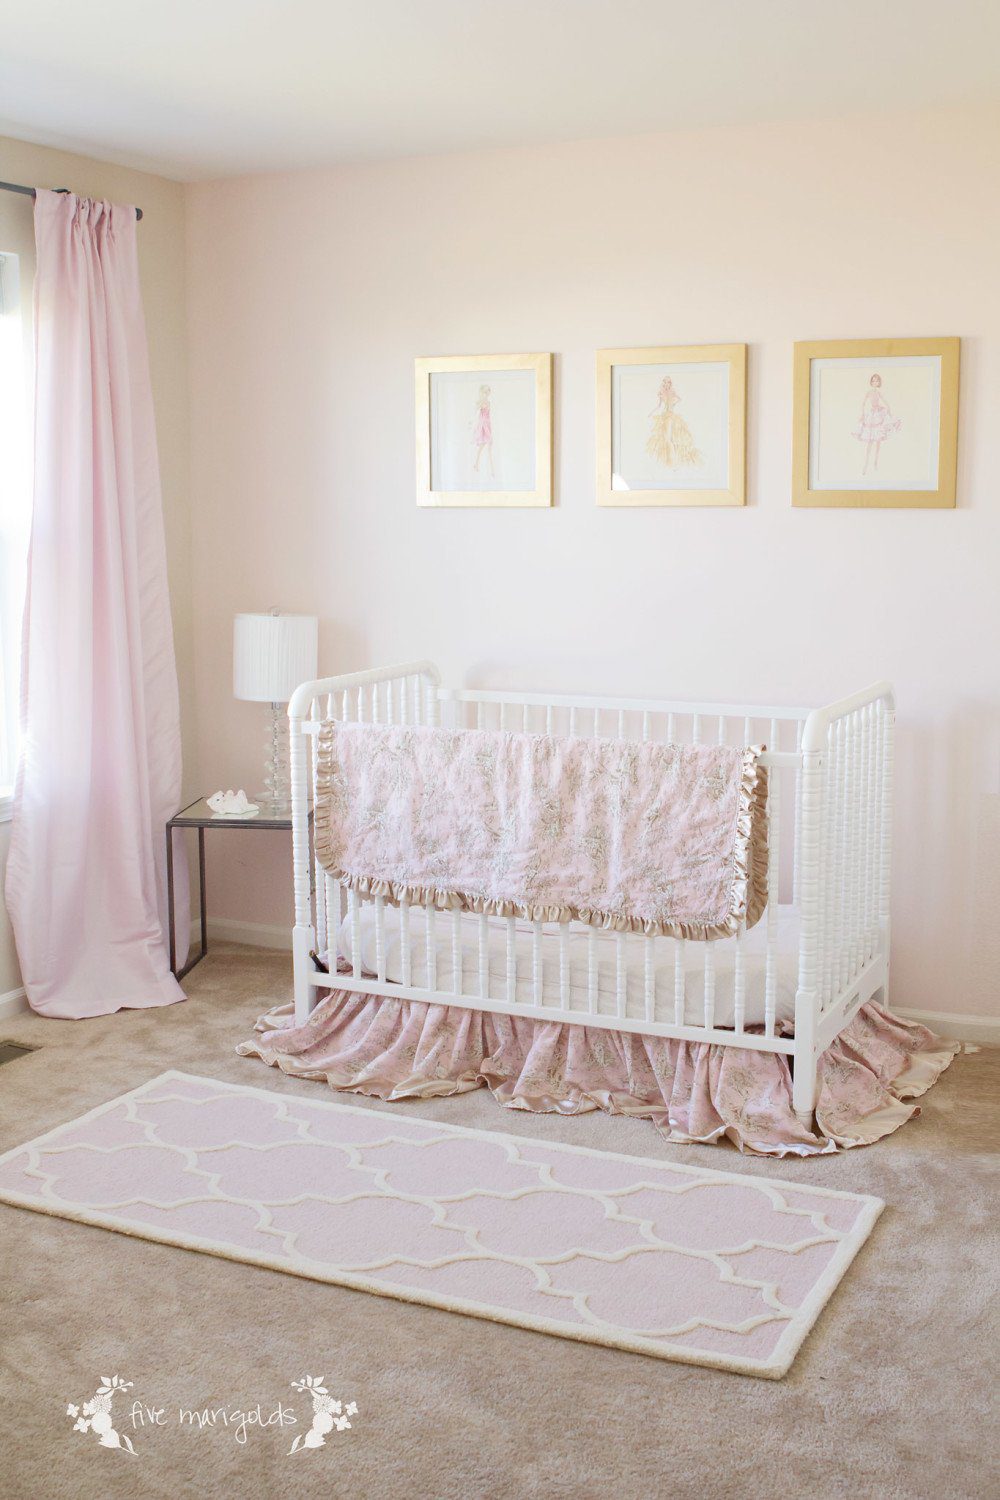
I love the look of three frames above the crib, but I’m debating adding the fourth and making it a square formation when Belle moves to a big girl bed. What do you think?
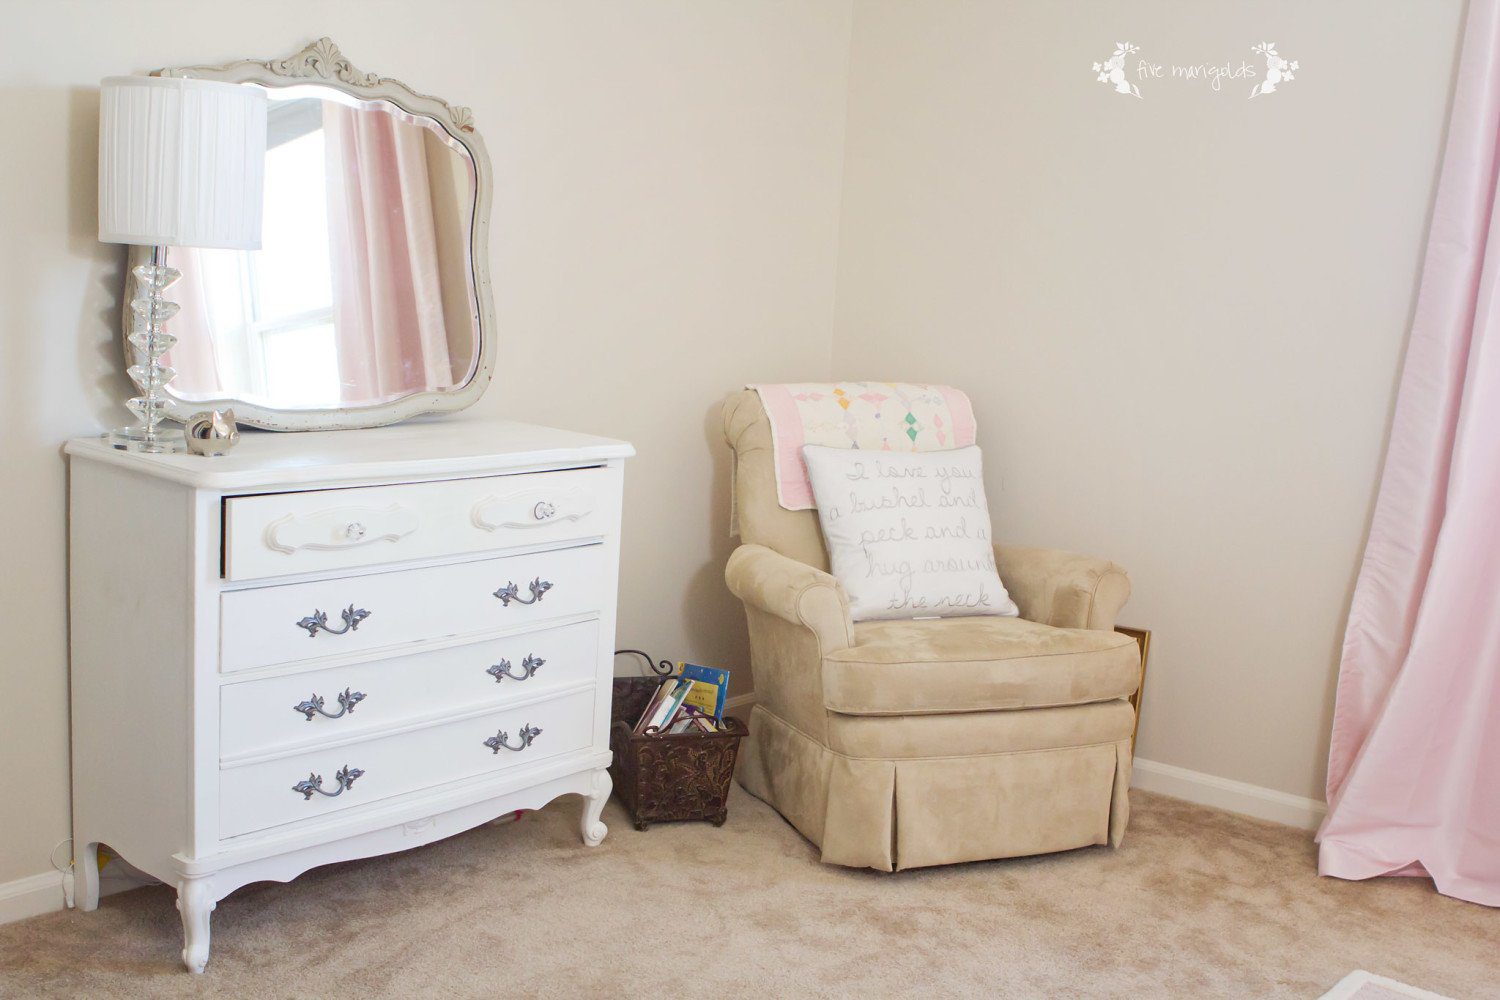
As for the rest of the room…

It’s needs some love. I have big plans, but I’m taking my time.
Details:
I recently tried to convince my husband to paint an entire wall of our dining area with black chalkboard paint. He didn’t quite have the same vision I had, so he asked me to hang a chalkboard until we could come to an agreement.
I agreed. After all, I’ve had a giant frame in storage that’s been waiting to be used for years. I bought it at a garage sale for around $10 which was a steal…but how do you fill such a large frame without spending a fortune? The chalkboard was the perfect solution.
If I hadn’t already had the frame, what I really would have wanted is a rustic wood frame. However, since this was likely temporary, I wanted to make this as easy and inexpensive as possible.
The problem: the frame was gold. Really gold. I debated on what to paint it. Silver? Weathered white? Blue? I haven’t committed to a color scheme in our new home yet, so I went with a safe, muted silver. I spray painted it with Krylon Brushed Metallic paint. I had planned to rub wax or wood stain to bring out the details, but I didn’t love that effect on the test areas so I just left it silver for now.
For the actual chalkboard, we bought a piece of thin plywood and I sanded it with a hand sander until it was really smooth. After cleaning it with a lint-free cloth, I painted four thin coats of Rust-Oleum Chalk Paint in black, using a foam roller. I sanded lightly between layers when necessary and removed all the dust with a lint-free cloth. When the paint was completely dry, I rubbed entire board with a large piece of sidewalk chalk to cure it, and then rubbed it with a lint-free cloth to erase it.
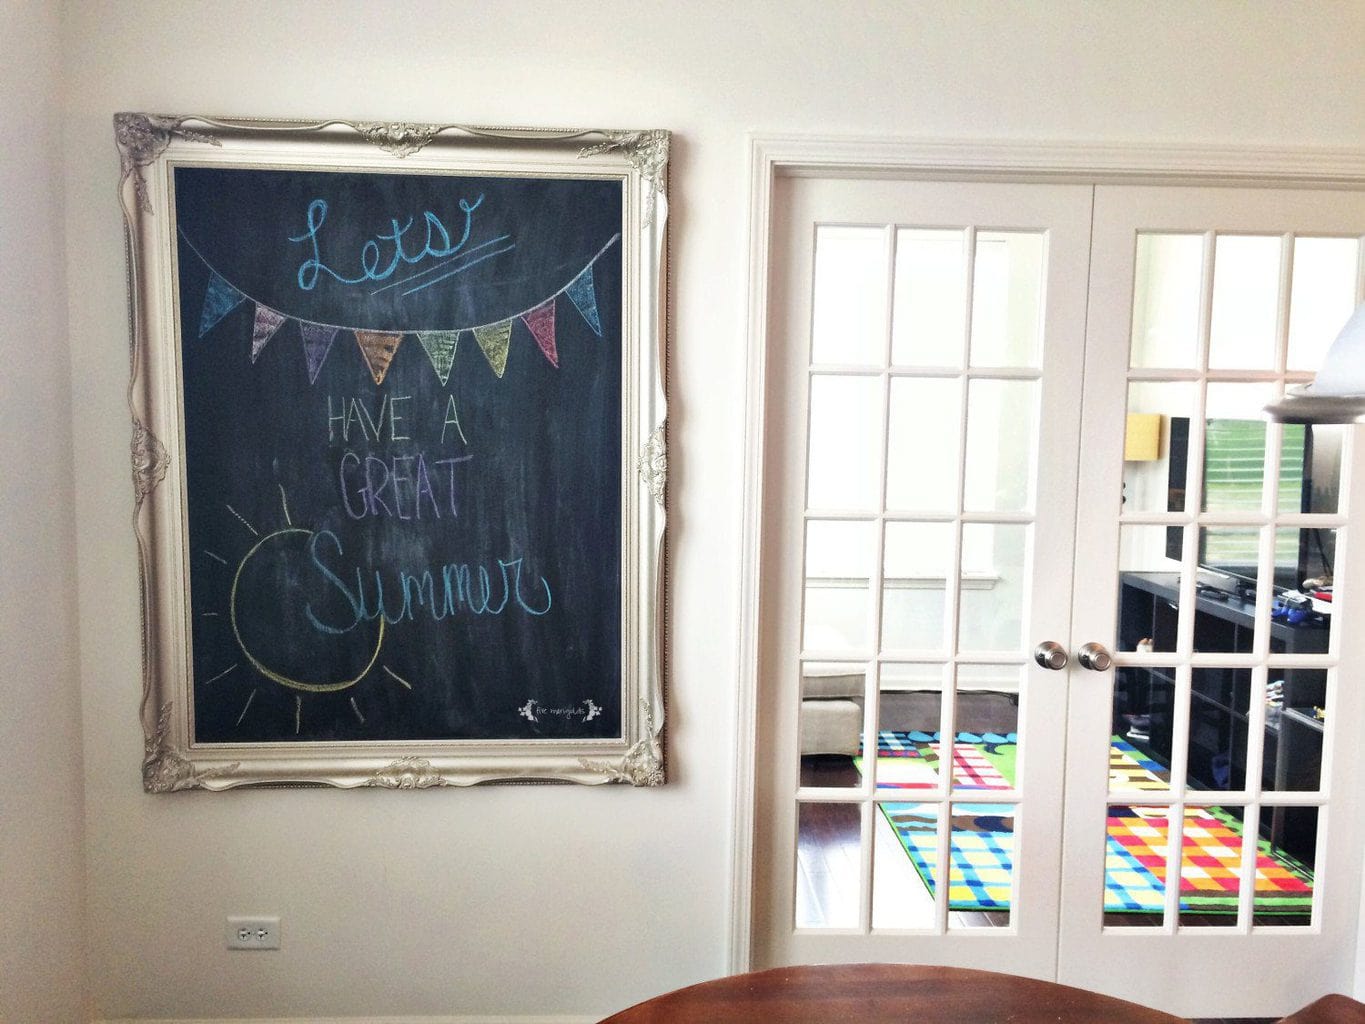
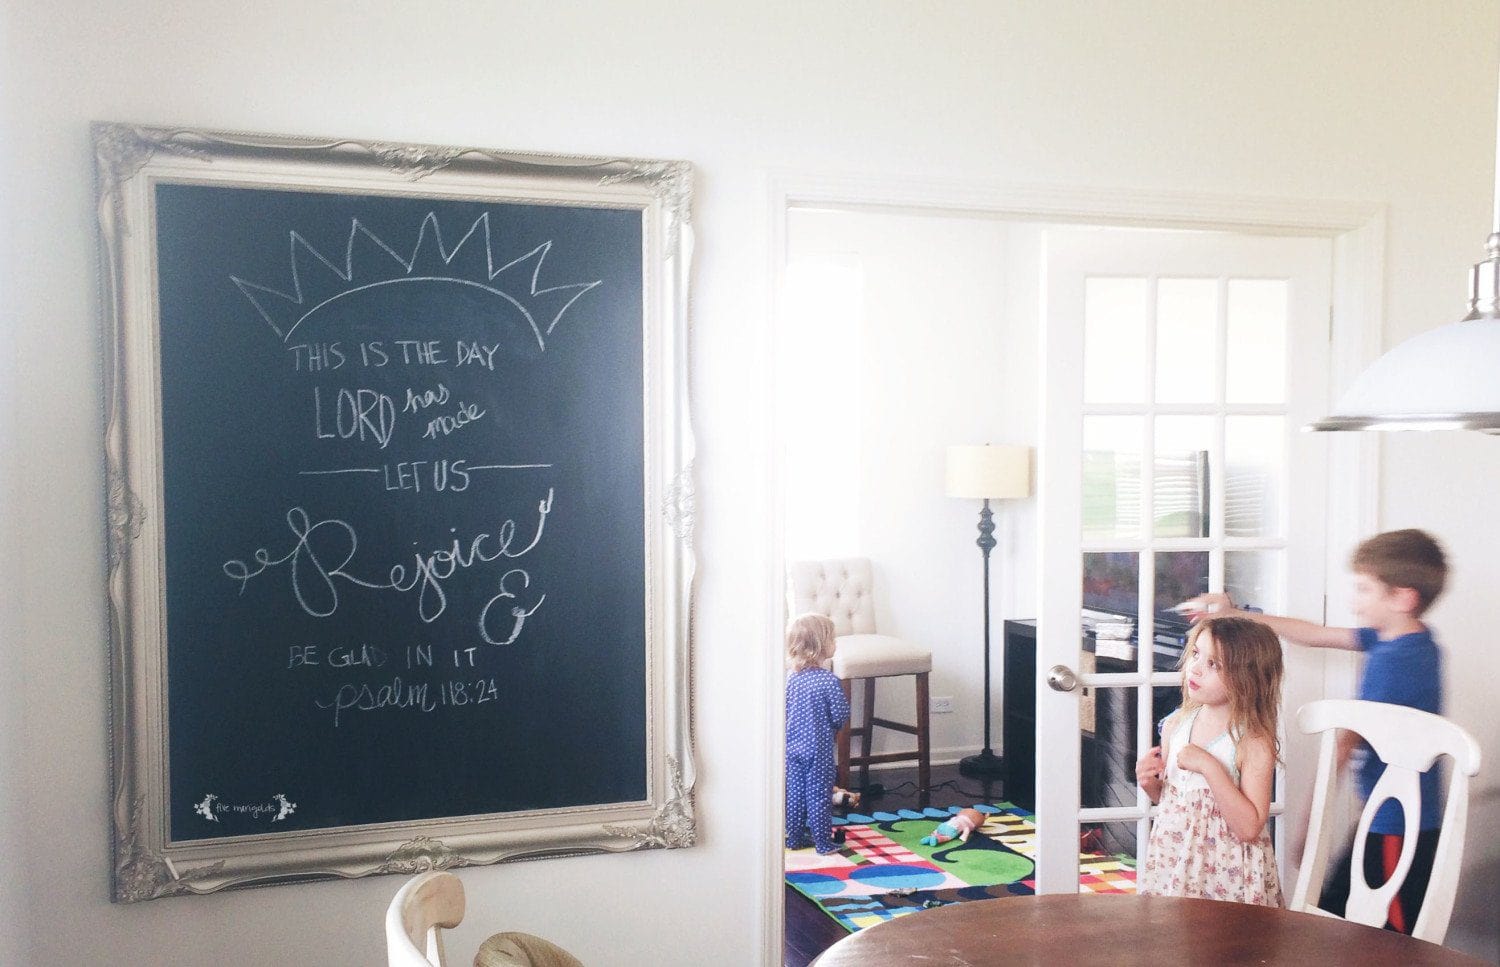
You can wipe it clean with a damp cloth for a clean crisp look, or with a dry cloth, which I prefer, for a true, messy chalkboard look.
So far, our family loves this addition to our home. We post fun quotes and verses, and the children love to use it for creating their own art, as well.


In addition to being shared on the fabulous blogs to the right, this post was also shared on Stone Gable Blog.
*Please read my affiliate disclaimer on the right sidebar. Thank you for your support!