Felt Christmas Tree Advent Calendar

Years ago I hand sewed a Christmas Tree Advent Calendar, which has become such a sweet tradition for our family. Ever since I was a young child, I absolutely loved Advent Calendars – usually the perforated paper variety in our home – to count down the days until Christmas. The anticipation was overwhelming each year.

I wanted to have that same tradition in our family – and I wanted to create something we could use year after year. I stumbled across this sweet calendar by Stitch Craft Creations. I fell madly in love with this idea and got to work, using her calendar as my guide. Felt Christmas Tree Advent Calendar | Five Marigolds

Continue reading

Vintage Doll House Makeover: Part I

Update: Please visit my updates to this vintage dollhouse makeover series here:

Vintage Dollhouse Makeover Part II ExteriorPart III Boy’s Room, Part IV Girl’s RoomPart V Laundry / BathroomPart VI Living Room

This summer I picked up this vintage doll house from the thrift store for a few dollars. I can’t explain why I picked it up, but I was thrilled with the find. So, what to do with a 1940’s era doll house in disrepair? I originally had delusions of restoring it, because it certainly had charm. However, once I started trying to do some touch ups I was faced with the reality that this baby needed a complete overhaul.

Here’s how it looked when I brought it home.

Vintage Doll House Makeover Before | Five Marigolds Continue reading

Free Printable Letter Writing Templates for Grandma, Pen Pal

Family is important to us and we live a little too far from the kids’ grandparents for our taste. Now that both Dub and Eve are writing I want to encourage them to work on their letter writing and communication skills via snail mail. To help them (and your little writers), we use letter writing templates for kids.

Letter to Grandma Printable Templates | Five Marigolds

Letter Writing Templates

I’ve searched high and low for letter writing templates that will work for young writers and have struggled to find a template with prompts that are appropriate for casual letter writing.

Many are specific to summer break (we love this one, especially for non-writers), summer camps and travel which is great but doesn’t work year round.

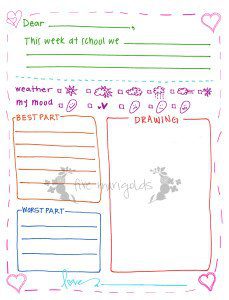
So, I created these letter templates that I’m really happy with.

The friendly letter template includes writing prompts that cover the things we talk about at home at the end of each day: what they’re learning at school, their feelings at the moment, and the best and worst part of their days.

I also added a “weather today” section, just for fun, and an area for them to just draw, which is their favorite part.

With different writing prompts the kids don’t feel like they are writing the same letter again and again.

You can find our letter writing templates for kids below. 

Letter to Grandma Printable Template Girl | Five Marigolds

More Letter Writing Ideas

Grandparents, aunts, uncles and cousins are the obvious first choices when thinking about who your kids should write letters to but don’t forget about friends that live close by.

Start a neighborhood pen pal program when your kids are preschoolers. It was so great for them to have friends their own age in the neighborhood that they could easily walk to visit. When they get older, they can write letters about shared interests, weekend plans and stories about school.

Another idea is for the kids to list things they want to do with their grandparents when they visit. This way, they can start thinking about and looking forward to their next visit!

If your kids are hesitant about letter writing, have them start with a postcard. They can be found almost anywhere (we even have some from our travels that the kids love to send) and are less intimidating than a full sheet of paper.

Another great way to ease into letter writing is with a fill in the blank letter. These are great for younger kids or those just getting started.

You can also hype up the writing process with cute kids writing paper, special stamps and some washi tape.

And don’t forget that you can always encourage your kids to write letters by writing a few yourself!

I hope these templates help your young writers and that you enjoy getting letters in the mail as much as we do!

Do you have friends and family members who live far away? Are your kids starting to interact with pen pals, or heading off to summer camp? This template is for you! I’m sharing them here for my subscribers. Enjoy!

Vanilla Almond Sugar Cookies

The best ever Vanilla Almond Sugar Cookies

Moms who want to get in and out of the kitchen quickly, you’re going to love these vanilla almond sugar cookies! The texture of soft almond sugar cookies just can’t be beat and they are so simple to make.

As you may or may not know, I am not the girl who will make a recipe twice if it’s complicated. Not only that, but I tend to ruin sugar cookies. Yes, it’s true. They came out dry, thin, and don’t even get me started on the way my cut out cookies would look when they didn’t hold their shape!

Let’s just say the kids were not impressed. If you have a history of sugar cookie Pinterest fails like me – there is hope. These sugar cookies with almond extract are here to save your baking reputation.

Vanilla Almond Sugar Cookie Cut Out Recipe

Why I Love These Soft Almond Sugar Cookies

Recently I attended a holiday party at my friend’s house and she kindly passed the recipe to me when she noticed I couldn’t. stop. eating. them. Oh my gosh, the flavor!

They were perfect vanilla almond sugar cookies. Soft, thick, and just a little chewy. There are so many creative ways to decorate them too!

My favorite part of this recipe is that this dough doesn’t have to be refrigerated before cutting out cookie shapes – it’s perfect for impatient bakers like me! Or, you know, your kids. Ahem.

As soon as I got my hands on that recipe, I had to try making them myself. So easy. The kids loved making the different Christmas shapes and decorating them and the time spent together in the kitchen was a total mom win.

Continue reading

Snow on the Mountain Recipe – Lightened Up

Snow on the Mountain Recipe Lightened Up

This simple, budget-friendly recipe is a Midwest favorite that combines chicken and rice with fresh veggies and crunchy Chow Mein noodles.

I have to admit, versions of this recipe sat in my cookbook unused for years. This was one of my husband’s favorite meals growing up, and my mother-in-law had provided me all his favorites years ago. However I never made it, mostly because anything that uses coconut as a key ingredient is not edible, in my book.

Recently, however, I relented. We were in a meal rut, and I was looking for ways to lighten up some of my existing recipes. Plus, my mother-in-law  had never led me astray before! I’ve seen many versions of this recipe online, and I have to say her’s is the best I’ve found. However, I adjusted the recipe just a bit to suit our tastes and using what we had on hand.

So Fresh; So Clean: A Round-Up of Healthy Recipes my Kids Actually Like! | Five Marigolds

Continue reading

My Experience and Personal Review: WPBeginner

My WpBeginner Review

When I first started this little blog, I had no idea what I was doing! I went to wordpress.com, where I saw I could pick your domain right there and be up in running in minutes. Perfect! No dealing with external hosts and domains. It seemed like the right choice for a blog I was writing for a hobby.

After a few months though, it became apparent I needed the versatility of wordpress.org, but I had no idea how to convert my blog without losing all my data or formatting. So I sat on it. For nearly another two years. That’s when I stumbled upon WPbeginner – a site that offers great content and information, but also offers to set up your WordPress blog or convert it…for free! That seemed too good to be true, and there wasn’t a lot out there on whether this was a legit site. However, I’d read two positive reviews and was desperate enough to take a leap of faith.

Today, I’m sharing my positive WPbeginner review in the hopes that it will help other people who are in my shoes.

Continue reading

Children’s Artwork Display for Less Than $5

This is one of my favorite projects to date – also the easiest and least expensive: the children’s artwork display located in our Family Command Center  – otherwise known as the mud room.

I wanted plenty of space where the children could hang their artwork and good grades with pride, without that messy cluttered look on the fridge. It also needed to be really flat to the wall, since the area I’d designated is in a space the width of a hallway.

Mud Room Family Command Center DIY Kids' Art Display | Five Marigolds Mud Room Family Command Center DIY Kids' Art Display | Five Marigolds

Here’s how I did it:

  • Buy these eye hook screws and wire at the hardware store for less than $5 total (or spend a few extra bucks and shop Amazon at the links above if you want to save a trip to the store).
  • Drill holes into the wall where you want your eye hooks to go. Screw the eye hooks into the wall by hand.  Then, wrap your wire around one of the hooks a few times. Stretch it to the other eye hook, pulling and straightening as you go. Wrap it around that eye hook 2-3 times and cut the wire.
  • I already had these cute little inexpensive clips on hand, leftover from Eve’s party favors.They work great for holding the various art and school papers the kids bring home.
  • Voila! Children’s art center complete in 20 minutes and for less than $5.

Mud Room Family Command Center DIY Kids' Art Display | Five Marigolds

As for the rest of our family mud room command center, it’s still a work in progress. I have dreams for this space!

Mud Room Bench Storage | Five Marigolds

Mud Room Key Drop | Five Marigolds

I found that sign at the thrift store. I think it was from a hotel long ago. I just love it!Mud Room Family Command Center Key and Mail Drop

What do you think of my low-tech art center for the kids?

Sources:

  • Rug, Homegoods (similar here and here)
  • Basket, Mary & Martha (similar here)
  • Door Paint, Sherwin Williams Tidewater
  • Walls, Benjamin Moore Revere Pewter
  • Drawer Pulls and Knobs, Restoration Hardware
  • Key Hook Sign, thrifted (similar here, here,  here and here)

Fashion Finds – Cold Weather Comforts

What is it about freezing temps and sunsets by 6:00 p.m. that make me want to load on the layers and hibernate all winter? Whatever it is, I’m doing it in style this year. I’m loving these cold weather comforts from Forever 21 lately, how about you?


*Please read my affiliate disclaimer in the right sidebar. Thank you for your support!

Turn Fall Leaves into Roses

I recently posted an Instagram photo of a “rose” I’d created out of fall leaves. I had several of you message me to ask how I’d done it. It’s easy! However, I can’t take credit for this idea – I saw this in my Facebook feed one day and decided to follow it:

Turn colorful autumn leaves into a rose bouquet - tutorial | Five Marigolds

Photo tutorial c/o Nicole Duke – unfortunately I can’t find her to link you to her online.

Collect around 10-15 of the prettiest fall leaves you can find, ranging from small to large.  I put the kids in charge of this. Starting with one of the smallest leaves, fold the “points” or tips of the leaves down, making sure the colorful side is on the outside.

Then, roll it from left to right into a tight tube, with the stem pointing down. Take your next leaf and do the same, but this time wrapping it around the first leaf. Repeat this over and over, wrapping looser with each leaf.

With your final 3-6 leaves, leave the points up and wrap them around the outside. Doesn’t it resemble a beautiful rose?

Turn colorful autumn leaves into a rose bouquet - tutorial | Five Marigolds

In addition to the fab blogs in the right sidebar, this was also linked up at Tatertots and Jello,Savvy Southern StyleLive, Laugh RoweNap Time Creations The Turquoise Home.and The Scoop.

Free Girl’s Room Nursery Artwork Printable

I’ve always loved this book by Bernadette Rossetti-Shustak, and all of my kids have, too.

I love you Through and Through Free Printable Artwork | Five Marigolds

It’s hard to believe this little ‘ol blog is more than two years old now. I created it shortly after my third baby was born as a creative outlet for my craftiness. Today, my baby is a toddler and will be transitioning into her “big girl” room soon!

Recently, I converted the design I created for Baby ‘Belle’s baby announcement to create this printable artwork for her current nursery / soon-to-be big girl room.

Vintage Sophisticated Floral baby girl birth announcement | Five Marigolds

When I see this hanging in her room, it reminds me of the baby she was, and of course these sweet words I want her to remember always.

I love You Through and Through Free Printable Artwork Download | Five Marigolds

In celebration of the two year anniversary of my blog, I’m making this art available by free download to my readers! If you take the time to print this for your sweet little girl’s room, please take a moment to tell me about it below. Even better – share your snap with me! I love to see my artwork in your homes!

Download the Free Printable here.


In addition to the fab blogs in the right sidebar, this was also linked up at Tatertots and Jello,Savvy Southern StyleLive, Laugh RoweNap Time Creations The Turquoise Home,Tidy MomElizabeth and Co. Vintage, Chica on a Shoestring and The Scoop.

Bring Life and Personalization to a Neutral Family Room

I recently posted a photo of our family room on Instagram and got lots of notes asking me about the space. I had friends tell me it looked like something out of a magazine. What a compliment!

Neutral Family Room with Bold Pops of Color | Five Marigolds

I was really surprised by the reaction I got, though. The truth is, anyone can make a space look amazing in just one photograph. Our home is a work in progress. Most of our home is not decorated. I finish little areas of a room and wait to finish the rest of the space as inspiration strikes me. That means there are uglier areas of the room that don’t get shown in photos – like the comfortable, oversized, slightly worn leather chair the corner where it doesn’t quite fit. The lamps that don’t quite match but that continue to live on in the room until I find the perfect lights that fit my budget.

I’m not very confident as a decorator, so I just go by my gut feeling. If I put a rug in the space and I find that I don’t feel comfortable, it’s not the right fit for me. If I put a wild throw pillow on the couch and it makes me want to sit down and enjoy the space – it was the right design choice for me.

Here are the design tips I follow in my home:

  1. Start with high quality, neutral furniture This means a great neutral couch with clean lines, a high quality rug and furniture in the space. Keep the colors neutral so they can last – both in structure and in design taste –  for many years. Like all things in life, when you get the foundation right everything works much better!
  2. Bring in texture In our home, we add lots of texture with mixed leathers, deep rich woods and distressed reclaimed woods, too. It means sleek cool mirrors and hard metal vases and decor juxtaposed with wild flowers and dried wild grasses. We use fabrics with varying textures, too – but they must always, always be comfortable and soft! Make sure your throw pillows are filled with down, too. They will look 100% better and will be more comfortable, too.
  3. Add pops of color For me, this means bold colors and patterns, as you can see with our throw pillows. I love all of these colors and patterns, and somehow when I mix them all they come together perfectly to me.
  4. Personalize This is my most important design rule. Nothing makes an environment more sterile than lack of personalization. I like to decorate with lots of pictures. Some I keep in their frames forever for nostalgia. For our main wall, I use updated family photos every year.
  5. Keep it versatile One of my favorite tips when buying mats and frames is to buy square or symmetrical frames, and have the mat cut to the size of photos you plan to use. Here’s why this is genius: if your favorite photo this year was portrait – oriented, inevitably you’ll one day have a favorite that is landscape – oriented. Instead of buying a new frame and re-hanging the photos on your wall to fit, you just turn the frame on its side, and you’re in business. See how I have examples of both portrait and landscape photos on my wall?

Sources:

  • Sectional: Carson’s Furniture
  • Ottoman: Restoration Hardware (old) similar here
  • End Tables: HomeGoods (old) similar here
  • Lamp
  • Pillows, similar: animal print, black/white geo, floral pillow made with Robert Allen fabric
  • Throw: HomeGoods (old) similar here
  • Wall Monogram: HomeGoods (old) similar here
  • Wall frames and mats
  • Rug

Fall Fashion Finds

The temperature is dropping here in the Midwest and it’s time to begin thinking of adding to the fall wardrobe. I’m absolutely loving what I’m seeing this season: glam accents like faux fur and leather, studs and spikes, sleek silhouettes and soft textures. I especially love the affordable finds I’m seeing at Forever 21 this season. Check out a few of my favorites here:


*Please read the affiliate disclaimer on the right sidebar. Thank you for your support!

Last Minute (Free) Halloween Costume: Liz Lemon

Looking for a last-minute Halloween costume, on a budget? Shop your closet and go as Liz Lemon of 30 Rock! Who cares that the show ended two years ago? Tina Fey is always in style. Plus, there are cheese puffs involved.

This one came a little naturally to me – I often get comments that I remind people of Tina Fey when I wear my glasses. Having spent half my life in corporate, I pretty much already have all the makings of a Liz Lemon wardrobe (for better or worse), but you can shop the look below.

Shop your Closet for Free Halloween Costumes- Liz Lemon 30 Rock | Five Marigolds

Shop the look:

Looking for more last minute and free Halloween Costumes? Check out my round-ups, here and here.

Shop your Closet for Hallween Tina Fey as Liz Lemon in 30 Rock Costume | Five Marigolds

Confession: I had a bag of Cheese Puffs for this costume…but I ate them before I could take the picture. I am Liz Lemon.


No-Carve Family Halloween Pumpkins

Family Halloween Pumpkins

Do you want some pumpkin decorating ideas that do not require you to carve them up first? I have the best no carve pumpkin decorating ideas the whole family will love! 

At our home, we don’t really “do” spooky Halloween. We have fun, dress-up, and eat lots of sweets on Halloween. So this year, I thought it would be fun to make a pumpkin representing each member of our family that we could bring back out year after year – in addition to carving Jack-O-Lanterns in real pumpkins, of course.

THE BEST NO CARVE PUMPKIN DECORATING IDEAS

Frozen (or cinderella?) no-carve pumpkin

For this pumpkin, you will need:

5 No-Carve Pumpkin Ideas that don't suck! This Cinderella / Frozen pumpkin is super easy to make!

You will want to paint the pumpkin with the aqua matte spray, and allow it to dry.

Then, spray a light coat of the diamond dust spray, and allow it to dry. 

To make it, I used Krylon aqua matte spray paint to painT a white craft pumpkin.

I then layered  Krylon opulent opal glitter spray paint on top.  I was super bummed with this though. It was gorgeous going on, but within moments it stopped working. I figured the glitter was clogging the nozzle and I tried multiple solutions to no avail. What a waste!

Frozen Cinderella Halloween Pumpkin | Five Marigolds

I went back and purchased Krylon glitter blast diamond dust spray paint. It was also beautiful and the can worked much better.

Once completely dry, decorate as desired with self-stick rhinestone gems. Top with a fun princess tiara, if desired.

Hello Kitty no carve pumpkin

For this pumpkin, you will need:

  • Pinter
  • Clear contact paper
  • Black and pink acrylic paint
  • Hair bow

Simply print out a Hello Kitty face on the printer, and place it over the clear contact paper as a stencil. 

Paint the stencil in with the paint and allow it to dry. Add a fun hair bow to complete this look.

Hello Kitty Halloween Pumpkin | Five Marigolds

Minecraft Creeper NO CARVE pumpkin

For this pumpkin you will need:

  • Black craft pumpkin
  • Krylon emerald green spray paint
  • Printer
  • Clear contact paper
  • Black acrylic paint
  • Black craft pumpkin

To make this painted pumpkin, cut out a square in the black craft pumpkin, and paint the inside green with the green spray paint. Print out the Creeper face, and place it over the contact paper to use as a stencil. Place the stencil inside the dry pumpkin and paint on the Creeper face with the black acrylic paint.

Minecraft Creeper Halloween Pumpkin | Five Marigolds

Stud NO CARVE Pumpkin

For my pumpkin, I just picked up this black studded pumpkin from JoAnn’s I just love it!

Black Stud Halloween Pumpkin | Five Marigolds

For my husband, well…

Decorating Family Pumpkins | Five Marigolds

He’s a long-suffering Chicago Bears fan (as am I). Da Bears!

What do you think of our no-carve Family Halloween Pumpkins? Looking for more easy Halloween ideas? Check out my Lazy Mom’s Guide to a Halloween theme dinner.

Lazy Mom's Guide to Spooky Halloween Theme DInner | Five Marigolds

Then, check out my free printable Halloween emoji nail decals here.

What a neat idea! Use tattoo paper to make nail art. Halloween Emoji nails.


Halloween Treats Round-Up

Spooktacular Halloween Recipes

Halloween may not be my favorite holiday in the world, but I do love getting festive with my food! Here is a round-up of some of my Halloween treats and recipes.

Mean, Green Halloween Punch with Spooky Skewers This refreshing punch with fun and spooky drink stirrers is sure to please at your Halloween gathering!

Make this mean, green, Halloween punch with spooky skewers | Five Marigolds

Skeleton guts made with little smokies and your favorite barbecue sauce make a fun Halloween party appetizer.Lazy Mom's Guide to Spooky Halloween Theme DInner | Five Marigolds

Monster Mix Simply toss whatever you have on hand: I use popcorn, pretzel sticks, Cheerio’s, M&M’s, candy corn, and a few mini Oreos. Just a little effort goes a long way with this snack. I once brought it to a cross country meet in a ziplock with some plastic cups for serving, and I don’t want to brag here – but phrases like “awesome mom” and “best cook ever” got thrown around by my kids and their friends quite a bit. No need to tell them this took all of 2 minutes to pull together.
Monster Mix Halloween Trail Mix Recipe | Five Marigolds

Monster Mix Halloween Trail Mix Recipe | Five Marigolds

Frankenstein Pudding This one is as easy as mixing a few drops of green food coloring in your vanilla cook & serve pudding and crumbling some Oreos on top. Draw a Frankenstein face on the outside of your clear container with a dry erase marker.

Halloween Treat Round-up: Frankenstein Halloween Pudding | Five Marigolds

Mummy Pizzas and Hot Dogs It doesn’t get any easier than wrapping strips of crescent rolls around a hot dog and baking them, or DIY mini pizzas using string cheese for the mummy wraps, but it still gets me some serious street cred with the littles.

Halloween Treat Round-up: Mummy Mini Halloween Pizzas | Five Marigolds

I made the eyeballs for the Mummy Hot Dogs using slices of string cheese and cutting out a hole using a straw. Then, using the same straw to place a perfectly sized olive slice in the hole. I really did that. Should I be ashamed right now?

Halloween Treat Round-up: Mummy Hot Dogs with Mozzerella and Olive Eyeballs| Five Marigolds


Jack-O-Lantern (and Minecraft Creeper) Stuffed peppers are a regular meal on our rotation, so we love to make it a little more festive in October. We sometimes also stuff them with spaghetti when we’re trying to make our monsters a little more gory with guts.

Halloween Treats Round up: Stuffed Pepper Jack-O-Lanterns and Creepers | Five Marigolds

This year, I even made a Creeper Stuffed Pepper for my Minecraft – obsessed son!

Minecraft Creeper Stuffed Pepper | Five Marigolds

Candy Corn Jell-O Parfaits These are as easy as they look. Layer orange Jell-O over cooled, firm lemon Jell-O gelatin.  Top with whipped cream and serve!

Halloween Treats Round up: Candy Corn Jell-O Parfaits | Five Marigolds

Monster Cookies First, get these fun Wilton eyeball candies and then follow this recipe.

Halloween Treat Round-up: Monster Halloween Cookies | Five Marigolds

Caramel Apple Bar Okay this one isn’t Halloween, per say, but what a perfect treat for a Halloween Costume party or Autumn gathering? Learn more about how I pulled this together, here.

Halloween Treat Round-up: Caramel Apple Bar | Five Marigolds

Even better, make your own to-die-for salted caramel dip!

Halloween Treat Round-up: Salted Caramel Dip | Five Marigolds

Lots of ideas for fun and spooky Halloween treats and recipes | Five Marigolds

Shop your Kids’ Closets for Halloween Costumes!

DIY HALLOWEEN Costumes FOR FREE

Looking for last-minute Halloween Costumes? Look no further than this inspiration for shopping your kids’ closets for these super cute looks!

Star Wars Jedi Luke Skywalker: All it takes is a Karate uniform top, a bathrobe or bed sheet (or you can buy a Jedi cape inexpensively here), some khakis and a pair of boots – and a blue light saber, of course. Here is how I envisioned the costume:

Shop your kids' closets for Halloween - Star Wars Jedi Luke Skywalker| Five Marigolds

Shop your kids’ closets for Halloween – Star Wars Jedi Luke Skywalker| Five Marigolds

And here’s how it looked on Dub.

Shop Your Kids' Closet for Halloween Costumes | Jedi Luke SkyWalker Star Wars | Five Marigolds


Sock Hop – I love this look for a brother and sister! The boy look is super easy, of course. For the girls, I paired a pink tutu pettiskirt with a cardigan, scarf and some black Mary Janes. Either cut out your own “poodle’ or grab a really inexpensive one online. Add some cute glasses for a final touch!

Shop your kids' closets for Halloween Costumes 50's Sock Hop | Five Marigolds

Here’s how it looked on my little one (Yeah…that was before her hair was done, but the only happy look I got. Toddlers!):

Shop your kids' closets for Halloween Costumes 50's Sock Hop | Five Marigolds


Baby Jazzerciser: This goes down as my favorite costume yet and it’s super easy. Just pair a baby onesie with a bright cut-up onesie,  legings or tights, some baby legwarmers or Baby Legs (or cut up some old socks) and use a knit baby headband for, well, the headband. I actually cut the elastic tops off of some baby socks for the little baby wristbands! My mother sewed an adorable boom box to complete the look. You can get something similar here or here.

Shop your Kids' Closets for Halloween | Baby Jazzercize Jane Fonda | Five Marigolds

Here’s how my little one rocked it:

Shop your Kids' Closets for Halloween Costumes | Jazzercize Exercise Baby | Five Marigolds


Baby Kitty Cat: This one can’t get any easier. Combine a black baby onesie with black leggings or tights, and maybe a cute matching fur vest or black tutu pettiskirt, and you’ve got yourself a kitty cat! Add the finishing touches of a black nose and whiskers using eyeliner, and don’t forget the kitty ears! You can currently buy kitty ears headbands at the Target Dollar Spot, online here, or you can make them on your own. Use a thin feather boa from the dress up pile, and cut it up to make “fur” wrist cuffs and use as the tail.

Shop your Kids' Closets for Halloween | Baby Kitty Cat | Five Marigolds


Pink Poodle: Similar to the black cat costume above, this costume starts with a pink leotard and tutu. I completed the look with a DIY Poodle Headband and faux fur cuffs.

Copycat Chic: DIY Pink Poodle Costume Pottery Barn Halloween Costume | Five Marigolds

Shop this look: Pink top or leotard, tights, tutu pettiskirt, ballet slippers

Copycat Chic: DIY Pink Poodle Costume Pottery Barn Halloween Costume | Five Marigolds

Looking for more last-minute Halloween Costume inspiration? Find more ideas for shopping your own closet here and here.