Shop Your Closet: Free and Fabulous Halloween Costumes!

DIY classic HALLOWEEN LOOKS FOR FREE

Note: This post was originally published in 2013, but due to the continued traffic and interest each season, I’m reposting it with updated shopping links. Enjoy!

Looking for last-minute Halloween costume ideas?  Here are 5 inexpensive DIY Halloween costumes you can shop your own closet for.  Or, follow the links to shop these looks for yourself!

Where’s Waldo

Shop your closet for these 5 Halloween Costumes on a budget Where's Waldo | Five Marigolds

Bank Robber

Shop your own closet for free and fabulous costumes this Halloween! Love this bank robber costume idea.


Holly Golightly – Breakfast at Tiffany’s

Shop your closet for these 5 Halloween Costumes on a budget Holly Golightly | Five Marigolds

Mary Poppins

Shop your closet for these 5 Halloween Costumes on a budget Mary Poppins | Five Marigolds

Or here are a couple inspired by some great television shows:

Liz Lemon (Tina Fey) in 30 Rock

Shop your Closet for Free Halloween Costumes- Liz Lemon 30 Rock | Five Marigolds


Couple Costume: Sheldon and Amy from The Big Bang Theory

Shop your closet for these 5 Halloween Costumes on a budget Couple's Costume Big Bang Theory Sheldon and Amy | Five Marigolds

I think my favorite is the “Shamy” couple costume from one of my favorite shows, “The Big Bang Theory.” Which is your favorite?

LOOKING FOR MORE LAST-MINUTE HALLOWEEN COSTUME INSPIRATION? FIND MORE IDEAS FOR SHOPPING YOUR OWN CLOSET HERE AND HERE.

Free Back to School Printable: Minecraft Lunchbox Jokes

It’s almost time to send the kids back to school! And while that may be an exciting time for moms, kids sometimes need a reason to smile during the school day. Enter these sure to make ’em giggle lunch box jokes. If you have a Minecraft lover in your family, print this free Minecraft printable out today!

Minecraft Jokes Free Lunchbox Printables | Five Marigolds

Why I Love These Lunch Box Jokes

Dub just loves clever jokes and puns. When I asked him what he most wanted me to pack in his lunch box for his first day of school, he told me he wanted a Minecraft joke. Your wish is my command, kid.

I love the idea that my guy is enjoying a laugh at lunchtime with the Minecraft characters. Maybe he even shares them with his friends and they talk about how hilarious they were. I don’t know, it could happen.

Minecraft Jokes Free Lunchbox Printables | Five Marigolds

Lunchbox: Happy Jackson

Minecraft Printable Lunchbox Jokes for Kids

After searching Pinterest I found there aren’t many options out there for Minecraft lunchbox printables, so I created one on my own. And today I’m sharing it with my wonderful subscribers!

Here’s a few of the “punny” jokes included:

Q: How does Steve chop down trees with his fists?

A: How wood I know?

Q: Have you heard of the creeper who went to a party?

A: He had a blast!

  1. What is a cobblestone’s favorite music?
  2. Rock music!

Okay, okay. Even if you don’t get these hilarious jokes (humble brag), your little Minecraft lovers will. Let’s be real, anything we can do to make their day go a little better is worth its weight in gold. Or is it goldfish? You get me.

Minecraft Jokes Free Lunchbox Printables | Five Marigolds

How to Make Minecraft Lunchbox Jokes

To use these kids’ lunch box jokes, just click the link below and save the file to your computer. Then print the cards out and trim them.

If you want your printable lunchbox jokes to be a bit more sturdy, and be an excellent weight for a mini airplane for the playground, use cardstock to print them out.

Add one of the jokes to your kid’s lunch and voila! Mom of the Year!

They also make great notes for afterschool snack time, to tape over the bathroom sink, or for a long car ride. Jokes are always appreciated.

Click the above image or use this link to grab your copy of the Minecraft lunchbox jokes freebie.

Want to see more printable resources like these? Let me know in the comments below!

Minecraft Printables and inspiration:

Like these printables? Be sure to check out my other free downloads and inspo:

Minecraft Lego Steve Favors | Five Marigolds

DIY Minecraft Lego Steve Favors

Be Minecraft Valentine's Day Printable

Be Minecraft Printable

Minecraft Birthday Party on a Budget | Five Marigolds

DIY Minecraft Birthday Party


Which Hardware? Boy Bathroom Progress

I’ve been working on Dub’s bathroom from some time now. My vision keeps changing as I find little treasures here and there, and it’s becoming kind of an eclectic hodgepodge instead of a well thought-out theme. I guess that’s about perfect for a boy’s space, right?

I’d started out planning to use this artwork I designed (check out the free printables), but then remembered the vintage Star Wars metal art I’d picked up at Hobby Lobby awhile ago and thought it would be fun to frame it for this space. I bought custom mats and framed them with Ikea Ribba frames.

Vintage Star Wars Boy Bathroom Art | Five Marigolds

I wasn’t sure what to put above the towel rack, but when I was out thrifting and found this Wax & Polish sign, I just had to have it!

Vintage Star Wars Boy Bathroom. | Five Marigolds

I love the crisp clean lines of the gray walls and white frames against the rustic barn wood vinyl floors and vintage finds.

Vintage Star Wars Boy Bathroom | Five Marigolds

Now I’m on the hunt for cabinet hardware. I’d really had my heart set on using these utility pulls from the hardware store. I just love this look. Unfortunately, they are just a little wide for the cabinet trim so I need to find a new option.

Which pulls do you think would be the right option for this space?


  1.  These are a shorter version of the same utility pulls – they are only 3 3/8″ inches, but would fit the width of our cabinet trim.

Utility Pull Hardware for a Boy Bathroom | Five Marigolds

2.   Or these more modern and streamlined pulls?

Utility Pull Hardware for a Boy Bathroom | Five Marigolds


Let me know what you think in the comments below!


Source list:

  • Paint: Sherwin Williams Gray Screen
  • Rug: Target
  • Star Wars Comic Tin Art and metal basket: Hobby Lobby
  • Frames: Ikea Ribba


In addition to the fabulous blogs listed on the sidebar, this post was linked up at Remodelaholic.


*This post may contain affiliate links. Please review my full affiliate disclaimer in the sidebar.


Three Refreshing Signature Summer Cocktails

A signature drink is a fun and refreshing addition to your summer soiree! We recently had a BBQ and served these three drinks that were a big hit!

Summer Cocktails | Five Marigolds

Wicked Watermelon Margaritas (4 servings) source: Bedsider.org

Mix the following ingredients in the blender and serve with a wedge of watermelon or slice of lime!

  • 3 cups cubed seedless watermelon, frozen
  • 1/4 C fresh lime juice
  • 1/2 C white tequila
  • 1 cup triple sec
  • 1 T sugar

Moscato Strawberry Lemonade

Mix the following ingredients in a large pitcher and garnish glasses with lemon slices.

  • 1 bottle pink moscato
  • 6 C lemonade (I used Simply Lemonade)
  • 1/4 C strawberry vodka
  • Frozen Strawberries

Popsicle Moscato

This one is super complicated: pour three parts pink moscato and one part Simply Lemonade into a cup and place an unwrapped popsicle in the glass. Drink once the popsicle has melted!

Popsicle Moscato - Signature Cocktails for Summer Soiree. | Five Marigolds

These are my three favorite tried and true summer cocktails. Do you have a signature drink? Tell me about it in the comments below!


Back to School Wardrobe for Boys – On a Budget

For many, it feels like school just got out for the summer. But in our neck of the woods, summer is already more than half over! Every year I scour summer sales to help build our back to school wardrobe on a budget. I try to find a variety of mix and match pieces to maximize our budget in style. Here’s what I’ve come up with so far:

Back to School Wardrobe for Boys On a Budget | Five Marigolds #BTS

Shopping information:

1 / 2 / 3 / 4 / 5 / 6 / 7 / 8 / 9 / 10 / 11 / 12

What do you think? Do you shop sales early for back to school season, or do you wait for the fall sales?

Thanks for stopping by!

* In addition to being featured in the fabulous blogs buttoned up in the right sidebar, this post was also linked up at The Scoop and The Turquoise Home.

*This post contains some affiliate links. Please see my affiliate disclosure in the sidebar.


My 3 Favorite Recipes for Homemade Ice Cream

3 Recipes for egg-free, no churn, Homemade Ice Cream: Cookie Dough Frozen Yogurt, Malted Milk Ball, and Birthday Cake Batter | Five Marigolds

With the official begin of summer quickly approaching, we’ve been having a lot of fun making homemade ice cream again. We’re huge fans of ice cream, and even made it the central theme for Eve’s birthday party one year! My very favorite homemade ice cream continues to be vanilla ice cream with a drop or two of lemon extract, but the kids have loved creating their own ice cream recipes.

Here are our favorite egg-free ice cream recipes – no ice cream maker required!

What’s your favorite ice cream flavor? Do any of the above three make your list?


Free Art Prints for Boy’s Room

I’m slowly going room by room and decorating where inspiration strikes. That only happens to be working in the kids’ areas, but I’m embracing it!

Next up is Dub’s bathroom. I love the idea of making it an all-boy kind of space – I absolutely love decorating really boyish spaces – but I want it to be somewhat neutral since it will be shared with overnight guests.

I railroaded Dub into the blue color for his room – I’d rejected the crazy bright aqua color he really wanted (I just couldn’t…) so I let him choose the paint for this space himself.

I tried to convince him that a steel blue color would be great. I go for neutrals everywhere else, so I was hoping this would be a room with some color. However, he really liked the idea of a silvery gray for the space. Out of 5 grays, he chose Sherwin Williams Gray Screen because of the slightly blue tint and light tone. Nice choice!

Here is the working Mood Board I’m using to inspire the makeover.

Boys Bathroom Mood Board | Five Marigolds

I designed artwork to add some color to the otherwise neutral, rustic space. I’m not 100% sure on this scheme, but since the artwork is free (I already have the IKEA RIbba frames on hand from a failed attempt to use it elsewhere), I’m going with it for now.

Splish Splash Take a Bath artwork for IKEA Ribba Frame | Five Marigolds

Rise and Shine Free Printable Artwork | Five Marigolds


Be Strong and Courageous Free Printable | Five Marigolds

And just because I couldn’t decide…I’m sharing a few variations I worked on:Be Strong and Courageous Free Printable | Five Marigolds

Rise and Shine Free Printable Artwork | Five Marigolds


What do you think? I’m hoping this inspires others to add some color to their spaces, so I’m making several of them available to you for free!

These 12×12 printables are designed to work with the Ribba frame, so you’ll want to get them printed at the copy store.

If you download these, please take a moment to tell me about it below. Even better, share photos of them in use. I’d love to see these prints getting used and enjoyed!


Sophisticated Nursery Art for $15

Ever since I’d planned my first born daughter’s nursery 7 years ago, I had a vision for adding vintage Barbie prints to the room that they could grow with.

Sophisticated Blush and Gold Baby Nursery with toile accents and Jenny Lind crib | Five Marigolds

My inspiration came from places like Posh Tots, Rosenberry Rooms, and other upscale design stores who were selling the framed prints for upwards of $135 each.

Source www.rosenberryrooms.com

Source www.rosenberryrooms.com

Fast-forward to this year. In the process of moving I realized we had four matted square frames that we’d never used! I think it was one of those things that I thought my husband had returned, and he thought I’d returned. Regardless, it was a sweet score that inspired me to revive this decor idea as we began decorating the kids’ new rooms. This time, I found a way to create this art on the cheap. I scoured Amazon for used vintage print Barbie calendars, and found that there are usually at least two 12×12 calendars available for a reasonable price. I believe I bought mine for around $10.

I spray painted my black frames with Rust-Oleum Metallic spray paint I had on hand (love this stuff), inserted my favorite prints, and voila! Vintage Barbie art for less than $15.

Sophisticated Blush and Gold Baby Nursery with toile accents and Jenny Lind crib | Five Marigolds


I love the look of three frames above the crib, but I’m debating adding the fourth and making it a square formation when Belle moves to a big girl bed. What do you think?

As for the rest of the room…

Sophisticated Blush and Gold Baby Nursery | Five Marigolds

It’s needs some love. I have big plans, but I’m taking my time.

Sophisticated Blush and Gold Baby Nursery | Five Marigolds

Sophisticated Nursery in Blush, Champagne and Toile | Five Marigolds

Details:


DIY Chalkboard Art

I recently tried to convince my husband to paint an entire wall of our dining area with black chalkboard paint. He didn’t quite have the same vision I had, so he asked me to hang a chalkboard until we could come to an agreement.

I agreed. After all, I’ve had a giant frame in storage that’s been waiting to be used for years. I bought it at a garage sale for around $10 which was a steal…but how do you fill such a large frame without spending a fortune? The chalkboard was the perfect solution.

If I hadn’t already had the frame, what I really would have wanted is a rustic wood frame. However, since this was likely temporary, I wanted to make this as easy and inexpensive as possible.

The problem: the frame was gold. Really gold. I debated on what to paint it. Silver? Weathered white? Blue? I haven’t committed to a color scheme in our new home yet, so I went with a safe, muted silver. I spray painted it with Krylon Brushed Metallic paint. I had planned to rub wax or wood stain to bring out the details, but I didn’t love that effect on the test areas so I just left it silver for now.

For the actual chalkboard,  we bought a piece of thin plywood and I sanded it with a hand sander until it was really smooth. After cleaning it with a lint-free cloth, I painted four thin coats of Rust-Oleum Chalk Paint in black, using a foam roller. I sanded lightly between layers when necessary and removed all the dust with a lint-free cloth. When the paint was completely dry, I rubbed entire board with a large piece of sidewalk chalk to cure it, and then rubbed it with a lint-free cloth to erase it.

DIY Chalkboard Art with Rust-Oleum Chalkboard Paint | Five Marigolds

DIY Chalkboard Art | Five Marigolds

You can wipe it clean with a damp cloth for a clean crisp look, or with a dry cloth, which I prefer, for a true, messy chalkboard look.

So far, our family loves this addition to our home. We post fun quotes and verses, and the children love to use it for creating their own art, as well.

DIY Chalkboard Art using Rust-Oleum Chalkboard Paint | Five Marigolds

DIY Chalkboard Wall Art using Rust-Oleum Chalkboard Paint | Five Marigolds

In addition to being shared on the fabulous blogs to the right, this post was also shared on Stone Gable Blog.


*Please read my affiliate disclaimer on the right sidebar. Thank you for your support!


Proverbs 31 Canvas Wall Art for Girl Room

DIY Large Wall Art + verses for the bedroom

When we moved into our new home, we dedicated it with bible verses for each room of the house. I’ve been dreaming of this Proverbs 31 canvas wall art  for Eve’s bedroom for some time now, but when I recently realized I already had the materials, I got moving.

I had a thrift store canvas that I’d previously tried (and failed) to artistically repurpose, so I painted it using a paint sample I already had on hand. Besides the price, the best part of repurposing a canvas is that you get fabulous texture under your new creation.

I used my Silhouette SD to cut the verse onto clear contact paper. I make so many mistakes that I’ve found this to be a cost saving way to use the Silhouette. I used a slightly imperfect font that would give me grace should the painting not go as I hoped.

Proverbs 31 canvas art | Five Marigolds

After spending way too long placing the many pieces of contact paper on the canvas and lining it up just so, I spray painted it with my favorite Rust-Oleum metallic gold spray paint.

I was worried it would get under the contact paper. but as long as I made sure the paper was adhering around the letters I had absolutely no trouble.

To build the frame, I used a similar technique as with Dub’s  big kid room wall gallery, but I used wood that wasn’t quite as deep, since I wanted this particular frame flush with the art.

I used Minwax stain in Early American, which is lighter IRL and gives it the right amount of color and rustic vibe.

Proverbs 31 Canvas Art using clear contact paper and Silhouette SD. Stain is Minwax Early American. | Five Marigolds

I debated (and am still debating) taking a tiny bit of wood stain on a rag and dry rubbing the canvas for a subtle shabby chic look.

I’ve also considered dry rubbing a tiny bit of the white paint over the frame very lightly for the same reason. But, at this point I’m afraid to ruin it!

Proverbs 31 Canvas art | Five Marigolds

I’m so happy with how this Proverbs 31 canvas wall art  turned out. I love the contrast of metallic gold and ivory against the rustic frame, and the sweet reminder my little girl will wake up to each day.

I’m already dreaming of how I might create a variation for Belle’s room 🙂

Additional bible verses that would be great for the girls’ bedrooms include:

God is with her; she will not fail. Psalm 46:5

He fills my life with good things. Psalm 103:5

I am fearfully and wonderfully made. Psalm 134:14

He calls me beautiful one. Song of Solomon 2:10

She is far more precious than jewels. Proverbs 31:10

Proverbs 31 Canvas wall Art.. | Five Marigolds

Details:

  • Lamp – Anthropologie (old)
  • Curtains – Simply Shabby Chic
  • Quilt – Handmade by grandma 🙂
  • Paint color – Behr Seed Pearl

Interested in more upcycled DIY Wall art? Check out my other projects here:

DIY Canvas Wall Art for Baby Nursery: I Love You Through and Through | Five Marigolds

I Love You Through & Through Paired Canvases

DIY Engineer Prints for Big Boy Room | FIve Marigolds

Framed Engineer Prints Wall Gallery

Industrial Boy's Bedroom Design. | Five Marigolds

Monogrammed Pallet Art

DIY Chalkboard Art with Rust-Oleum Chalkboard Paint | Five Marigolds

DIY Chalkboard using Garage Sale Frame


Review: Target Brookline Counter Stools

When I was shopping for stools for our new home, I wanted something that looked sophisticated, yet was comfortable and fairly inexpensive. I found what I was looking for in Target’s Brookline Counter Stools in Sandstone. But, buying furniture online is tough, and there weren’t many helpful reviews on this particular product – so I’m sharing mine here.

Target Brookline Stools Review | Five Marigolds

Price – The major reason I bought these stools was the price. They were the most inexpensive upholstered stools I could find that were available at counter height.

Target Brookline Stools Review | Five Marigolds

Color – Online, it was difficult to tell what I’d really be getting, but I’m happy with the neutral, slightly greige color to these stools.

Target Brookline Stools Review | Five Marigolds

Comfort – There is really no way to test these stools out. They have samples of 1-2 colors at my local target, but you can’t take them off the shelf to sit on them. So this was a gamble, too.  Overall, these are reasonably comfortable stools, with a nice cushion on the seat and back.

Durability – With three kids ages 2 through 7, I needed these to be fairly durable. I knew choosing a neutral upholstered chair would be a test on even the highest quality furniture, which is why I chose the least expensive stools that fit the style I was going for. That way, even if we destroy these, I reasoned I would learn my lesson with less to lose. My husband put these chairs together quickly and easily. If he found that one wobbled, he simply adjusted it until it was level. We then taped off the wood legs and I sprayed  two coats of Scotchgard over the next several hours.

Getting it done: I used painter tape and a garbage bag to protect the wood legs from the Scotchgard.

Getting it done: I used painter tape and a garbage bag to protect the wood legs from the Scotchgard.

The kids sit on these stools for breakfast, drawing and doing homework, but we don’t eat all of our meals here. However, they have had their fair share of food smears from sticky hands, and so far they’ve wiped clean every time, even if it takes a little fabric cleaner for the extra ground-in, dried messes.

Overall, we’ve been happy with these chairs. I hope this review helps anyone else who is on the hunt for new stools for their home!


*This post contains affiliate links. Please read my full disclaimer in the right sidebar. Thank you for your support!

Big Boy Room Custom Engineer Prints

engineering prints = Inexpensive large wall art

Engineer prints are a great way to design a boy bedroom, bringing custom touches through large photo prints on a budget.

I’m very slowly beginning the process of decorating our new home, and focusing on the areas where inspiration strikes me the most. Dub’s room is the one I have the most concrete vision for, and I knew exactly where I wanted to start when I saw this idea for engineer prints for a boy’s room.

I immediately set out taking images of the things most important to Dub. He loved being able to be a part of it in this way.

He loves Legos, video games, and the Wilson brand holds special inside meaning for us

I was able to order the engineering prints online by sending  the images to the FedEx Kinkos copy store.

I ordered 18×24 engineer prints. DIY Engineer Prints for Big Boy Room | FIve Marigolds

Continue reading

Happy April Fool’s

Today’s April Fool’s gag is brought to you by the (brown) letter “E” and frozen milk. Don’t worry, I made actual brownies to soften the blow of this joke.

https://instagram.com/p/079bngR_eH/?taken-by=chellegold

What are your favorite April Fool’s Day gags?

Tutu Birthday Party for my Two year-old

What could be better than a tutu birthday party for your little ballerina’s two year-old birthday?

For baby ‘Belle’s party, I wanted to do something that conveyed her love of dancing and tutus and looked special, but that was simple and inexpensive to put together.

First, for my $3 backdrop, I took 3 white plastic tablecloths from the dollar store for my backdrop.  I simple folded them in half length wise, then began rolling them up toward the fold. Once the cloth was rolled approximately 10″ from the fold, I began cutting the rolled tablecloth in strips approximately 3″ apart. Easy!Tutu Ballerina Birthday Party | Five Marigolds

I finished it off with the vintage bunting we re-use for the girls’ parties each year. I love how this small investment adds something special to every party we have for them.

Next, I layered the table with two tablecloths, sandwiched with some tulle. I had planned to make this an inexpensive “tutu tablecloth” but it didn’t quite turn out that way! No problem though – I still love the effect of the pink tulle as the focal point of the table. To finish it off, I placed the tablecloth over the top and bustled it at the center to better highlight the tulle.

Tutu Ballerina Birthday Party. | Five Marigolds

Finally, I placed a trifle bowl upside down and I placed her own baby tutu around the bowl. Then, I just placed the cake on top. Tutu Ballerina Birthday Party. | Five Marigolds

I’d ordered a the cake to looks similar this:

Frilly Cake

So, I was a little disappointed in the finished result from my local Target bakery.However, I really can’t complain for such an inexpensive cake…and really it looks so cute when it’s all propped out with this gold “2” candle and bunting.

Tutu Ballerina Birthday Party. | Five Marigolds

We served ballerina punch, pink Jelly Bellys and dipped marshmallows for a birthday-worthy sugar buzz.

I hope you like ‘Belle’s tutu party fit for a two year-old ballerina. Thanks for stopping by!

Tutu Birthday Party | Five Marigolds

DIY Open Air Terrarium

DIY open-air terrarium (or at our home, Yoda’s home on planet Dagobah).

I’ve always been obsessed with terrariums, but was too intimidated to try my own. After I came upon some free supplies, I decided it was time to try my own open air terrarium as a special project with Dub.

First, here is what you need for an open air terrarium:

  • Glass vessel
  • Succulent plants – as many as you can fit in your container. (I found mine at Home Depot)
  • Potting soil
  • Small gravel (the size you find in fish aquariums)
  • Large smooth stones, if desired
  • Moss – I used sheet moss

First, make sure your vessel and rocks are clean. Then, I placed the large decorative stones around the edge and filled the middle with the gravel for drainage.

DIY Open Air Terrarium | Five Marigolds

Cover the rocks with moss which acts as a filter.

DIY Open Air Terrarium | Five Marigolds

Next, cover the moss with as much soil as your plants need to build roots. We covered our soil with moss because we liked the way it looked, but this is optional.

DIY Open Air Terrarium | Five Marigolds

When you’re done arranging your plants, give it some water to set the soil and roots in place and continue watering just a bit each week, being careful not to over-water, which promotes rot.

Once our terrarium was complete we thought it needed a little ornament. We thought it looked like Yoda’s swamp, so we added a little Yoda Lego man. He fits right in, don’t you think?DIY Open Air Terrarium | Five Marigolds

Overall, this ended up being incredibly inexpensive for me since we sourced everything for free except the plants and soil. This was a fun project to do with Dub. He was stoked about this project and excited to put the terrarium in his room!

Minecraft Steve Lego Birthday Party Favor

For Dub’s birthday this year, he wanted everything Minecraft. He also loves Legos so, naturally, Lego Steve from Minecraft seemed like the perfect party favors.

I did a lot of research trying to find an easy way to do this. To be honest, I was hoping there would be a sale of Minecraft Lego lots on ebay that would allow me to phone this one in, but it was not to be.

So, I ended up making a Minecraft Lego Steve myself using the Lego Pick-A-Brick feature.
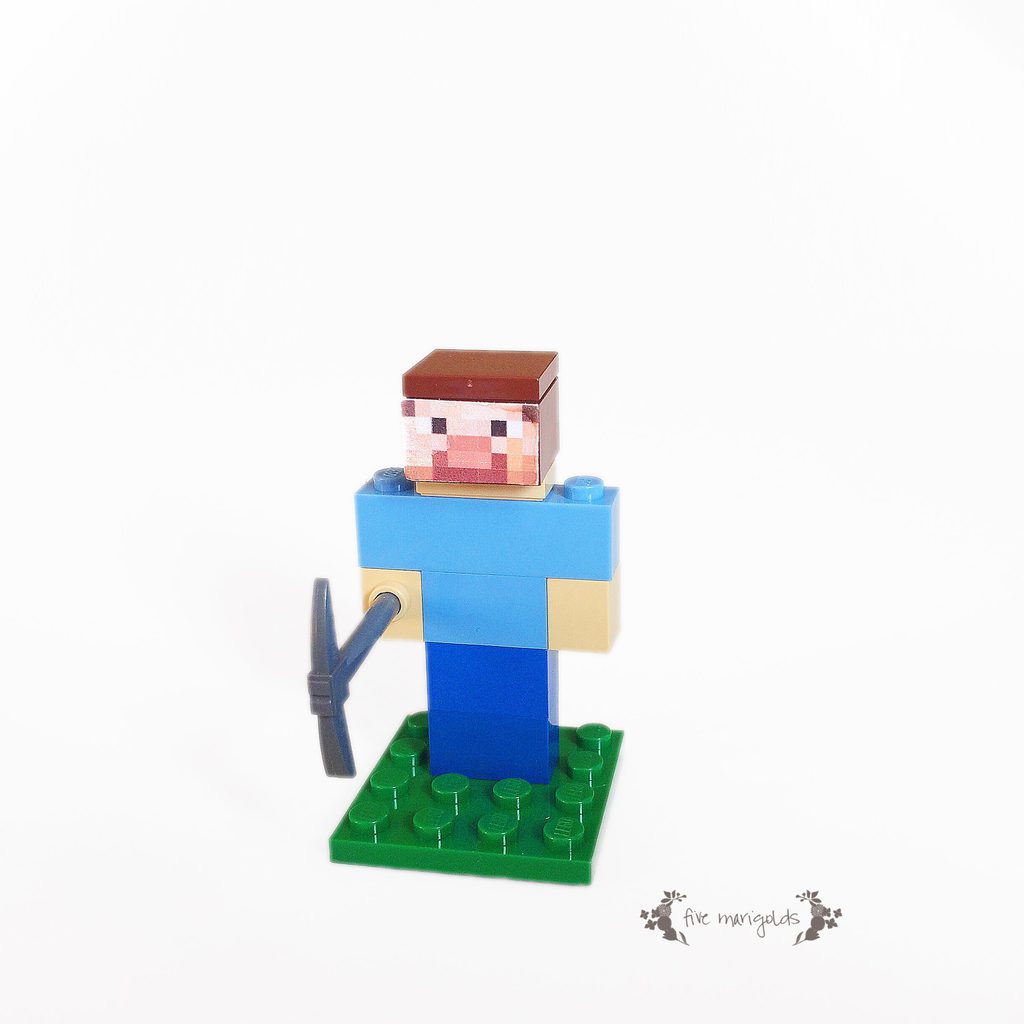
Minecraft Steve Lego Favor | Five Marigolds

While you can do this in-store if you have a Lego retail location near you, they have a varying selection, so I saved myself the trip and did my shopping online. I wanted to be able to have all the pieces I needed for Minecraft Steve! This is where I insert my Lego PSA – I found out after I placed my order that Pick-A-Brick orders can take up to 18 business days! That’s almost a month! So, this Lego Minecraft Steve favor only really works if you are planning out by at least a month to ensure your Bricks get to you in time.

Here’s what I ordered to make 15 favors:

Item#, color  – quantity

  • 300423, blue – x30
  • 4113915, yellow – x15
  • 4155708, yellow – x15
  • 4163696, light blue – x15
  • 4179833, light blue – x15
  • 4211210, brown – x15
  • 4243821, green – x15
  • 4271949, brown – x15
  • 4579260, yellow – x15

For the pick axe, I had to go to Ebay where I got a great deal paying $1.47 total for 15 axes. That brought the total to $26.21 for 15 favors, or $1.74, each. (I didn’t see any swords or pick axes in the Pick-A-Brick section when I was ordering. They do have a “mini Fireman’s axe” or a “warrior weapon,” though.)

Then, I went to work making  a face for Minecraft Steve in PhotoShop. I measured it to the size of the 2×2 Lego and then I printed it on Avery label paper. Removing the paper backing first,  I cut down each face sticker to the exact size and then replaced it on a small square of the paper backing to place in the favor bag.

Steve Lego Face Free Printable | Five Marigolds

I took a photo of the complete Lego Minecraft Steve to include with all the kits. The kids had a lot of fun putting Lego Steve together while they were still at the party, and had a great time showing off their new toy when they were done.
Minecraft Steve Lego Favor Insert Printable web| Five Marigolds

I placed the Legos in a small jewelry ziplock bag. Then, I made a simple tag that I stapled to the top of the sealed bag as a finishing touch.

Minecraft Lego Steve Favors | Five Marigolds

This was a huge hit among the 6 and 7 year old crowd!

While this Lego Minecraft Steve party favor does take a bit of advanced planning, you and your child will will have so much fun sharing these unique and fun activities for the kids to do!

Thinking of making a Lego Steve for your Minecrafter’s party? You can get a head start by downloading Steve’s face here (compatible with Avery 5260* labels), the finished Steve image inserts here, and the favor tags here.  Enjoy!

MORE FREE MINECRAFT PRINTABLES: Like these printables? Be sure to check out my other free Minecraft Printables here and here.

Find my other Minecraft Birthday Party posts here:

Minecraft Birthday Party on a Budget | Five Marigolds

DIY Minecraft Birthday Party

Minecraft Birthday Party Tinsel Tassel Banner Tutorial | Five Marigolds

Minecraft Tinsel Tassel Bunting Tutorial


Minecraft Birthday Party

This year, Dub wanted his party to be all about Minecraft. I didn’t want our home to look like it threw up Minecraft-licensed decor, so I went with something that we all could get excited about. We weren’t having a big celebration at home either, so I wanted to keep this simple and fairly inexpensive. Minecraft Birthday Party | Five Marigolds

First: the centerpiece du jour: his Minecraft cake. Kind of a boring concept, but this is a representation of THE pixelated cake featured on the video game. I was more than happy to outsource this portion of the party and Dub was in love with how it turned out. It was exactly what he wanted!

Minecraft Birthday Party Cake | Five Marigolds

Next, I created the theme using a brown dollar store tablecloth and some tissue paper “grass.” Super inexpensive for one package to cover this table, and the kids were fascinated by this!

I created a simple and inexpensive tissue paper bunting that added some visual interest in the party theme color (tutorial here).

Finally, I like to decorate with party favors, because it’s the decoration that cleans itself up as the guests leave.

I bought some green lunch bag sized paper bags and cut felt into the shape of a Creeper face. Really, this would have been so much easier with black construction paper and my Silhouette SD, but black felt was what I had on hand so that’s what I used.

Minecraft Birthday Party Favors | Five Marigolds

I filled the bag with goodies like gold and silver ore, Mike & Ikes, a growing green bug, and I repurposed my Minecraft Valentine printable to wrap boxes of Nerds candy.

The highlight of the goodie bags was a Lego Steve creation I made with the help of Pinterest and the Lego Pick-A-Brick tool.

Minecraft Birthday Party Favors. | Five Marigolds

*This post contains affiliate links. Please read the full disclaimer on the right sidebar. Thank you for your support!

Find my other Minecraft Birthday Party posts here:

Minecraft Birthday Party Tinsel Tassel Banner Tutorial | Five Marigolds

Minecraft Tinsel Tassel Bunting Tutorial

Minecraft Lego Steve Favors | Five Marigolds

DIY Minecraft Lego Steve Favors


Tutorial: Tinsel Tassel Party Banner

I absolutely love the look of these tinsel tassel banners for party decor. Even better? They’re super easy and inexpensive to make.

Dub really wanted a Minecraft-themed birthday party, but I didn’t want a licensed decor explosion, so I began thinking of ways to decorate with color. With lots of Pinterest inspiration, I decided I wanted to give this a try. However, I was surprised to find there aren’t a lot of tutorials out there so I am sharing a quick and dirty tutorial of my own.

I set to work on this particular banner with four colors of tissue paper, green, lime green, chevron and silver metallic (I linked to some examples because I initially had a hard time finding these).

1) First, I took a stack of 8 sheets of tissue in each color and cut them the short length of the pre-cut sheets (approximately 20″) and cut them about 8″ wide.Tinsel Tassel Banner Tutorial | Five Marigolds

2) I then folded the stack of sheets in half and began cutting them in 1/4″ strips, stopping about 1″ from the fold. I used a rotary cutter and mat to make quick and more precise work of this, but regular scissors will do.

Tinsel Tassel Banner Tutorial | Five Marigolds

Tinsel Tassel Banner Tutorial | Five Marigolds

3) I then unfolded the papers and, taking 2 sheets at a time, began rolling them tightly at the center. Once each set of 2 was rolled at the center I began gently twisting the rolled portion. Once it was lightly twisted I folded it in half and began twisting the rolled portions together. When you’re done it will look something like this. Perfectly imperfect.Tinsel Tassel Banner Tutorial | Five Marigolds

4) Thread the tassels through a string or ribbon. I made a single simple knot at each tassel to keep them in place.

Tinsel Tassel Banner Tutorial | Five Marigolds

All in all, this was a pretty quick and easy project that took me maybe 20 minutes total to complete. I also love that if you source your papers from the dollar store, you could complete three of these banners for just $4! (meaning, each banner is just over $1, with plenty of paper to spare for favors or gifts). I have a feeling various themed tinsel banners will be showing up at more parties around here!

Dub’s party is not for a few more weeks, so I’m letting it hang on our mantle for St. Patrick’s Day. How’s that for multi-purpose party decor?

Find my other Minecraft Birthday Party posts here:

Minecraft Birthday Party on a Budget | Five Marigolds

DIY Minecraft Birthday Party

Minecraft Lego Steve Favors | Five Marigolds

DIY Minecraft Lego Steve Favors


Healthy (ish) Breakfast Cookies

You will love these delicious and healthy breakfast cookies. With wholesome ingredients and honey-sweetened goodness, they are sure to be a hit in your home. 

Are you tired of the same old breakfast routine? Want to try something new and healthy, but don’t have the time to cook? Look no further than healthy breakfast cookies!

Healthy Breakfast Cookies featuring Bananas, Oats, Honey, Almond Butter and Chocolate Chips | Five Marigolds

Healthy Breakfast Cookies featuring Bananas, Oats, Honey, Almond Butter and Chocolate Chips | Five Marigolds


Healthy breakfast cookies are not only easy to make but also packed with nutrients to start your day off right. They are perfect for those busy mornings when you don’t have time for a sit-down breakfast.

The banana and honey combine to give it a natural sweetness, and the almond butter and oats provide a protein boost and loads of fiber. And who doesn’t love chocolate chips, right?

These healthy breakfast cookies are not only great for breakfast, but they are also perfect for a grab-and-go snack on the run as well. 

I’ll often mix up the dry ingredients before I go to bed, and in the morning just add the banana, nut butter, and honey and pop them in the oven. So good! Here is the recipe with my preferred ingredients.

Ingredients You Need:

  • 2 1/3 C. quick oats
  • 3/4 t. salt
  • 2 bananas, mashed
  • 1 C. nut butter (I prefer almond butter)
  • 1/4 C. honey
  • 1/3 C. mini semi-sweet chocolate chips

Making your Healthy Breakfast Cookies

  1. Preheat oven to 325 degrees.
  2. Mix all the ingredients together, folding in the chocolate chips at the end.
  3. >Scoop 3 tablespoons per cookie onto a parchment-lined baking sheet  – I used my Pampered Chef large scoop> to make easy work of this – and gently flatten to the desired shape.
  4. Bake for 15 minutes and let cool on a baking rack.

I have a serious sweet tooth in the morning, so I’ve long been on the hunt for sweet breakfast recipes that are healthy’ish AND taste good. It’s been a long journey! After a testing a  lot of recipes and coming up short, I’ve finally found something that balances a little of both – it’s super yummy, and the ingredients are in the healthy’ish zone that I can feel good about serving my kids. Rich flavor – with no flour, butter or refined sugar.Another thing I love about these cookies is that they are really satisfying. I’m almost always hungry within 30 minutes of breakfast, but not with these.  Ladies and Gentleman: I proudly introduce you to Banana Chocolate Chip Breakfast Cookies.

Makes around 15 cookies. These stay good for about three days or can be frozen for later. Be sure to separate cookies with parchment paper in storage.

Are you a fan of breakfast cookies? Let me know what you think in the comments below!

Source: Sally’s Baking Addiction